How to build an AI pipeline with loops: my 3D model factory
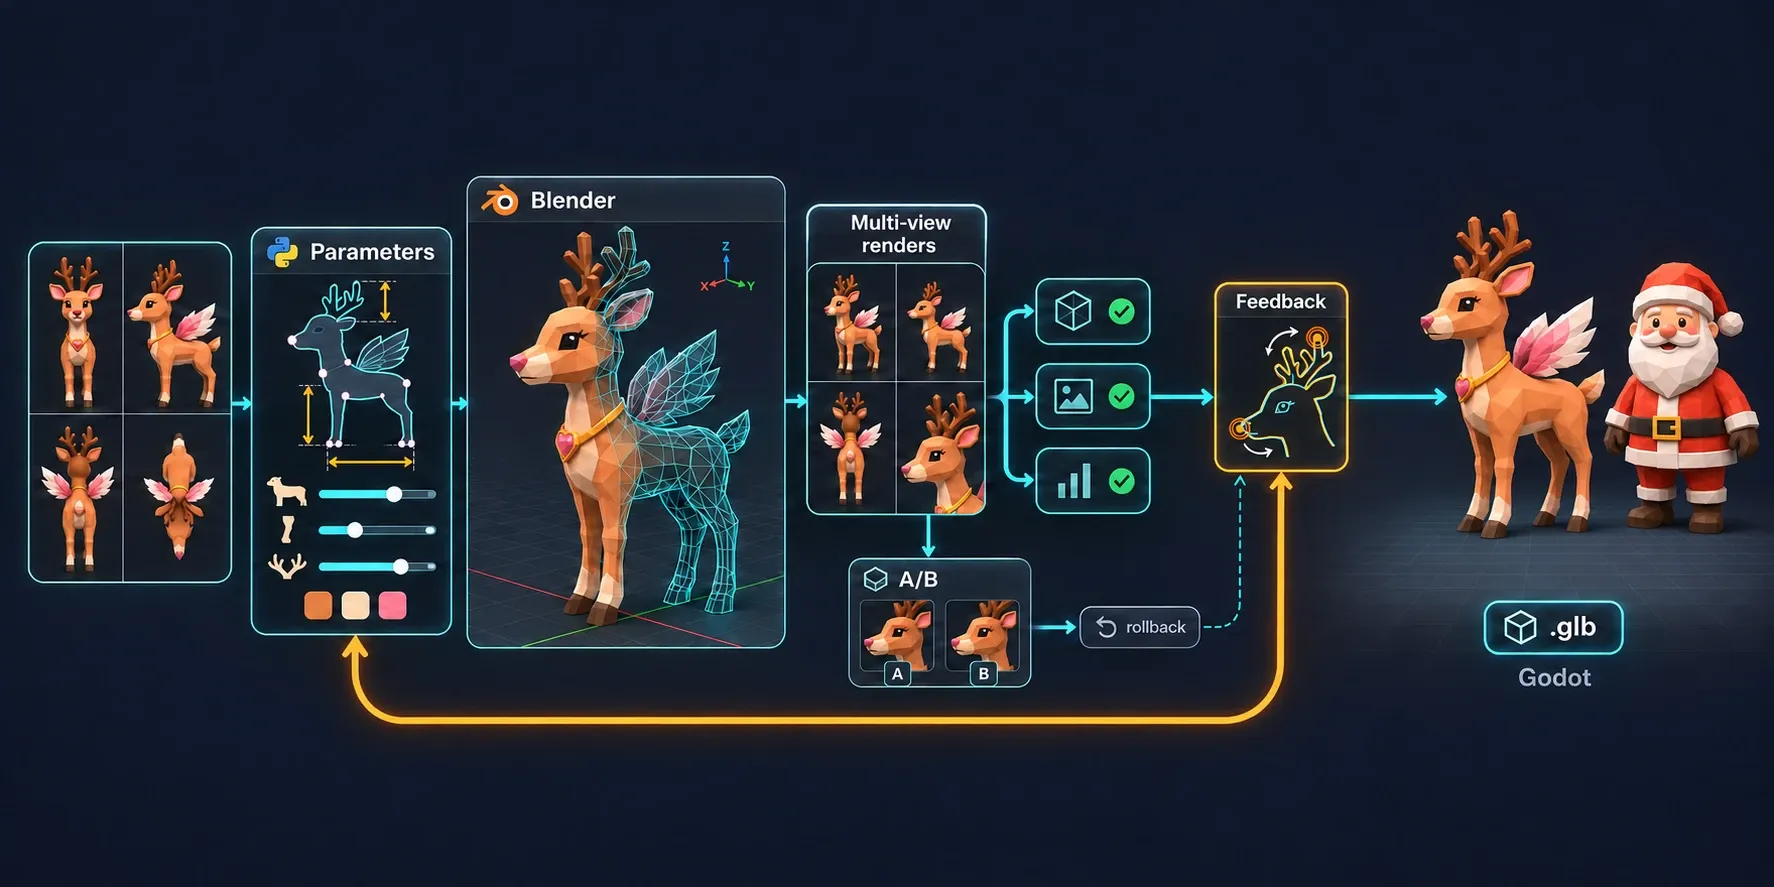
I’m making Santa Slideway, a mobile game built entirely with AI, 3D models included. In my previous post I told you what it cost my “3D model factory” to create the main character: about $190 in AI for a rigged, animated 3D Santa Claus.
That post was about cost. This one is about how it works inside: how to build an AI pipeline with loops. Pipelines of autonomous agents that review their own work are today’s state of the art in applied AI. It’s the direction the most advanced companies are working in, and Anthropic has published the patterns to build them. You don’t need to know anything about 3D: what I explain here applies to other fields too.
The pieces of my 3D model factory
My 3D model factory is an autonomous AI pipeline: a chain of steps that, once it starts, takes an input to a result without anyone having to step in. In my case, the input is four reference images that I provide, and the result is an animated 3D character inside the game.
It starts from an external request. That can be me in the chat, but it could also be a scheduled task that wakes up every night, or a webhook that another system calls when there are new images. Once started, the pipeline works on its own.
Let me first walk you through the pieces of the system.
Agents
Anthropic defines an agent as a system where an AI model directs its own process and its own tool use to reach a goal (Building effective agents (opens in a new tab)). In practice, an agent works with three things: instructions (the request and the project context), a catalogue of tools it can use, and a catalogue of skills, extra knowledge it loads only if the task calls for it. With those, the agent can decide the next steps without anyone dictating them.
Like us, agents work better when they can focus on one specific task, so when the job is complex, it’s best to split it into subtasks. The main agent, the one that gets the request, acts as the orchestrator: it organises the work and makes the decisions. Subagents are separate agents the orchestrator launches for a specific job. Each one works with its own context and only returns a short report, so its effort doesn’t fill up the orchestrator’s memory.
In my case, the main agent is the Claude Code chat itself: the conversation I open (or the one a scheduled task would open). It’s the only one that touches the 3D model. The subagents review, measure or edit videos.
Skills
A skill is a folder with instructions, scripts and reference documents on how to do a specific job. The interesting part is how it loads. At first, the agent only sees the name and description of each available skill, a couple of lines. When a request matches a description, the agent decides to load that skill and only then reads its full instructions. That way it can keep many skills at hand without paying to read them all.
In my case, I’ve created one skill per loop: one for modelling, one for rigging and one for the process video.
Loops
A loop is a cycle that does a task, checks the result and repeats until it meets some criteria. It isn’t a separate program: the skill itself defines it. Its main file describes the phases of the cycle and who does what in each one, and makes clear that the agent doesn’t stop until it meets the definition of done.
A pipeline can have all kinds of steps, but in mine almost all the work happens inside loops. In my case there are three: modelling, skeleton and animation, and a process video.
Definition of done
It’s the loop’s exit condition, and it also lives in the skill. Without it, the loop either never ends or ends when the agent feels it’s good enough, which is exactly what you want to avoid. The more measurable, the better.
In my case, the modelling criteria are numbers: how well the silhouette matches, how many centimetres off the edges are, and how many flaws are still open.
Tools
A tool is an instrument the agent has access to in order to perform an action: read and edit files, search, run commands, launch subagents… The model decides when to use each one, and the result comes back into its conversation. Each agent has its own tools, with its own permissions: an orchestrator can write and run things, while a subagent that only reviews may only be allowed to read.
In my case, the agent uses Claude Code’s built-in tools. The one that runs commands is especially relevant, because it’s what lets the agent use the skill’s scripts to measure the silhouette against the drawing, the colour, the health of the mesh and the joints.
Memory on disk
An agent’s working memory fills up, and when it does, it gets summarised and details are lost. Anything the loop needs to remember from one lap to the next is better kept in files than in the agent’s head. And subagents can read those files too.
In my case, that’s a defect log, a measurements document and the git history.
Models and harness
The AI model is the agent’s brain: the part that reads, reasons, writes, and decides what to do and which tool to use. Not every agent needs the most capable one. Tasks that need judgement go to a big model; mechanical ones, to a cheaper one.
But these models, on their own, only generate text. The harness is the program that puts them to work: it passes them the instructions and context, runs the tools the model asks for and returns the result, again and again. It also manages their memory, applies permissions, launches subagents and loads skills. An agent needs both: the model, which decides, and the harness, which executes.
When each session starts, the harness builds the initial context from the project folder:
CLAUDE.md: the project instructions. It’s loaded in full in every session, so it’s the place for everything the agent must always know..claude/skills/: the skills. At first, only the name and description of each one are loaded..claude/agents/: one file per subagent, with a description of its job, the tools it can use and its model..claude/settings.json: which tools the agent can use, and with what permissions.
In my case, the orchestrator and the subagents that judge use Claude Opus 5.5, and the ones doing more mechanical tasks use Claude Sonnet 5.5. As the harness I use Claude Code (opens in a new tab), Anthropic’s own, in its cloud environment. And inside it, Blender (opens in a new tab) (the 3D program) and Godot (opens in a new tab) (the game engine), both running headless.
Anatomy of my 3D modelling pipeline
With all the pieces on the table, this is how a request flows through my factory, from the first message to the result:
- A session opens. When you open a new chat, or when a scheduled task fires, the harness builds the initial context: the
CLAUDE.md, the list of skills, the available subagents and the tools with their permissions. That chat already is an agent, the main agent. - The request arrives: the agent gets its first message. For example, “model this character from these four images, give it a skeleton and animations, and put it in the game”.
- Loop 1, modelling. The agent spots the modelling skill and reads it. From then on it acts as the orchestrator: it hands work out to the subagents, writes down on disk what it needs to remember, and keeps working in a loop until it meets the definition of done.
- Loop 2, skeleton and animation. With the model finished, the agent follows its instructions, reads the rigging skill and moves on to the next loop, this time with no subagents.
- Loop 3, video (optional). Once it’s out of the modelling and animation loops, and if the original request asked for it, the agent reads the video skill and enters a last loop to edit the process video. It uses subagents to check that the edit meets the brief.
- Delivery. When all the loops are done, the main agent puts the character into the game.
One important detail: each skill defines its own loop, but none of them calls the next one. The main agent is the one that chains the loops together.
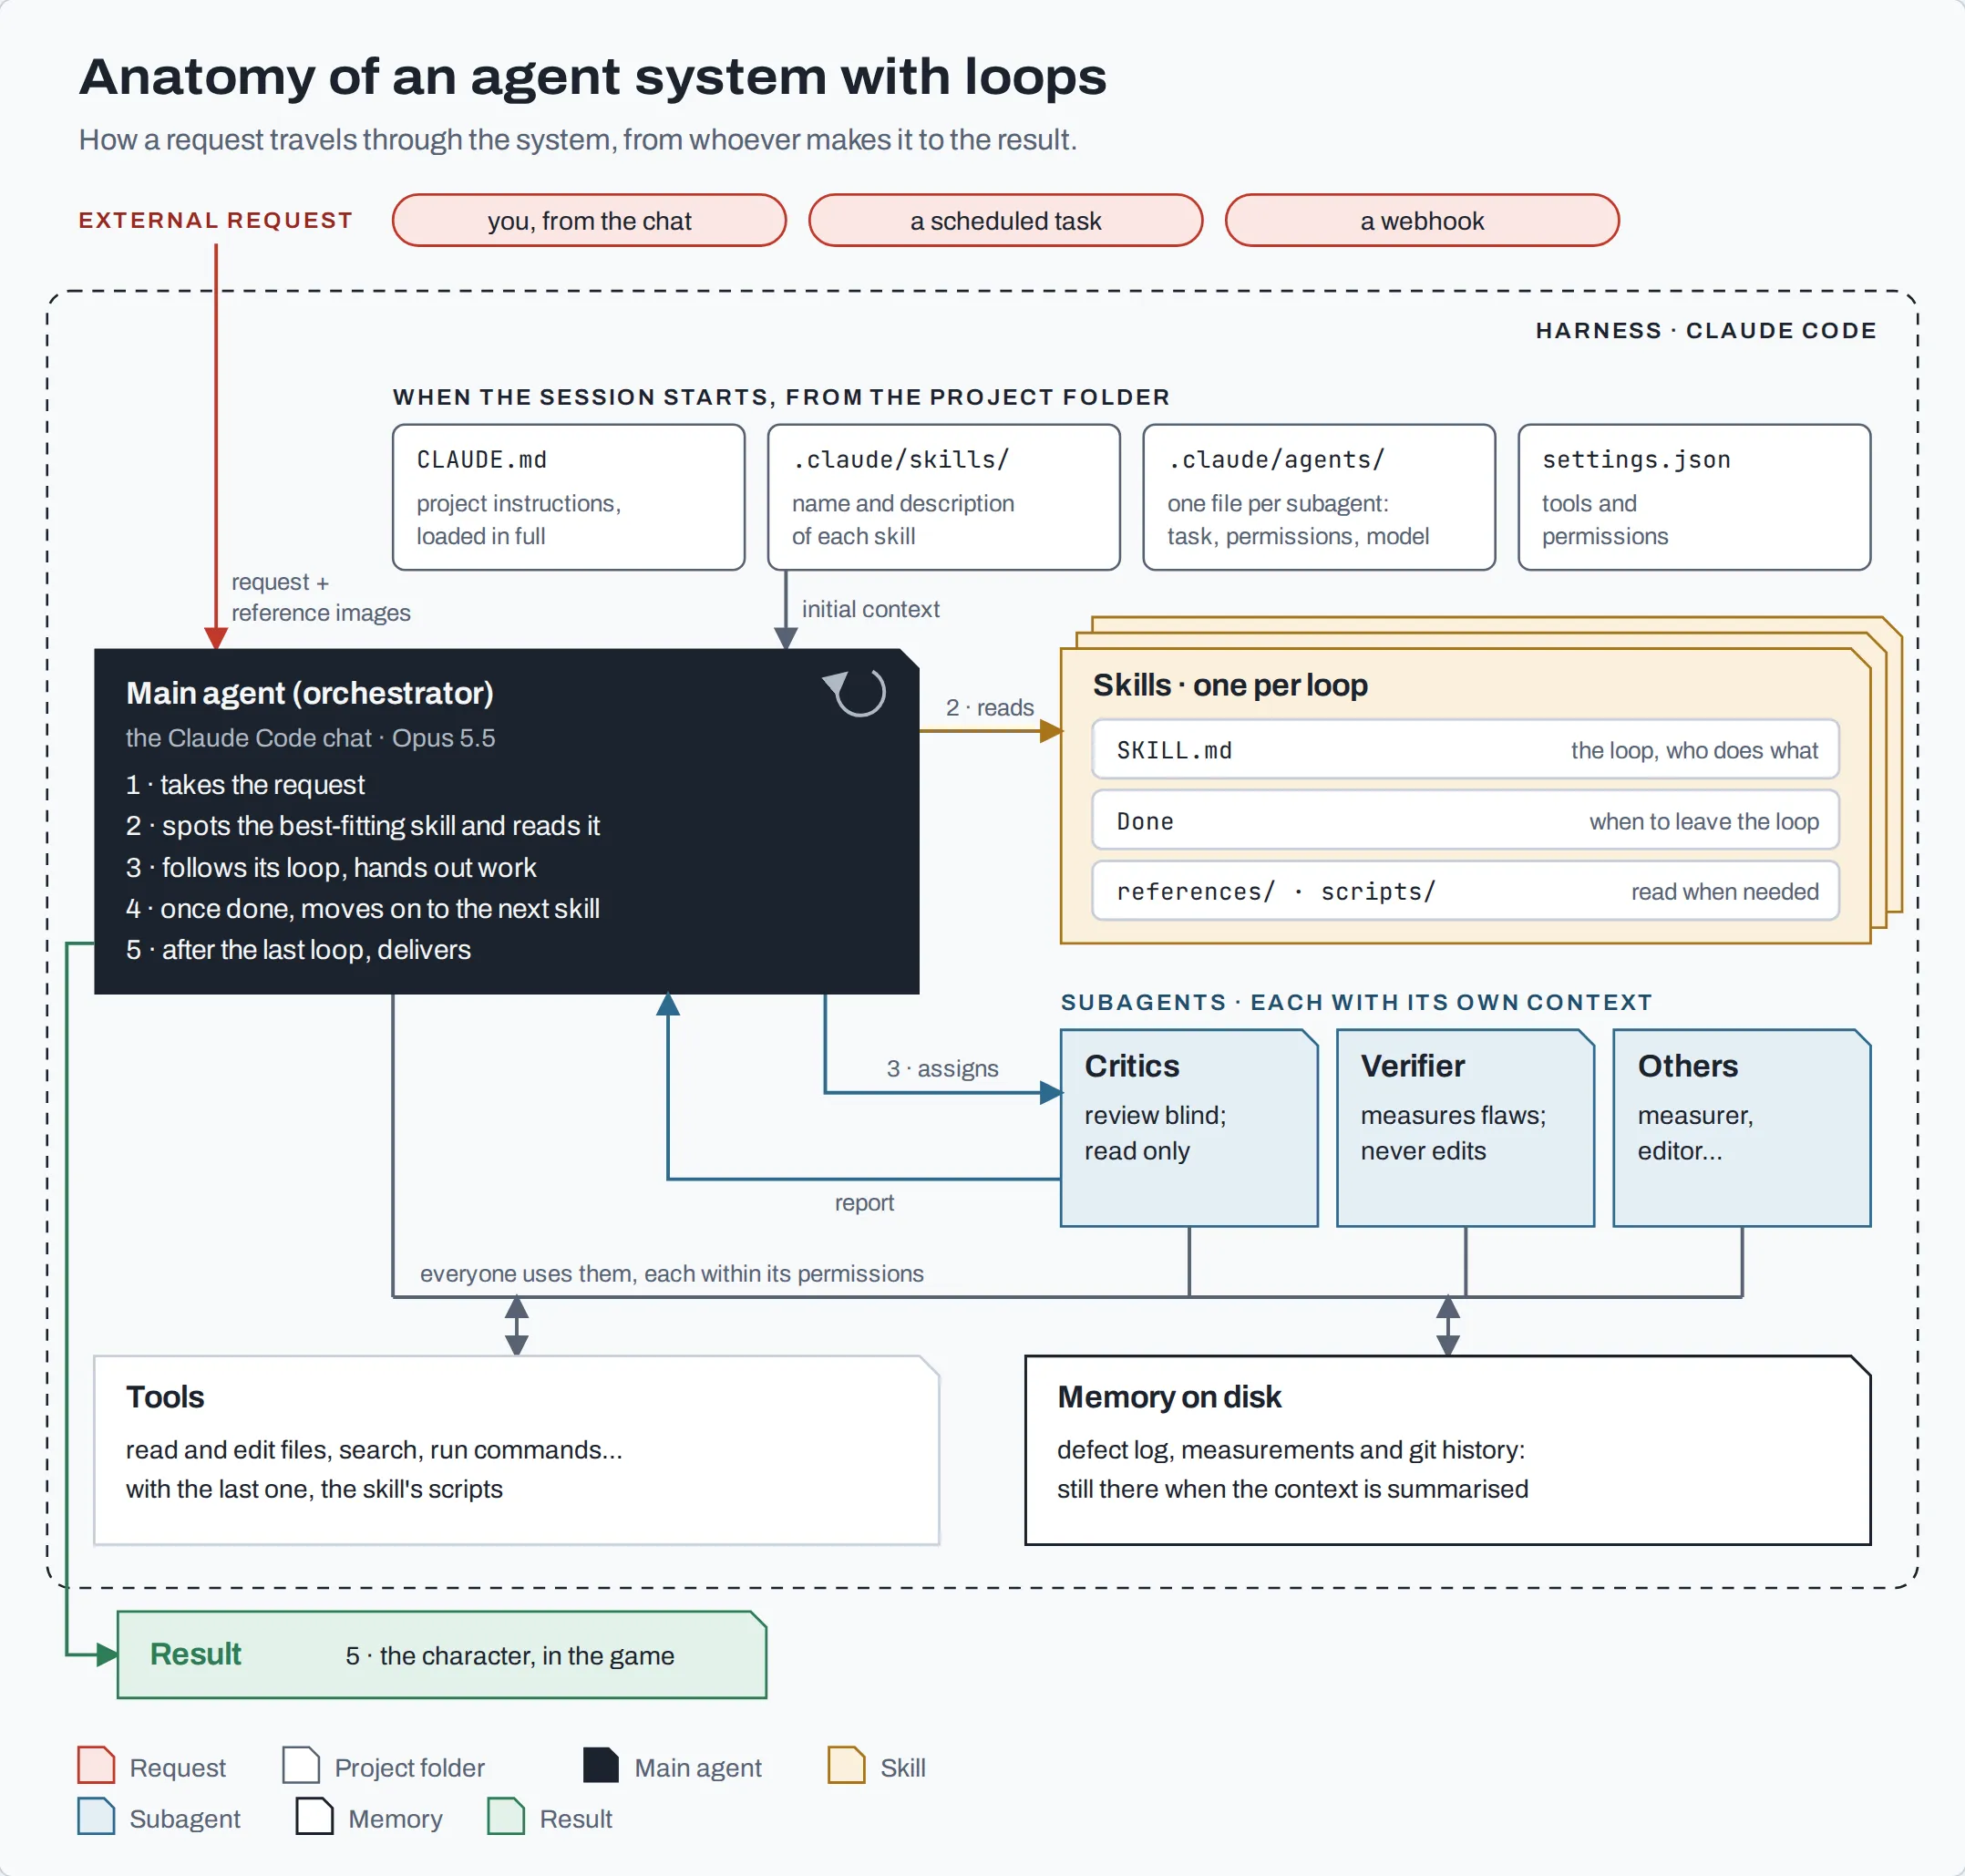
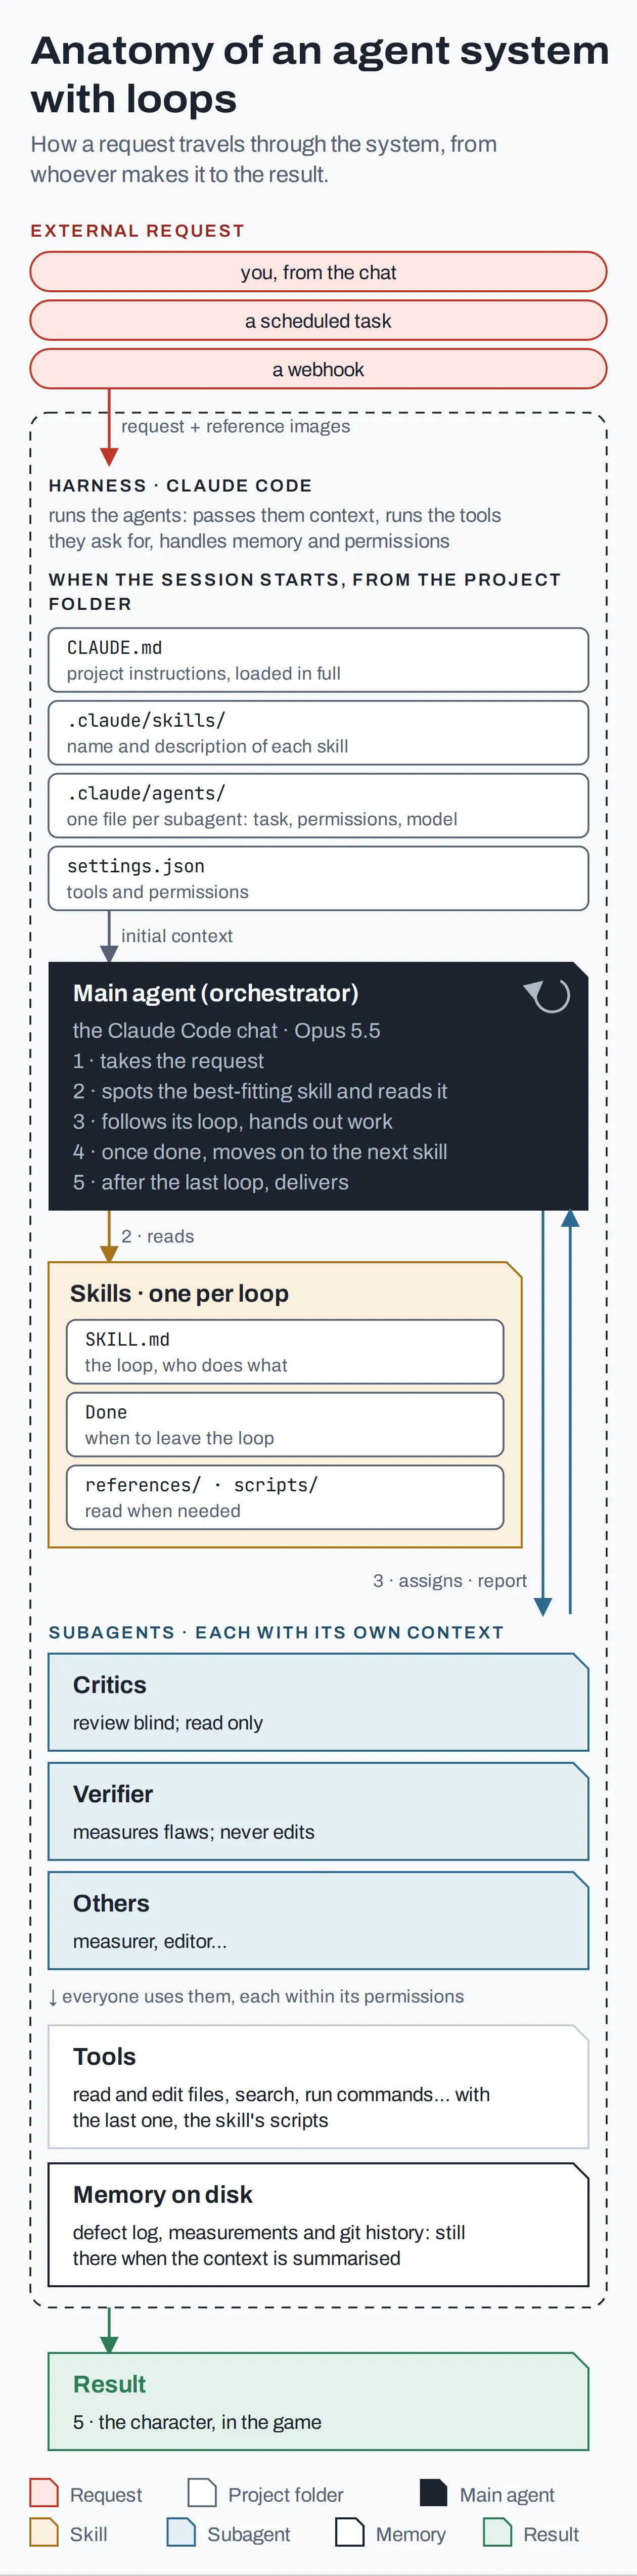 Anatomy of an agent system with loops
Anthropic’s loop patterns
These loops aren’t my invention. They’re a set of patterns Anthropic recommends.
An agent’s basic loop is gather context, act, verify and repeat. That’s how Anthropic describes it in Building agents with the Claude Agent SDK (opens in a new tab), adding that when code can do the verification, so much the better.
On top of that, Building effective agents (opens in a new tab) describes several patterns to organise the work. I use three:
- Evaluator-optimizer: one agent produces the result and another, the evaluator, reviews it and says what to fix. It repeats until the evaluator approves it. This is the loop itself. In my case it’s in all three loops, and in the rig loop the evaluator isn’t an agent but code.
- Orchestrator-workers: a main agent splits the work among subagents and puts their results together. It’s what Anthropic does in its multi-agent research system (opens in a new tab). In my case, I use it in modelling and in the video.
- Parallelization (sectioning): several agents evaluate at the same time, each one a different aspect. I do this in the first loop, with the three modelling critics.
The pipeline at a glance
In my case, there’s a step I do by hand on purpose: the design. I choose the character’s look with ChatGPT (GPT Image 2) and get four reference images in T-pose: front, side, back and top. I keep the art direction for myself.
From there, three automated loops:
- Modelling.
- Skeleton and animation (the rig).
- Process video, optional.
At the end I can review it in a 3D viewer, if I want to.
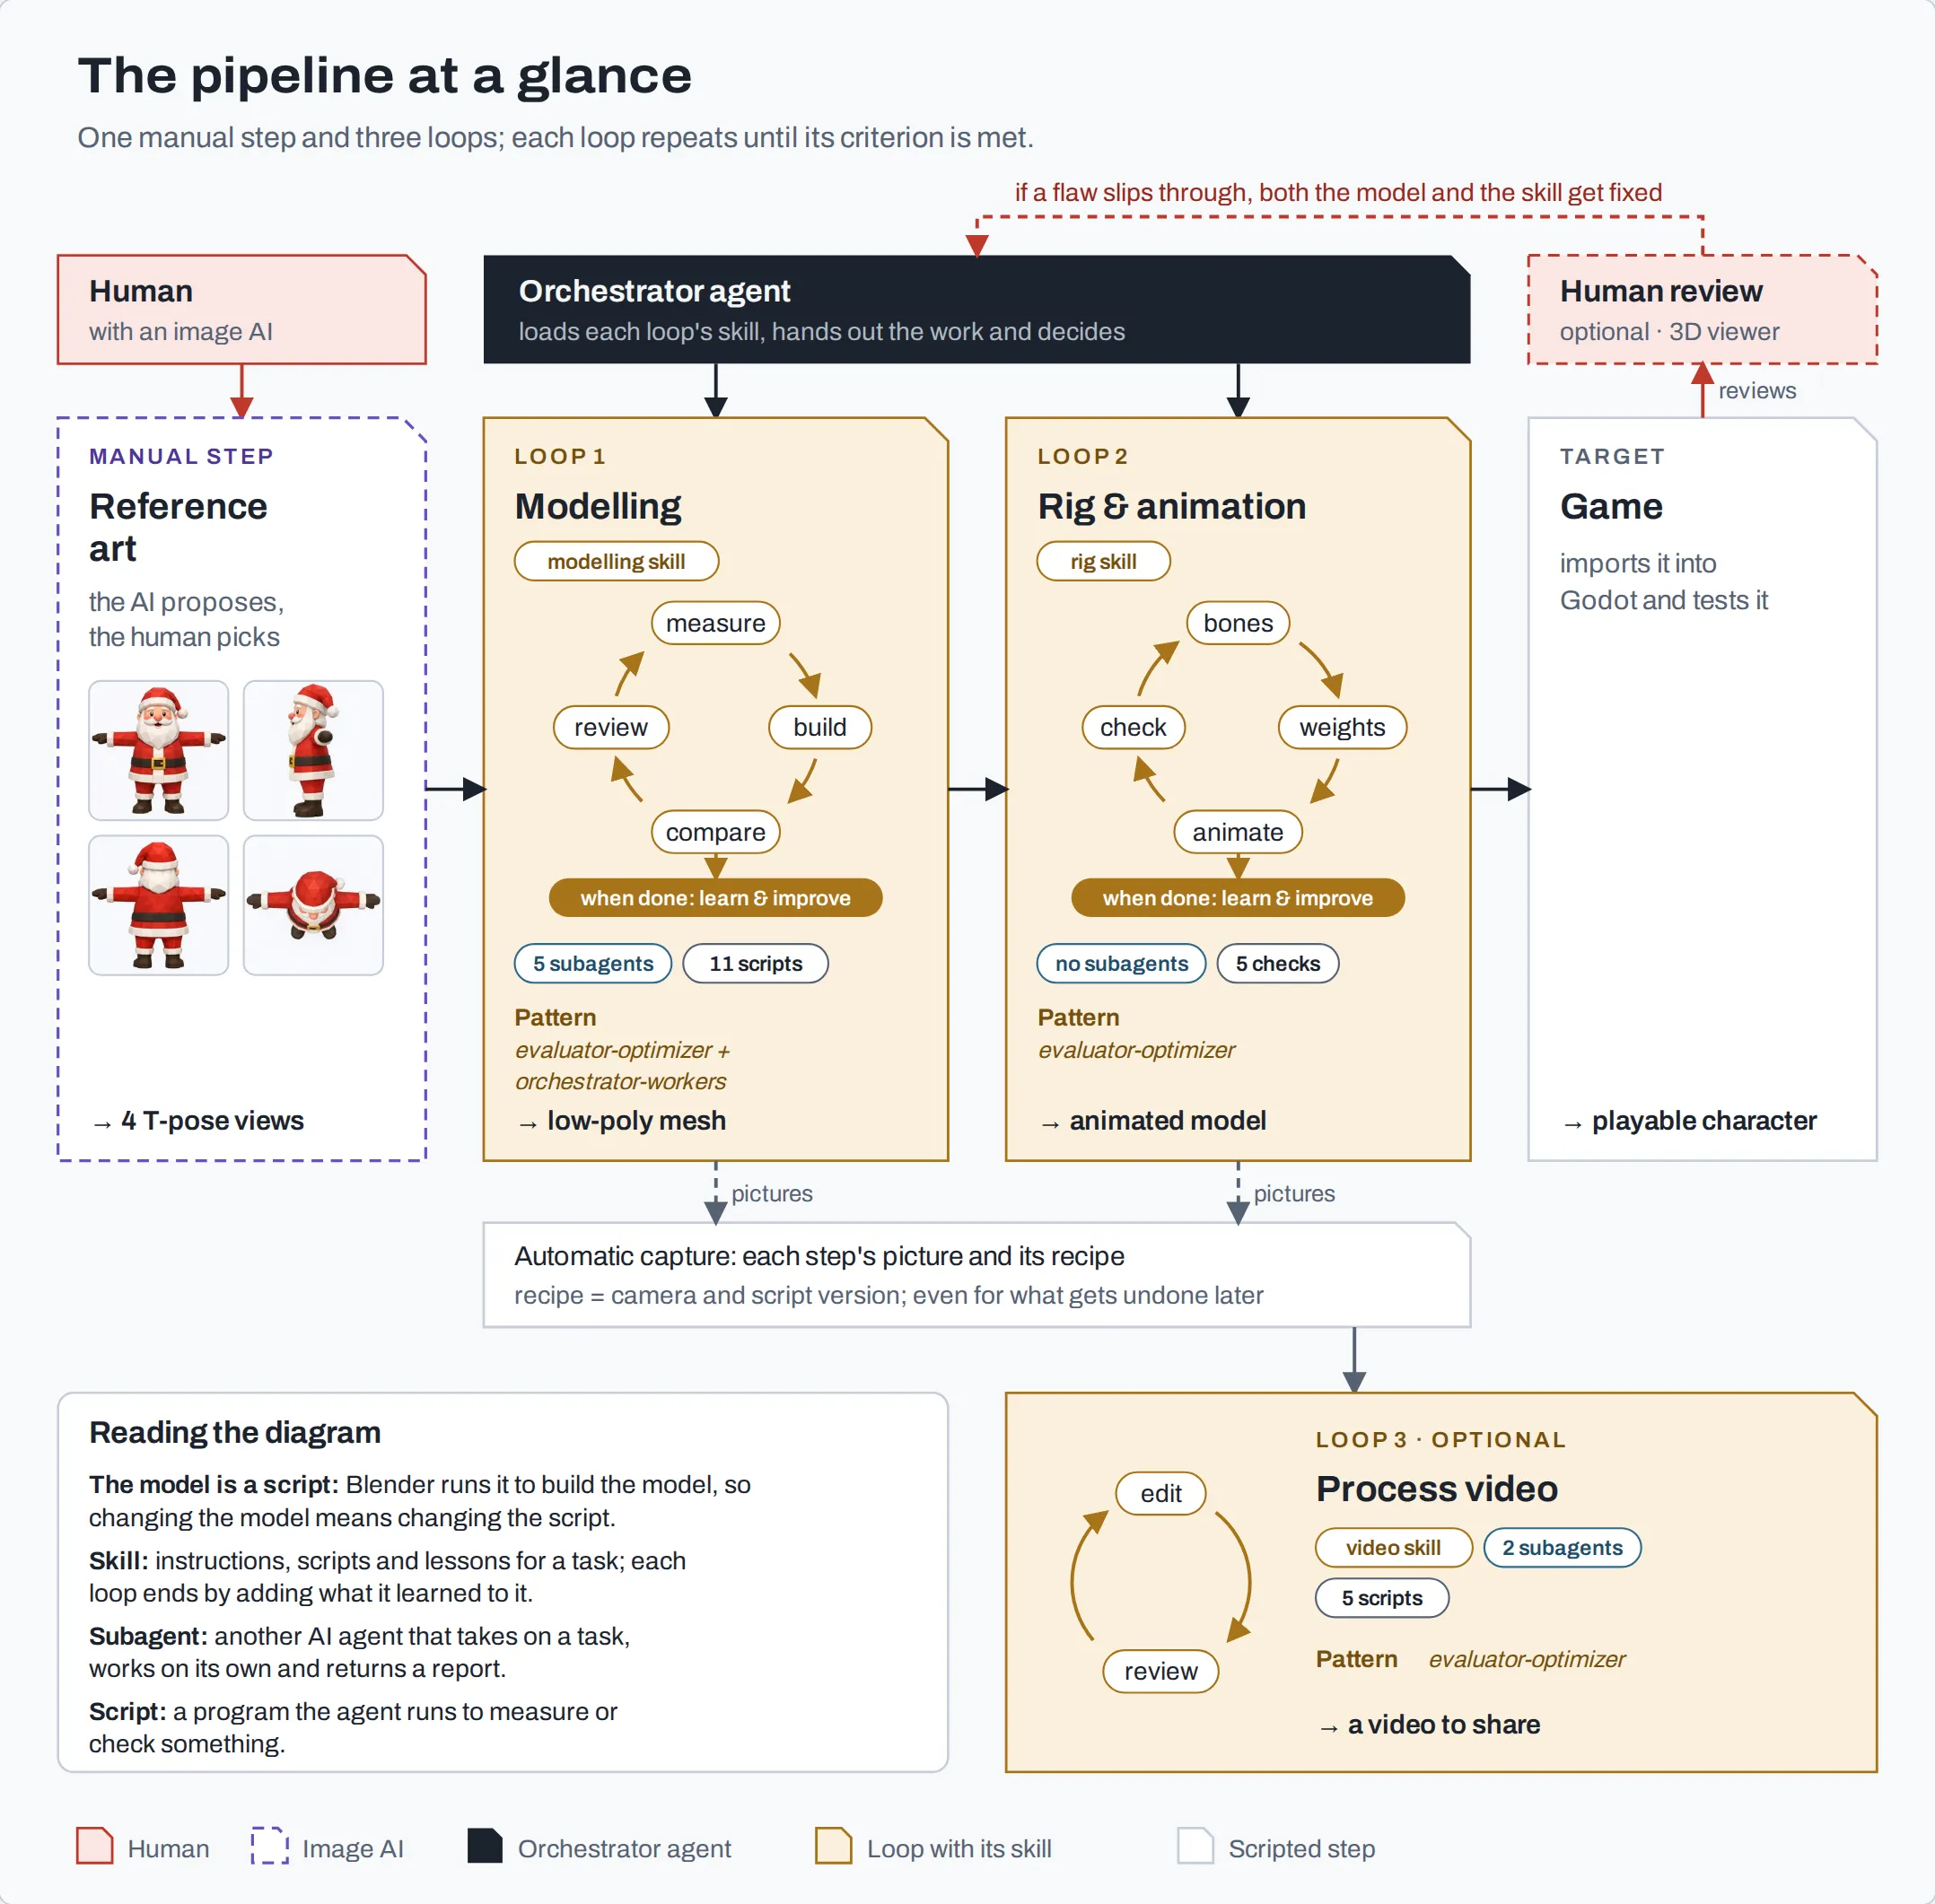
 The pipeline at a glance
The foundation: make the work code
One more thing before getting into the loops. An agent works much better when what it produces is text or code: it can read it, change it, diff versions, undo and measure. If your problem isn’t code to begin with, it’s worth finding a way to make it so.
In my case, nobody drags vertices around with a mouse. Each character is Python code that Blender runs headless, and it lives in its own folder in the repository (scripts/tools/blender/<character>/) with two files:
params.py: all the character’s measurements and colours (the height of the hat, the width of the belly, where the eyes go), plus its lights and cameras. No number lives outside this file.build.py: which parts the character has and how they’re put together with those measurements.
What’s the same for every character (basic geometry, scene, cameras, measuring and captures) lives in a shared library inside the skill. So a new character only needs its two files. Next to them sits its defect log, defectos.md.
With that, the agent can change the model like any other code, undo versions with git and measure the result, because every run comes from the same numbers. Each step also leaves a capture and the recipe to repeat it (the camera and the script version). That way the process video can be re-rendered at higher quality without redoing the work.
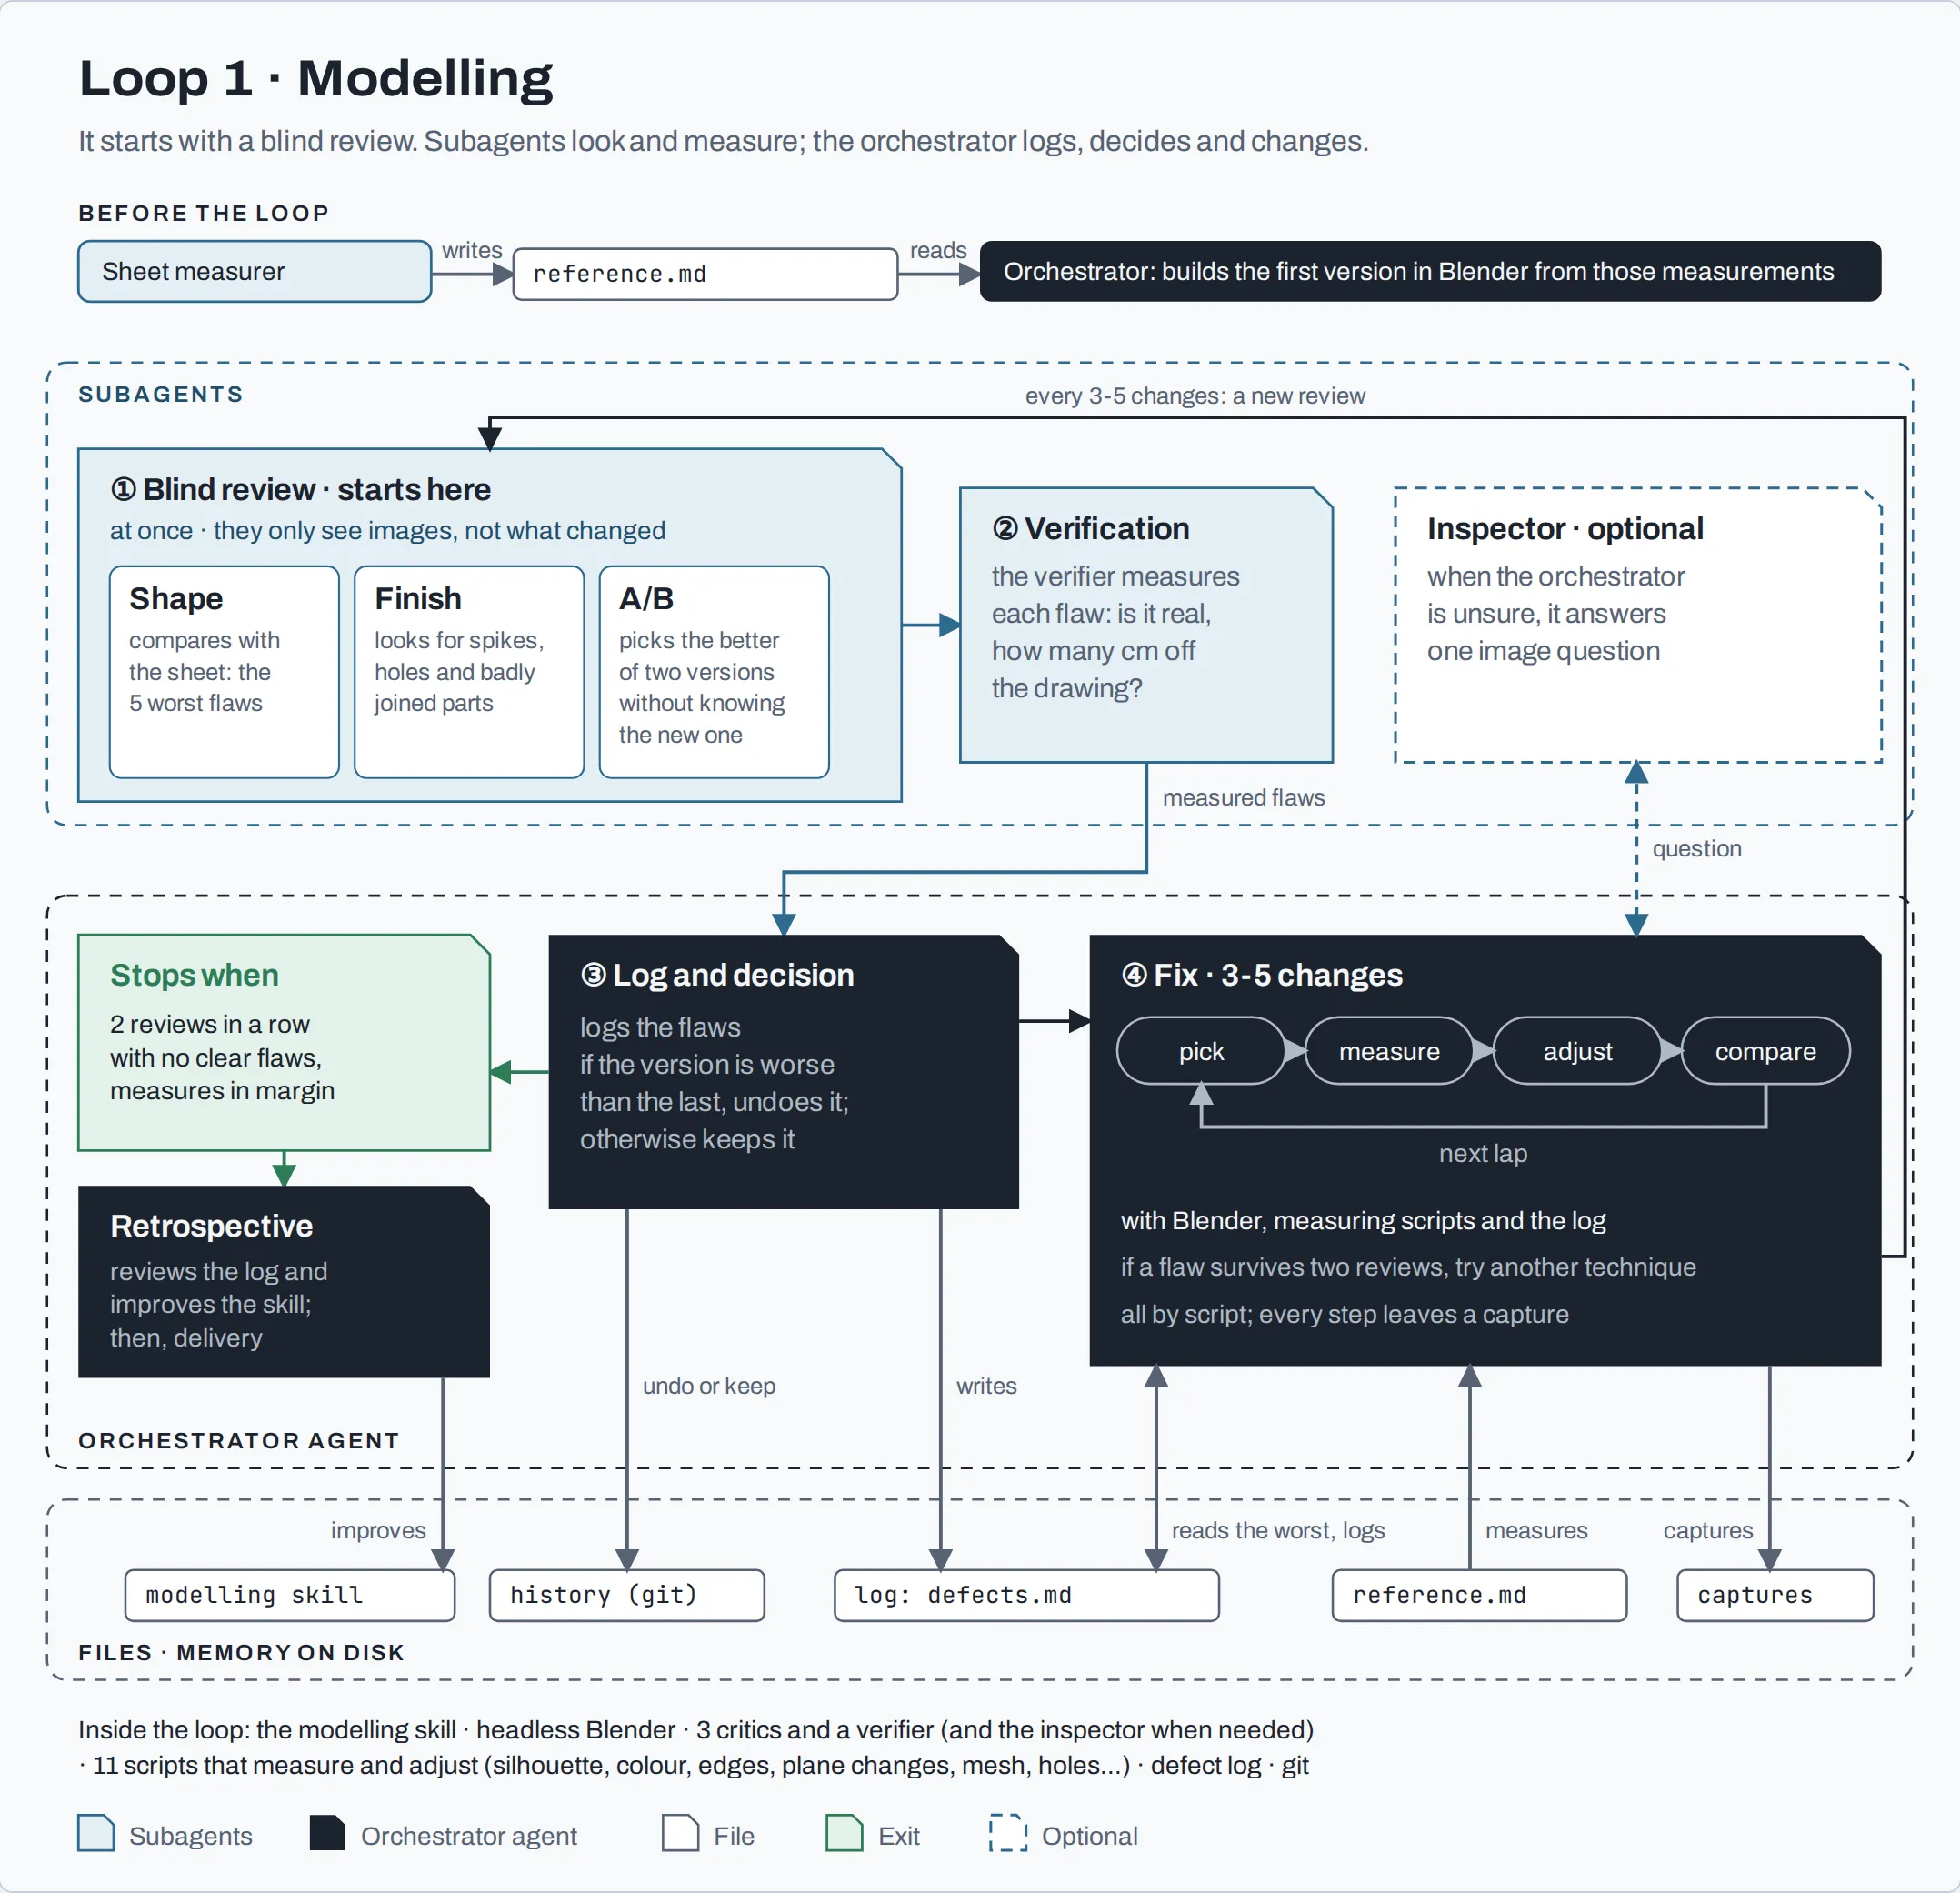
Loop 1: modelling
It’s the most complex loop and the one that takes almost all the cost.
The agents
In a review loop, the first thing is to separate who does the work from who judges it. If the same agent builds, decides what’s wrong and assesses its own fixes, it carries its biases from one task to the next.
In my case, the orchestrator writes and fixes the model’s script. Around it, there are six subagents:
| Subagent | What it does | Tools | Model |
|---|---|---|---|
| drawing measurer | measures the references, once per character | Bash, read, write | Opus 5.5 |
| shape critic | does it look like the drawing? | read only | Opus 5.5 |
| finish critic | looks for spikes, holes, badly joined parts | read only | Opus 5.5 |
| A/B critic | picks the better of two versions without knowing which is new | read only | Sonnet 5.5 |
| verifier | measures each flaw the critics report | Bash and read, never edits | Opus 5.5 |
| inspector (optional) | answers a specific question about an image | read only | Sonnet 5.5 |
In Claude Code, each subagent is a file in .claude/agents/<name>.md: it has a header with its name, a description, the tools it can use and the model, and its instructions below. Notice the permissions: the critics can only read, and the verifier can run scripts but can’t touch the model.
Here are three principles you’ll thank me for:
- Limit what you give the subagent. Pass it paths and, at most, one line of context. Never the orchestrator’s hypothesis: if you tell it your suspicions, it’ll end up confirming them even when they aren’t true.
- Ask it to read everything in one go. Every separate read the agent makes is one more turn of conversation, so the model reads everything it has accumulated all over again. If a subagent has to look at dozens of images, ask it to read them all in a single response, in parallel. This approach let me cut the time and cost of the critic agents.
- Remember that subagents load when the session starts. If you change or add one, you’ll need to start a new session to use it.
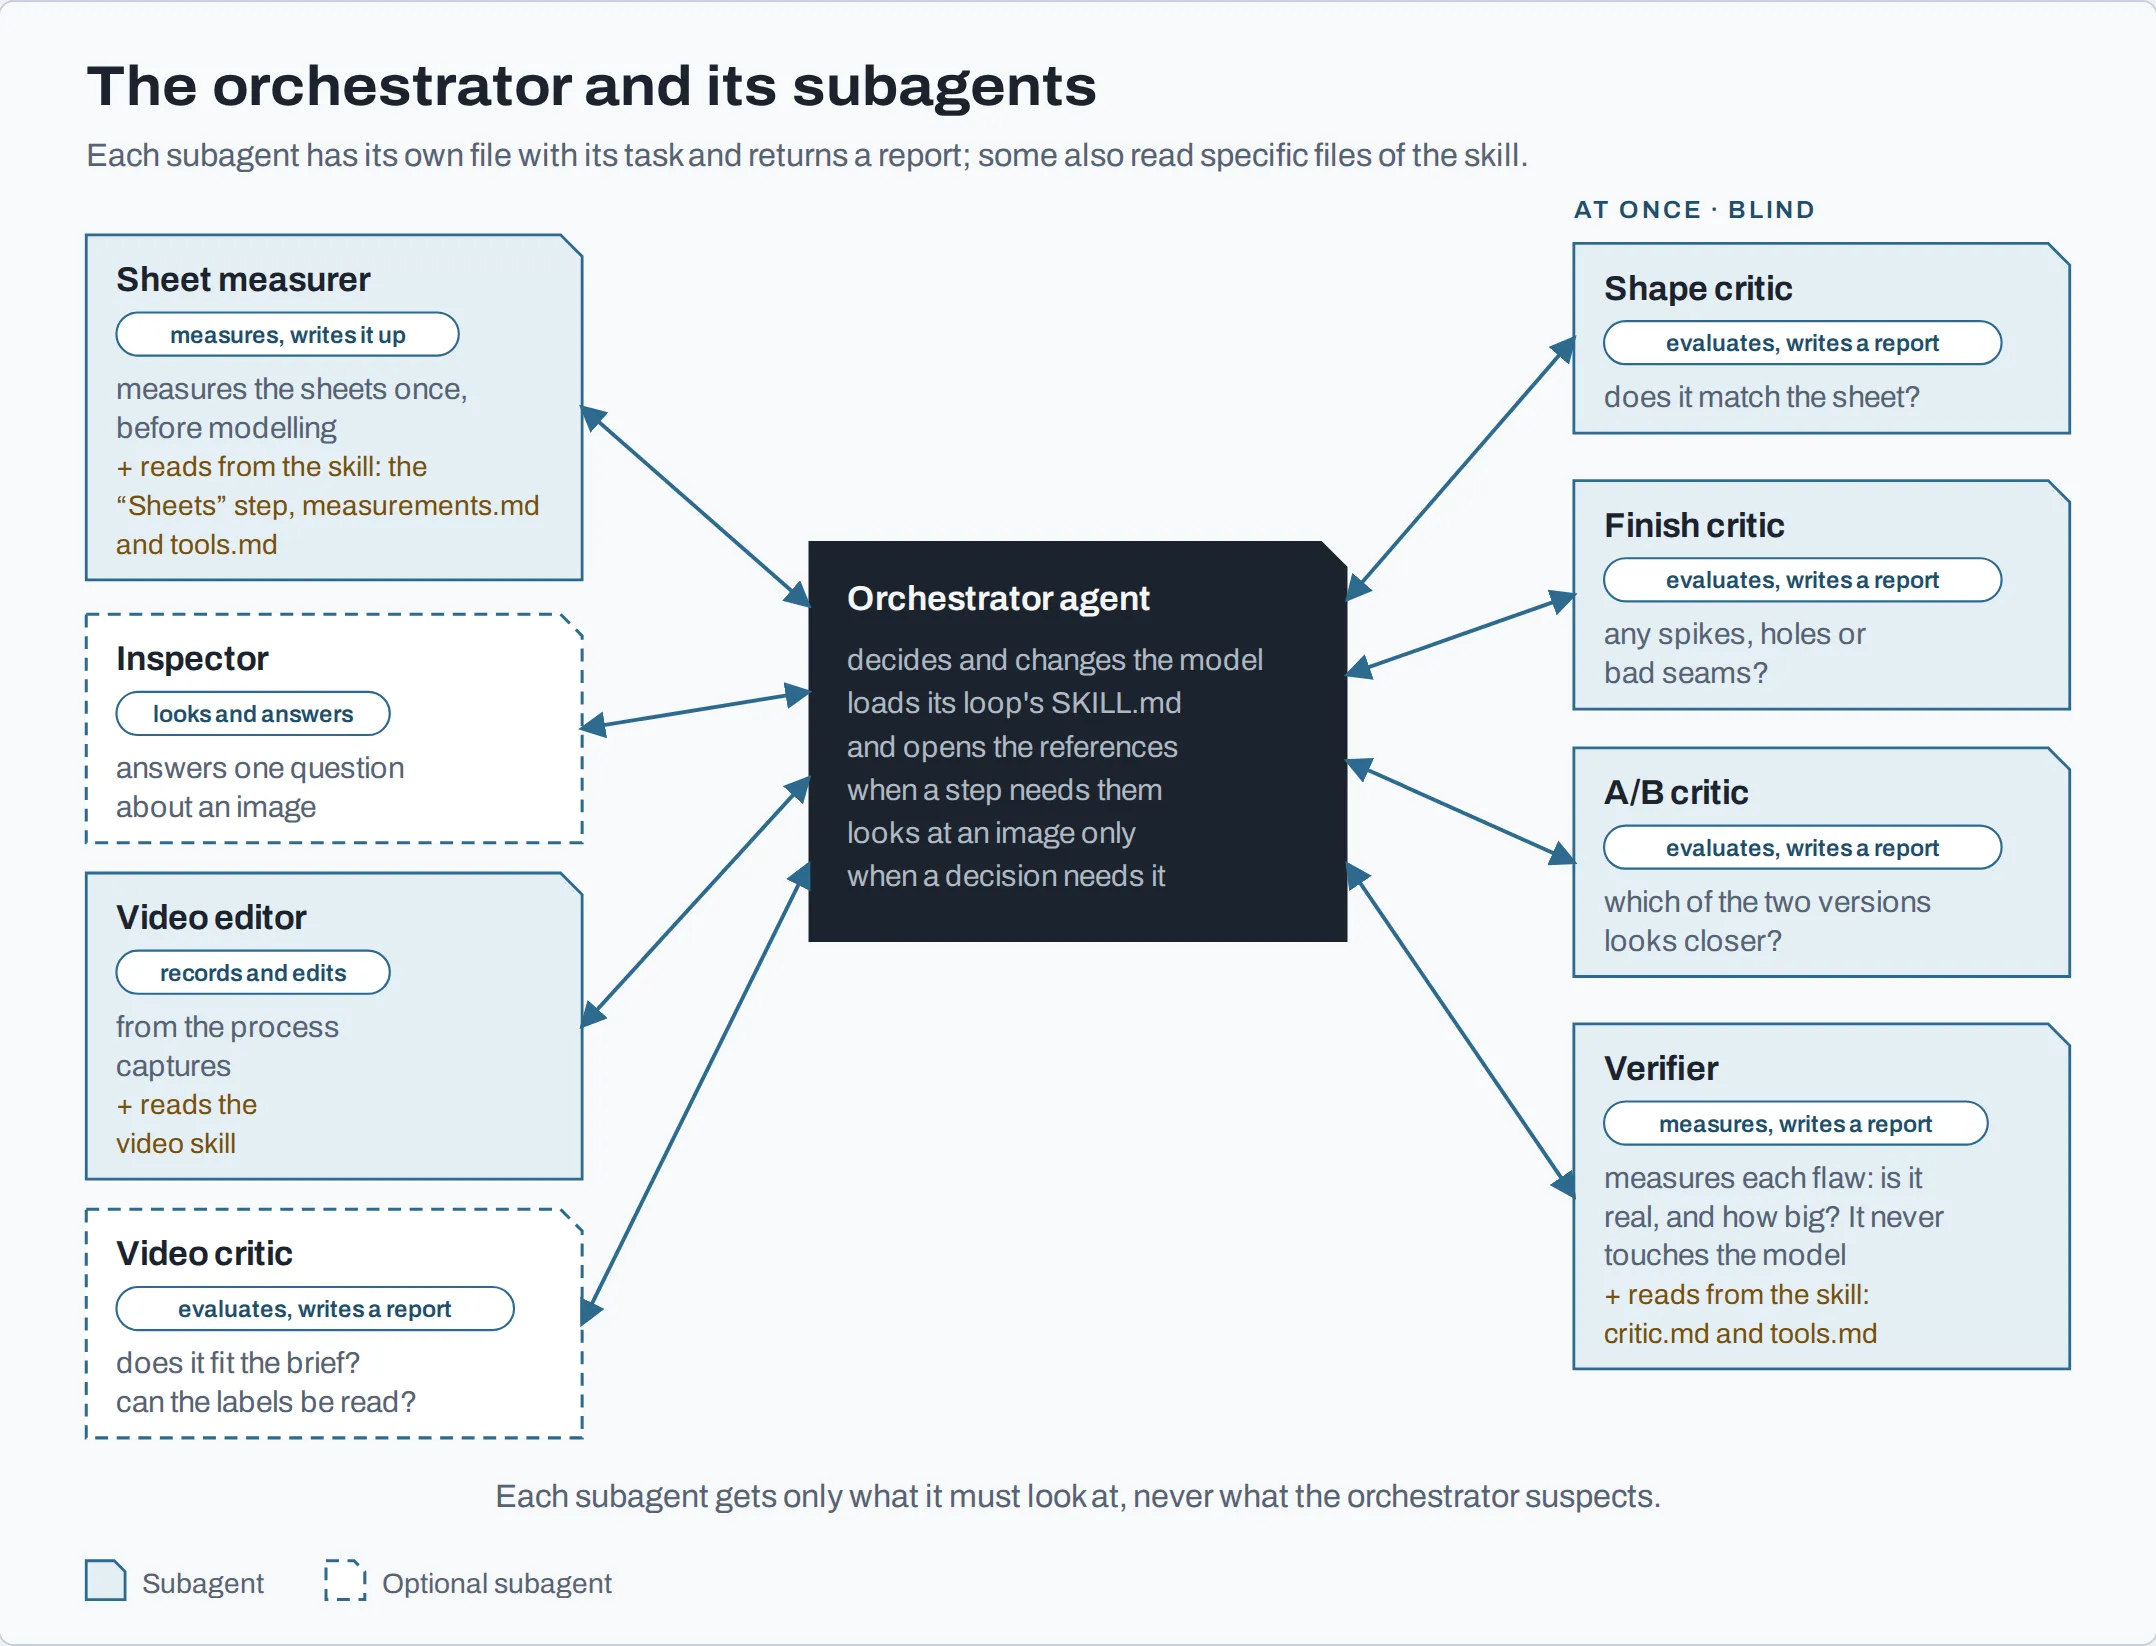
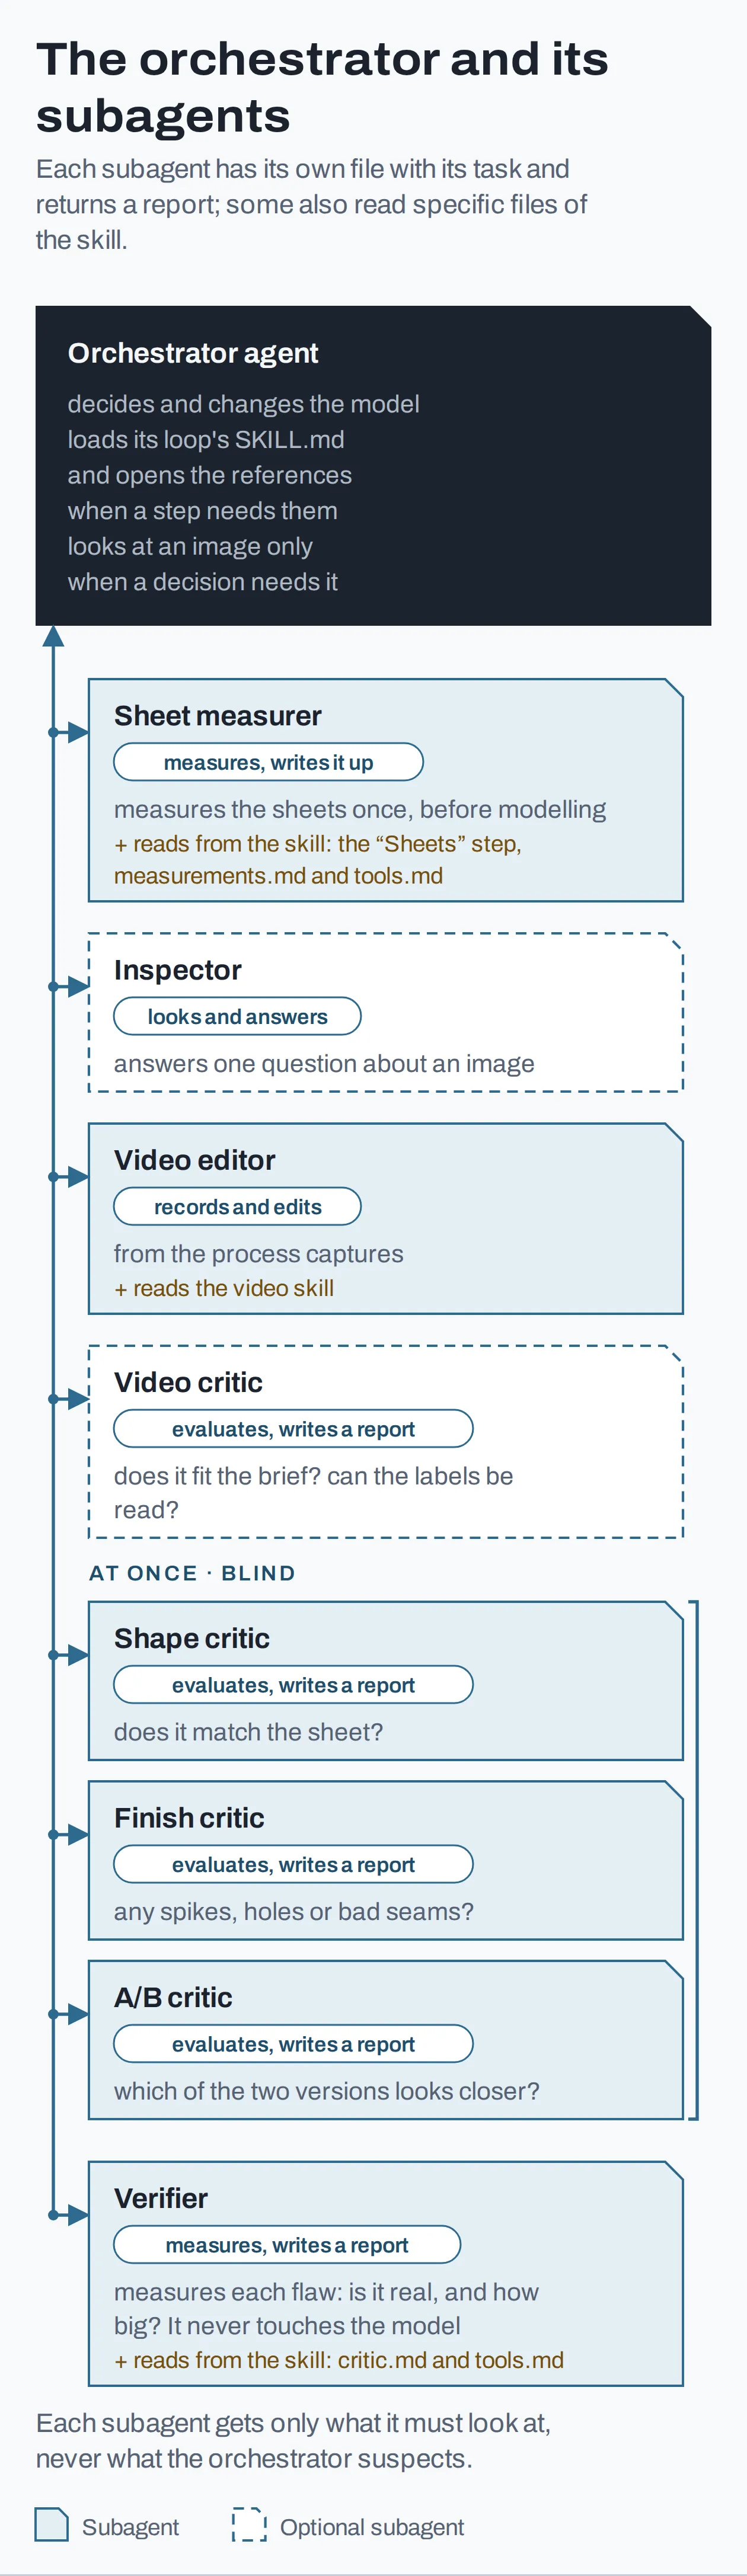 The orchestrator and its subagents
The skill
The modelling skill has:
SKILL.md, the main file, the one the agent reads when it loads the skill: the rules of the job, the phases of the loop in order, which subagent comes in at each one, and the definition of done.references/, documents the orchestrator and some subagents look up only when a step needs them:herramientas.md(what each script does),medidas.md(how to measure the hard parts),critico.md(how the critics work and the log format) andtrampas.md(every mistake that cost a round, with its symptom and its fix).scripts/, the programs the agent runs in this loop: they measure the drawings and the model, adjust its geometry, prepare each review and save a capture of every step. A good part of the system’s power is here, because this is good old software: deterministic. Doing the work costs no tokens, and the same input always gives the same result. The model decides what to measure; the script measures.
What matters is who loads what. An agent’s context (its working memory, everything it has read and written) has a limit, and the fuller it gets, the worse it works. Deciding what goes into each context is what Anthropic calls context engineering (opens in a new tab), and for skills it proposes progressive disclosure: the agent reads the minimum first and opens the rest only when it needs it (Equipping agents for the real world with Agent Skills (opens in a new tab)).
In my case:
- The orchestrator agent loads
SKILL.mdand opens each reference only when a step needs it. With one exception:trampas.mdis mandatory before touching a single measurement. - The critic subagents and the inspector load nothing from the skill, only their own file. Looking with fresh eyes is exactly what I want from them.
- The measurer subagent reads the references step in
SKILL.md, plusmedidas.mdandherramientas.md. - The verifier subagent reads
critico.mdandherramientas.md.
The measuring and adjusting scripts
Verification scripts are what make the loop possible: they turn a subjective judgement (“it looks right”, “it’s fine”) into a number the agent can check without asking you. Without them, the evaluator can only give an opinion. They should return little text, because everything they return goes into the agent’s context.
In my case, these are the most important ones:
compare.py: overlays the model on the drawing and produces an error map.segment.py: splits the drawing by material so each one can be measured separately.planos.py: detects where the surface changes plane.malla.py: checks the health of the mesh (spikes, steps, asymmetries).revision.py: prepares the material for each review. It leaves a list of images for each critic and, for the A/B, puts the previous and the new version side by side in random order, with the key kept elsewhere so the critic can’t tell which is which.fit.py: adjusts measurements on its own. It tries values for the measurements you point it to (say, the position of an eye), rebuilds the model, measures how far its outline is from the drawing, and keeps the values that get closest.sculpt.py: sculpts the surface when adjusting numbers isn’t enough.
The part about returning little text I learned by filling up contexts. compare.py now prints only a summary and leaves the full report in a file, which is searched with grep: before, its output was half of the text filling the context. And for questions like “can you see X in this image?”, the orchestrator asks the inspector instead of reading the image itself.
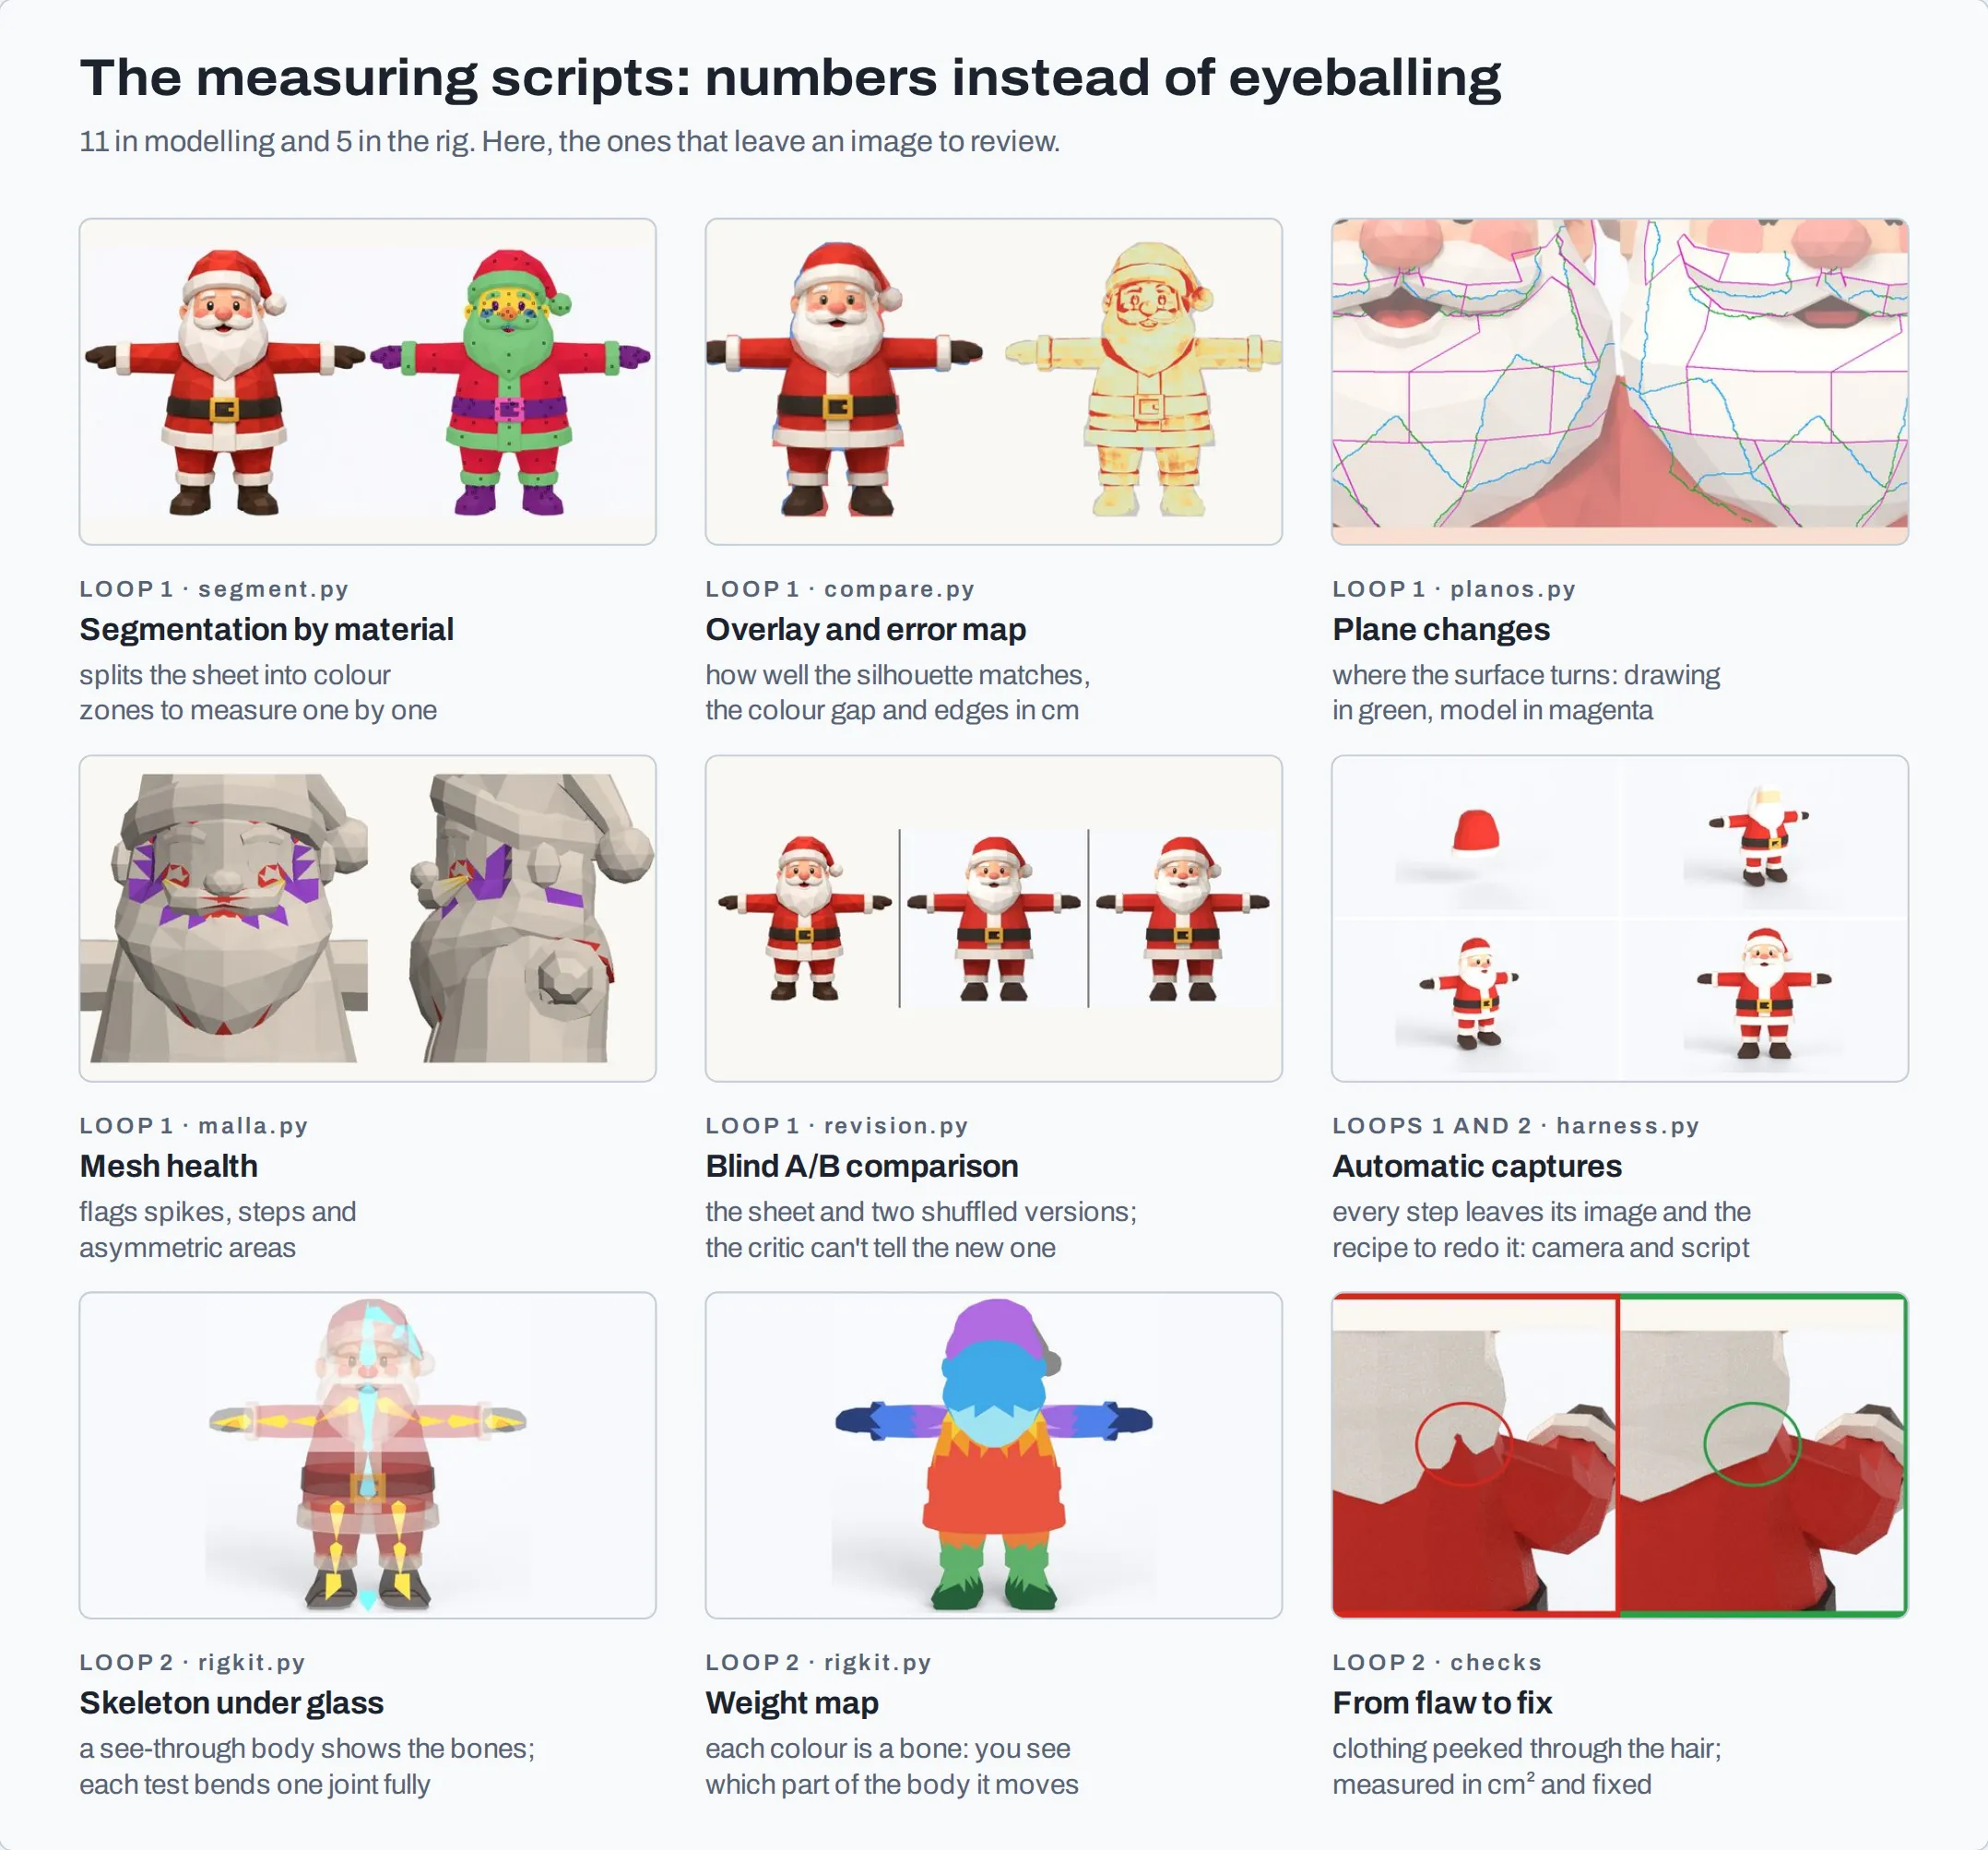
 The measuring scripts of loops 1 and 2
What each lap looks like
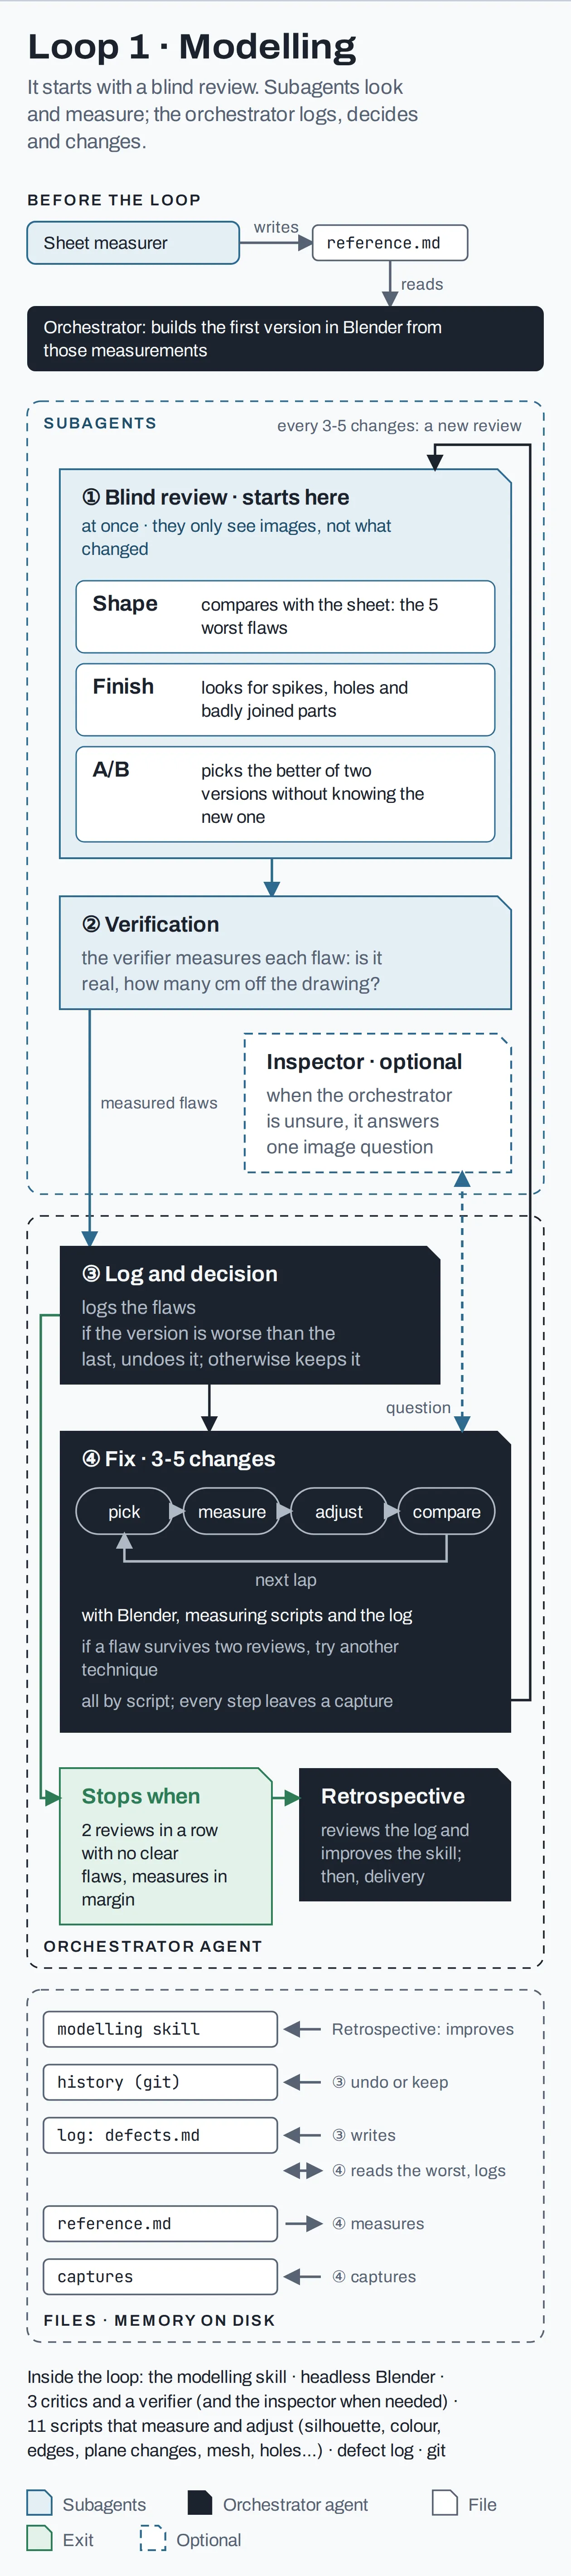
Before the cycle, the measurer measures the drawings (proportions, colours and the angle each one was drawn from) and writes referencia.md. The orchestrator reads it and writes the first version of the script.
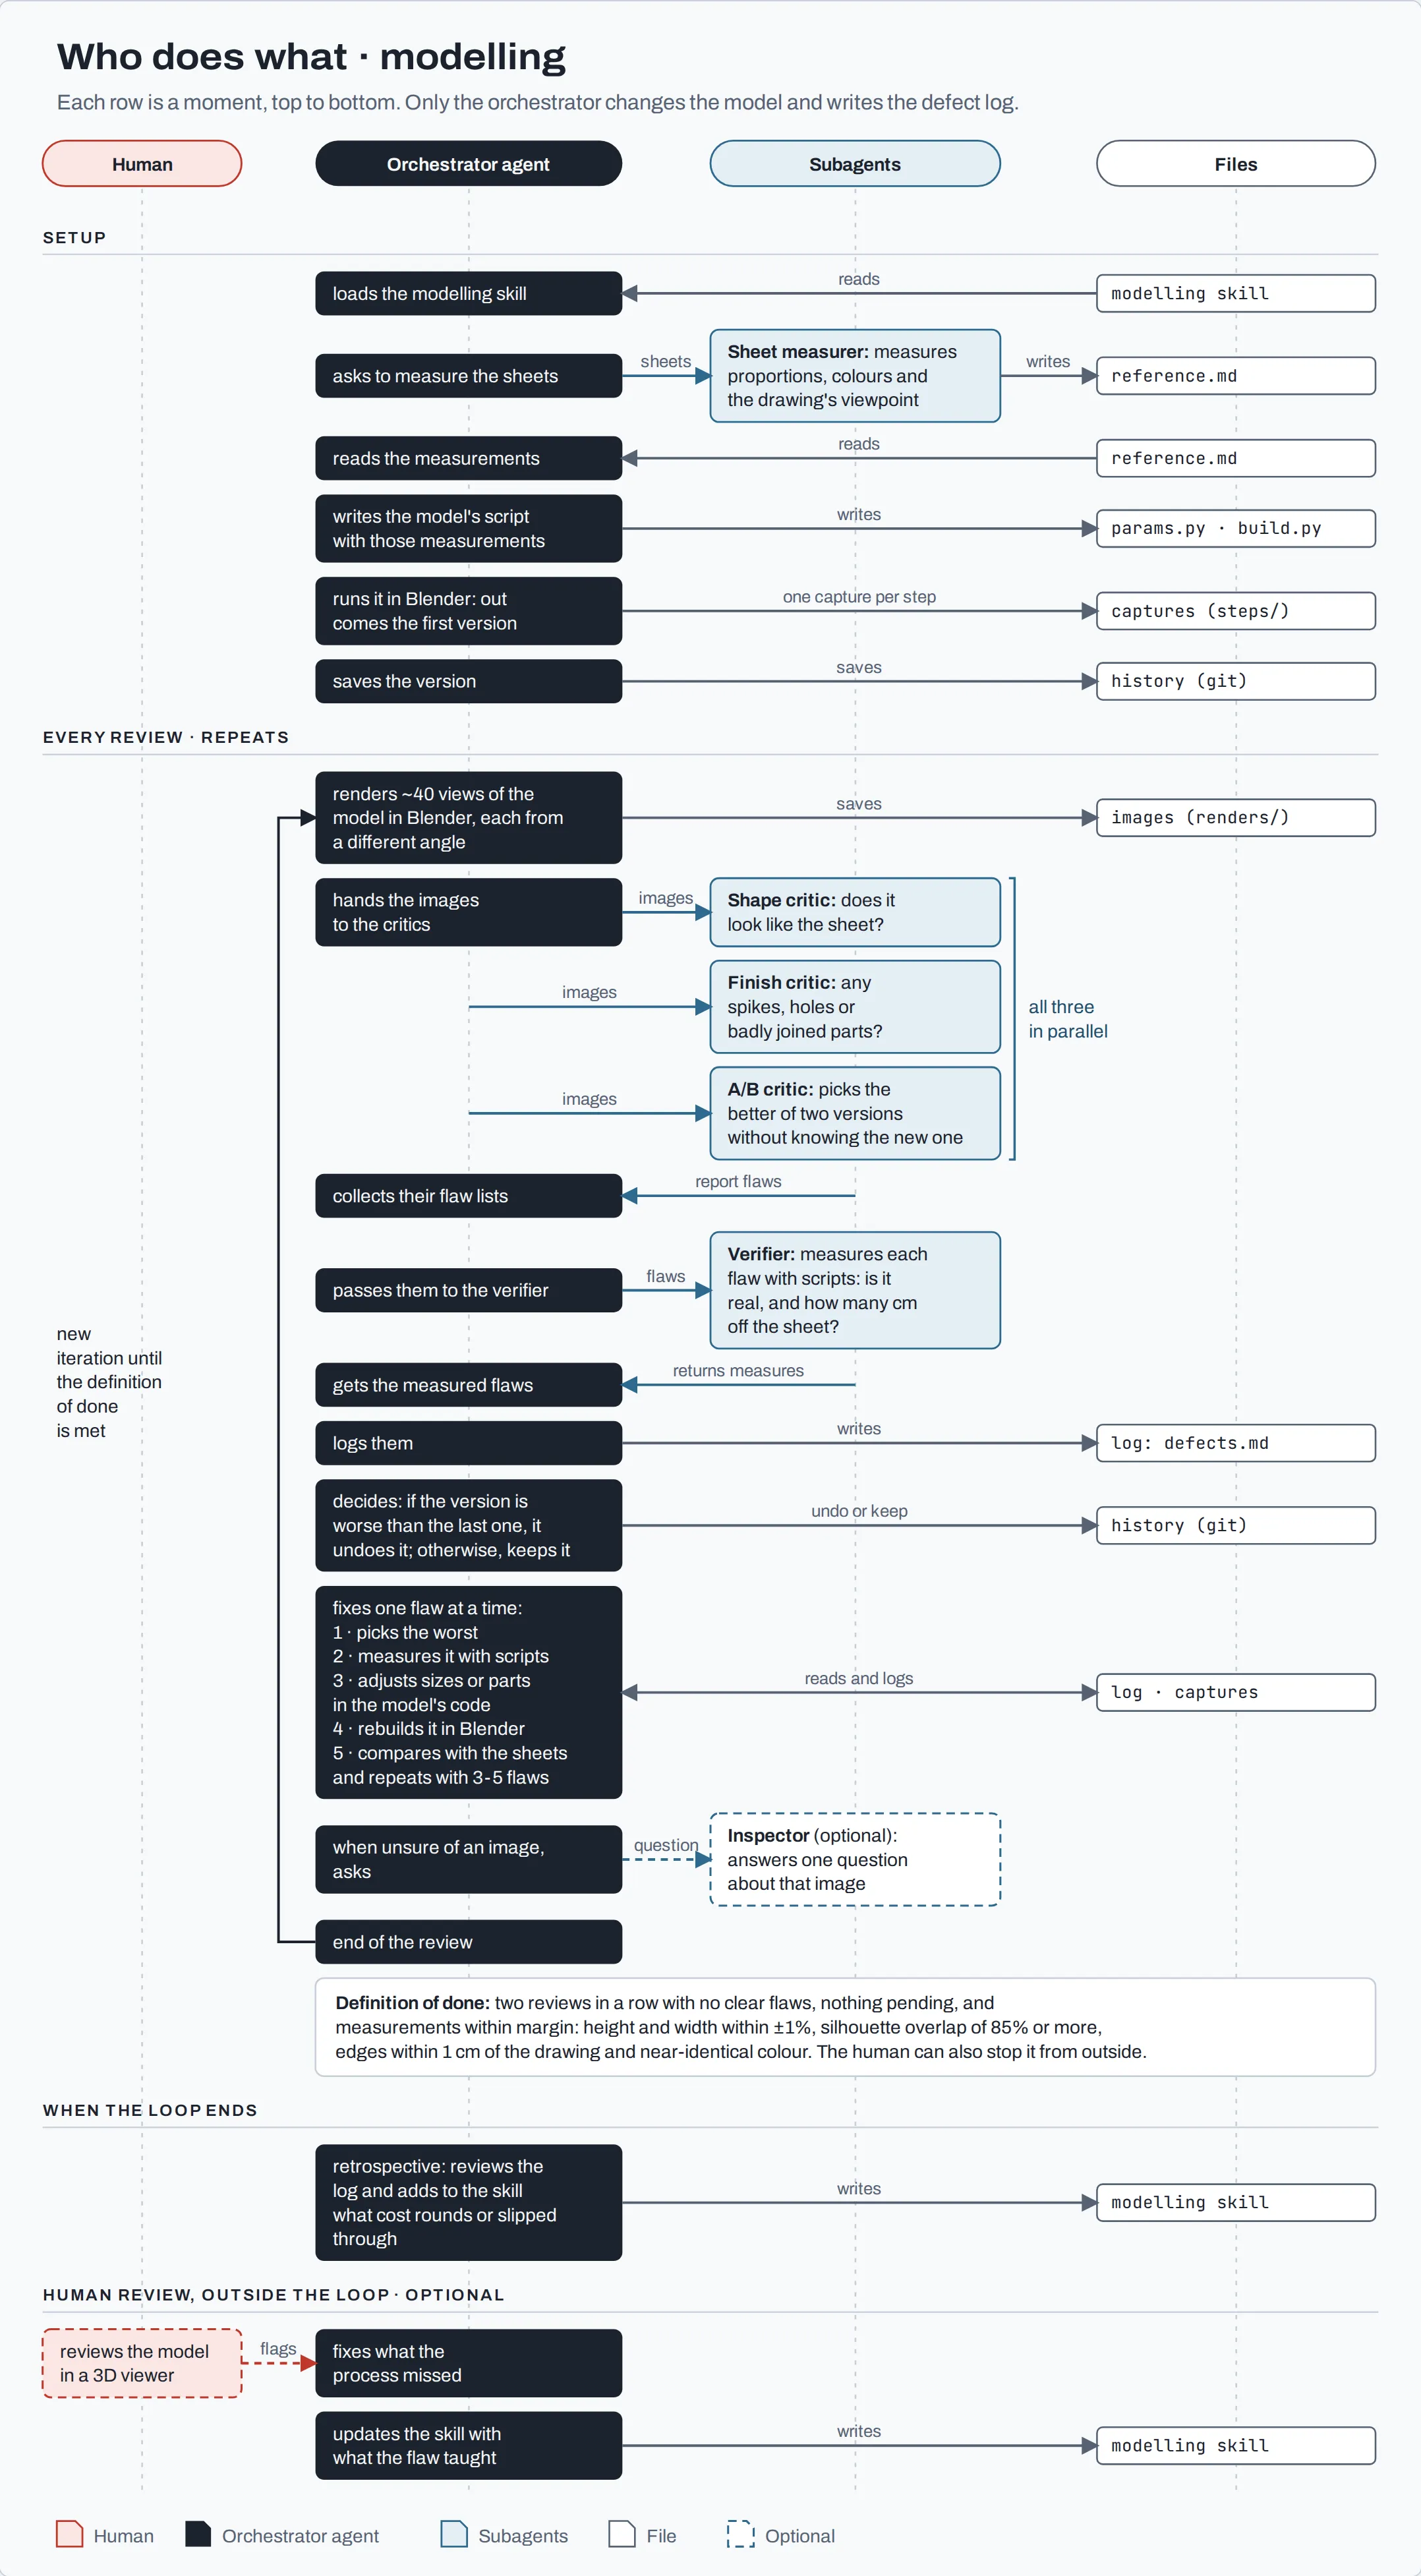
 Who does what in modelling
Each lap has four steps:
- Blind review. The orchestrator renders about 40 views from different angles and launches the three critics at once. None of them knows what changed.
- Verification. The verifier measures each flaw: whether it’s real, whether it comes from the drawing, and how many centimetres off it is.
- Log and A/B. The orchestrator writes each flaw into
defectos.md. If the new version loses the A/B against the last accepted one, it undoes it with git. - Fix. It takes the worst flaw and works on it: pick, measure, adjust the script, rebuild and compare. It makes 3-5 changes before the next review.
When a flaw won’t go away, the agent changes technique. If a flaw is still there after two reviews trying the same thing, it doesn’t try again the same way: it moves to the next technique on this list, each more drastic than the last:
- Change a measurement by hand in
params.py. - Let
fit.pysearch for the measurements. - Change the mesh structure: more vertex rings, or split the part in two.
- Sculpt the surface with
sculpt.py. - Rebuild the part from scratch.
The reason behind this strategy is that some flaws aren’t about measurements but about structure: if the part is missing vertices or has the wrong shape, nudging the vertices won’t fix it.
The definition of done requires all of these to be met:
- Two reviews in a row with no clear flaws.
- No open flaw in the log: each one fixed, false (with proof) or accepted (with the number and the reason).
- Height and width within ±1%, silhouette overlap of 85% or more, edges within 1 cm and near-identical colour.
I can also stop it from outside. In Santa’s case, I closed it myself, after 16 reviews. Some threshold probably needs relaxing, but I’d rather have a demanding system and stop it by hand than the other way round: getting back something that isn’t ready.
 Loop 1: modelling
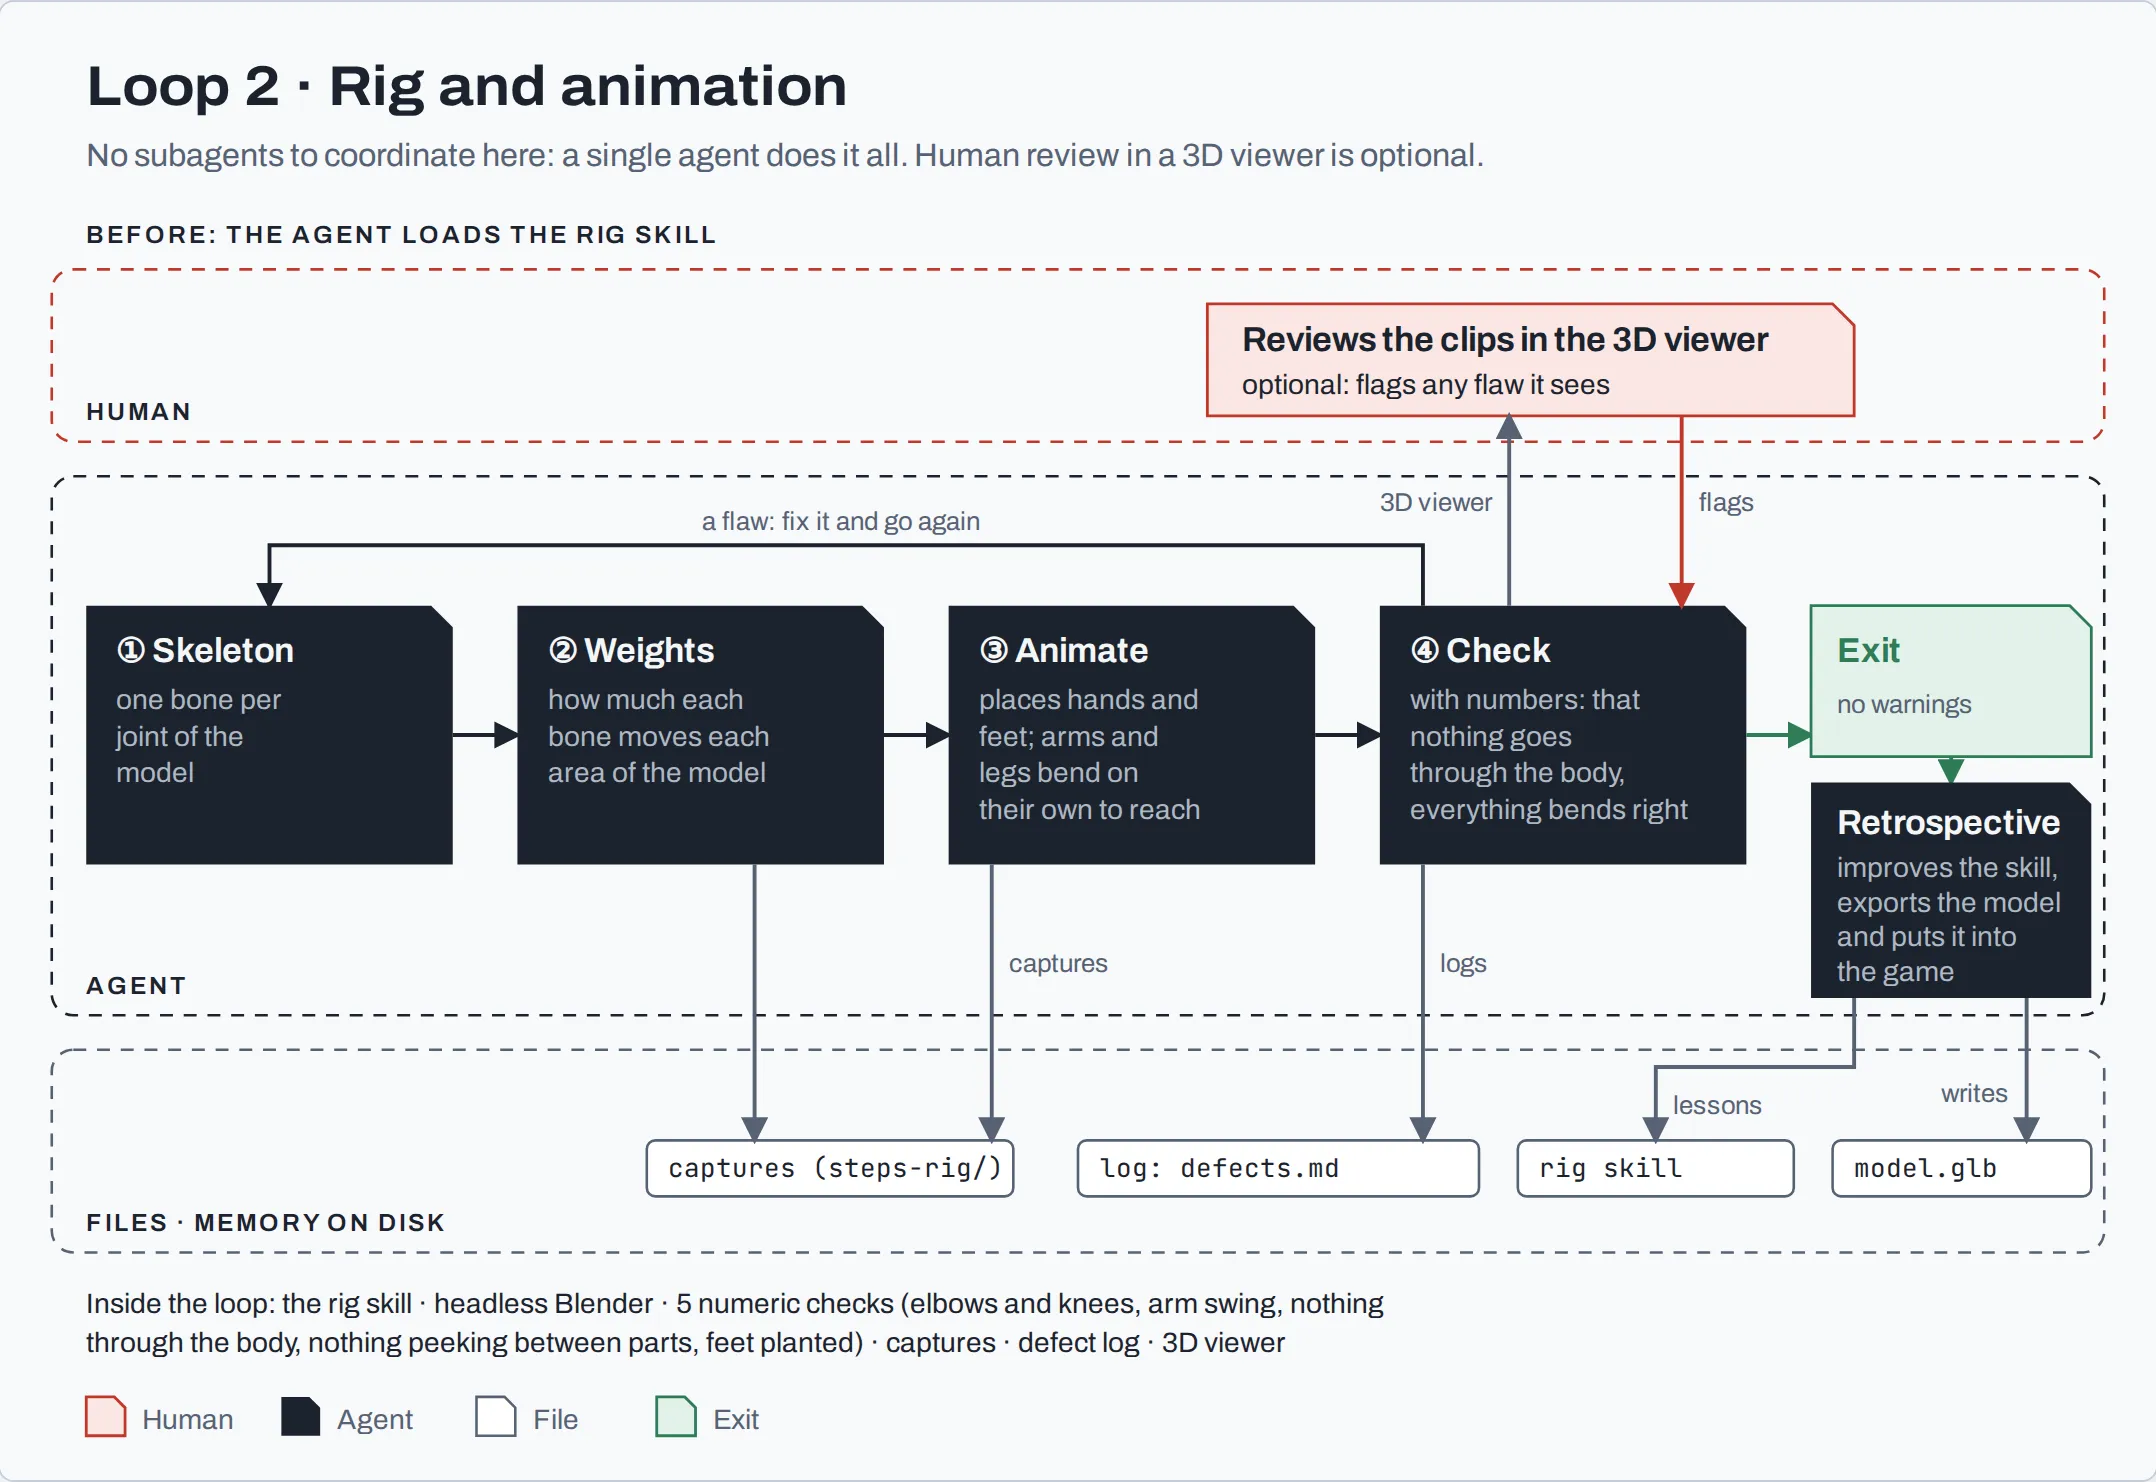
Loop 2: skeleton and animation
When the result can be checked with code, the evaluator doesn’t need to be another agent. A script is cheaper, faster, and doesn’t make the same kind of mistakes.
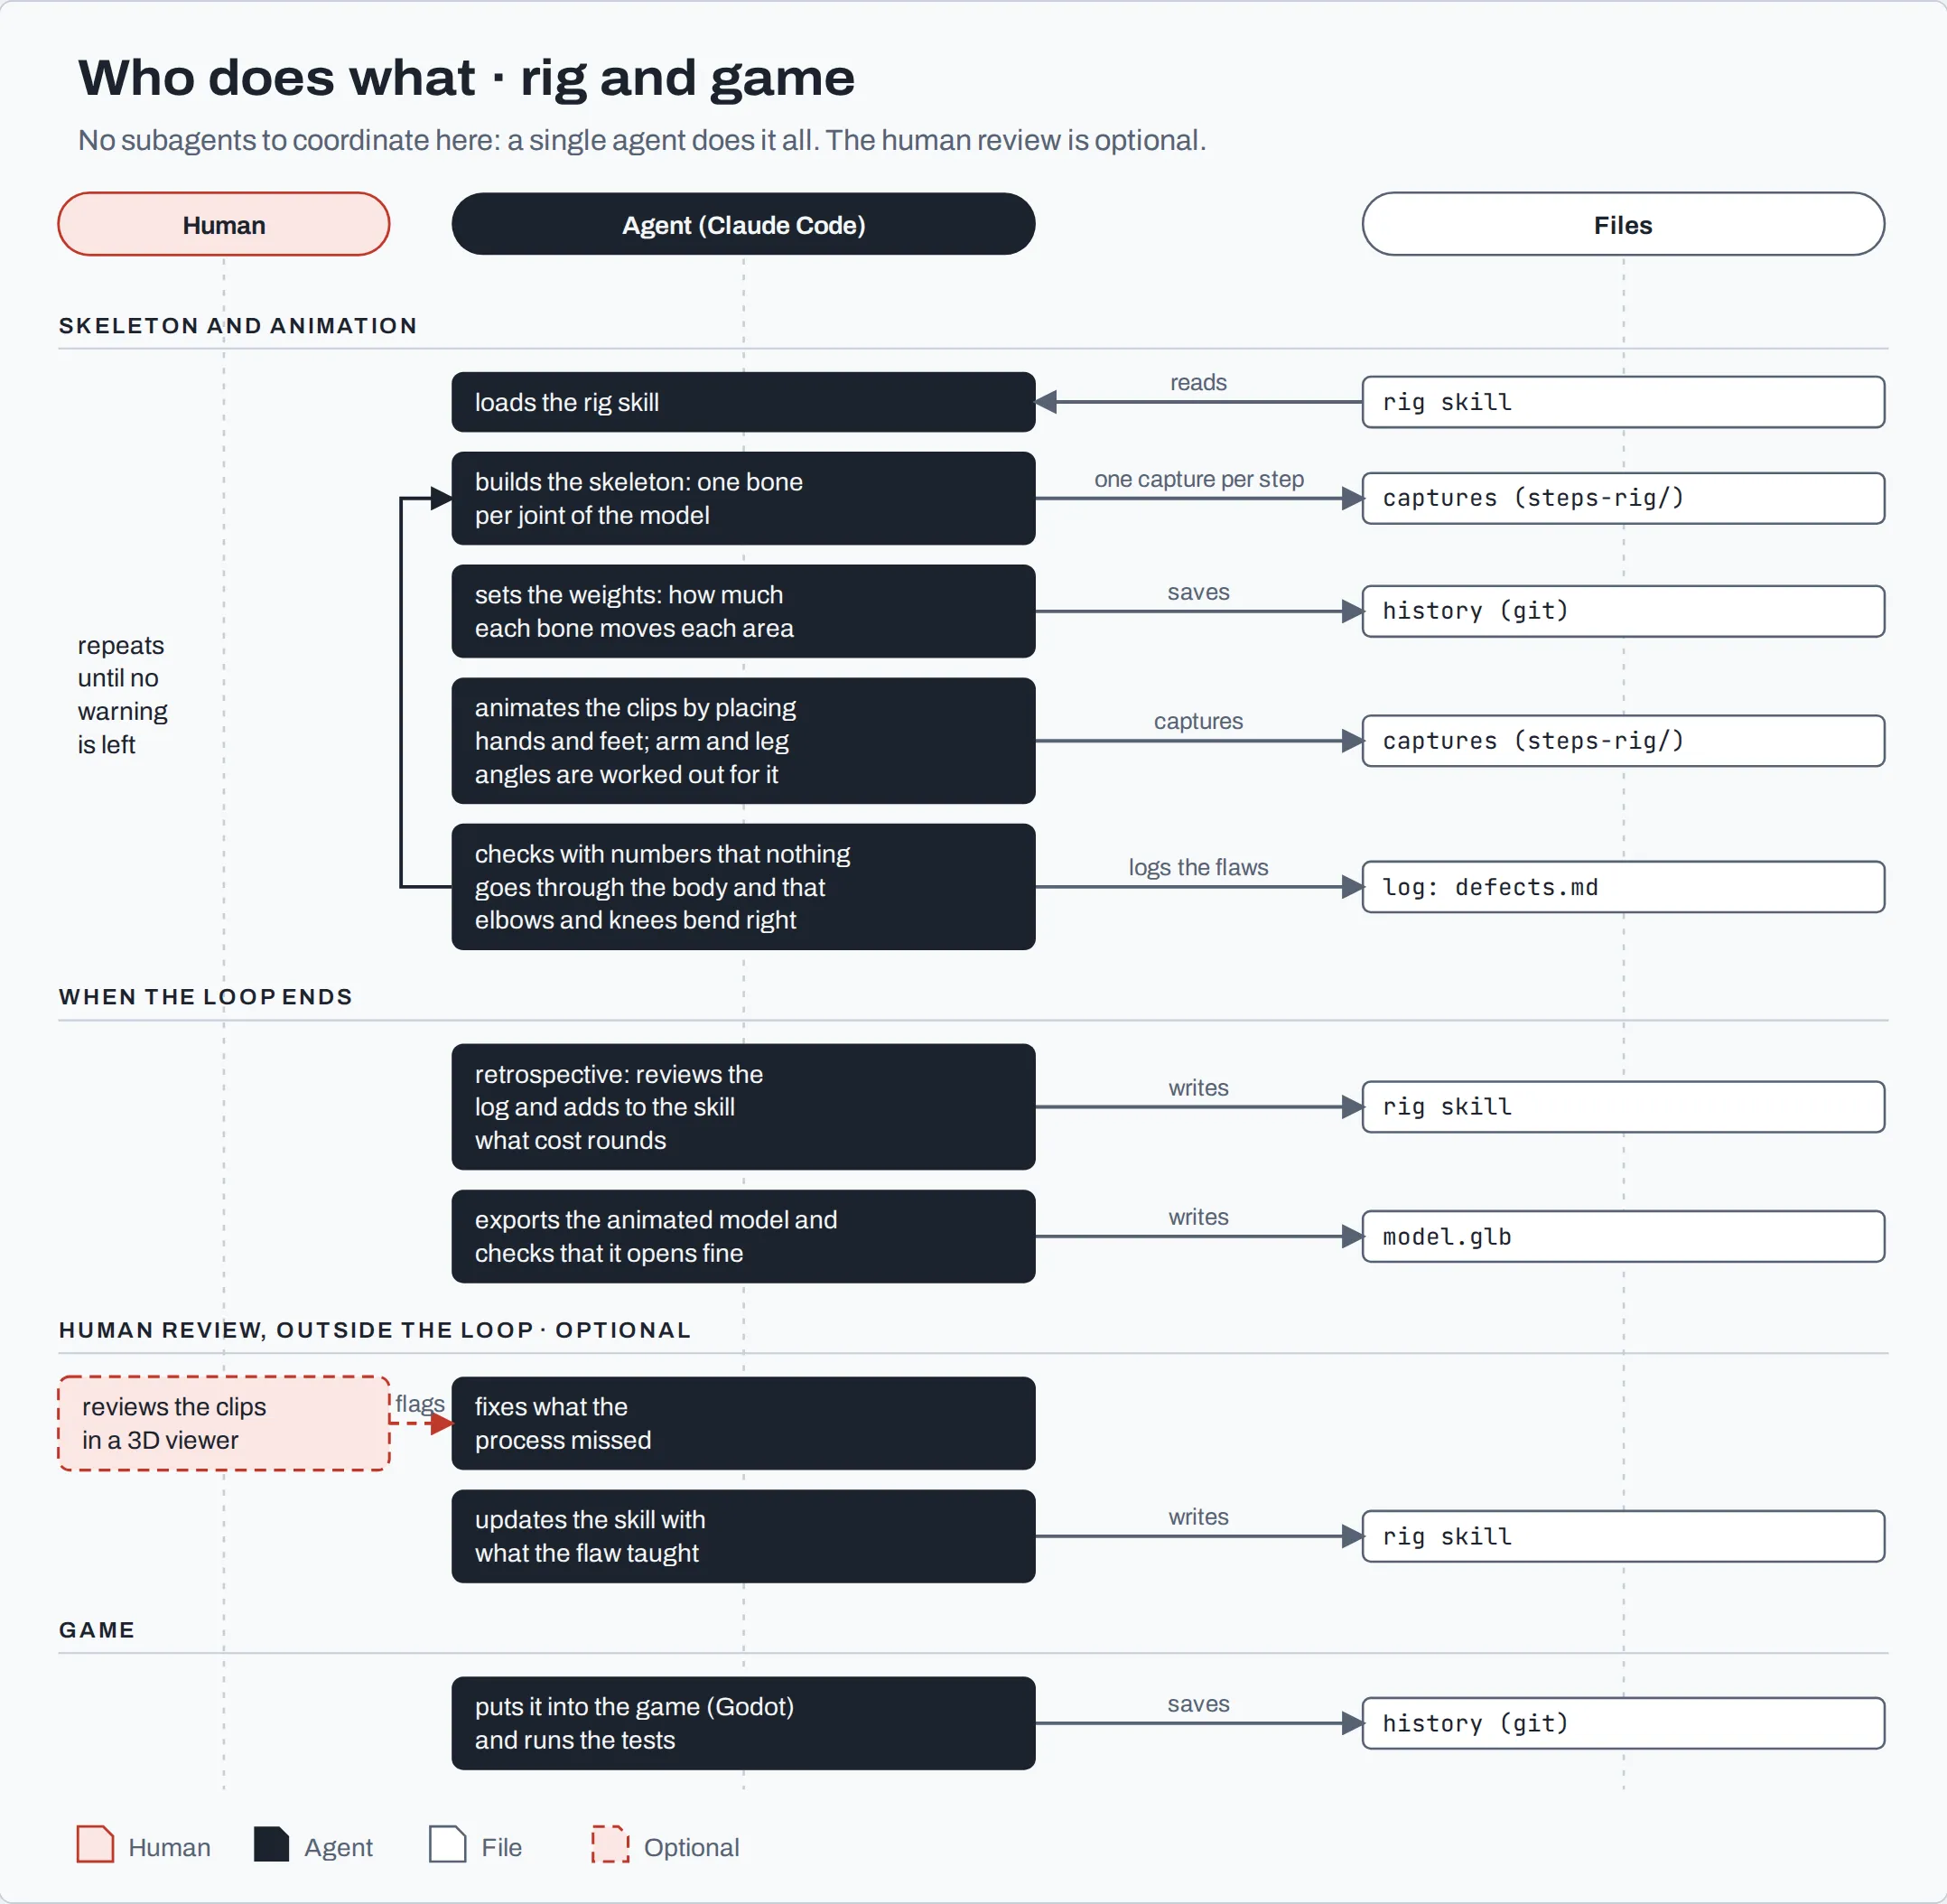
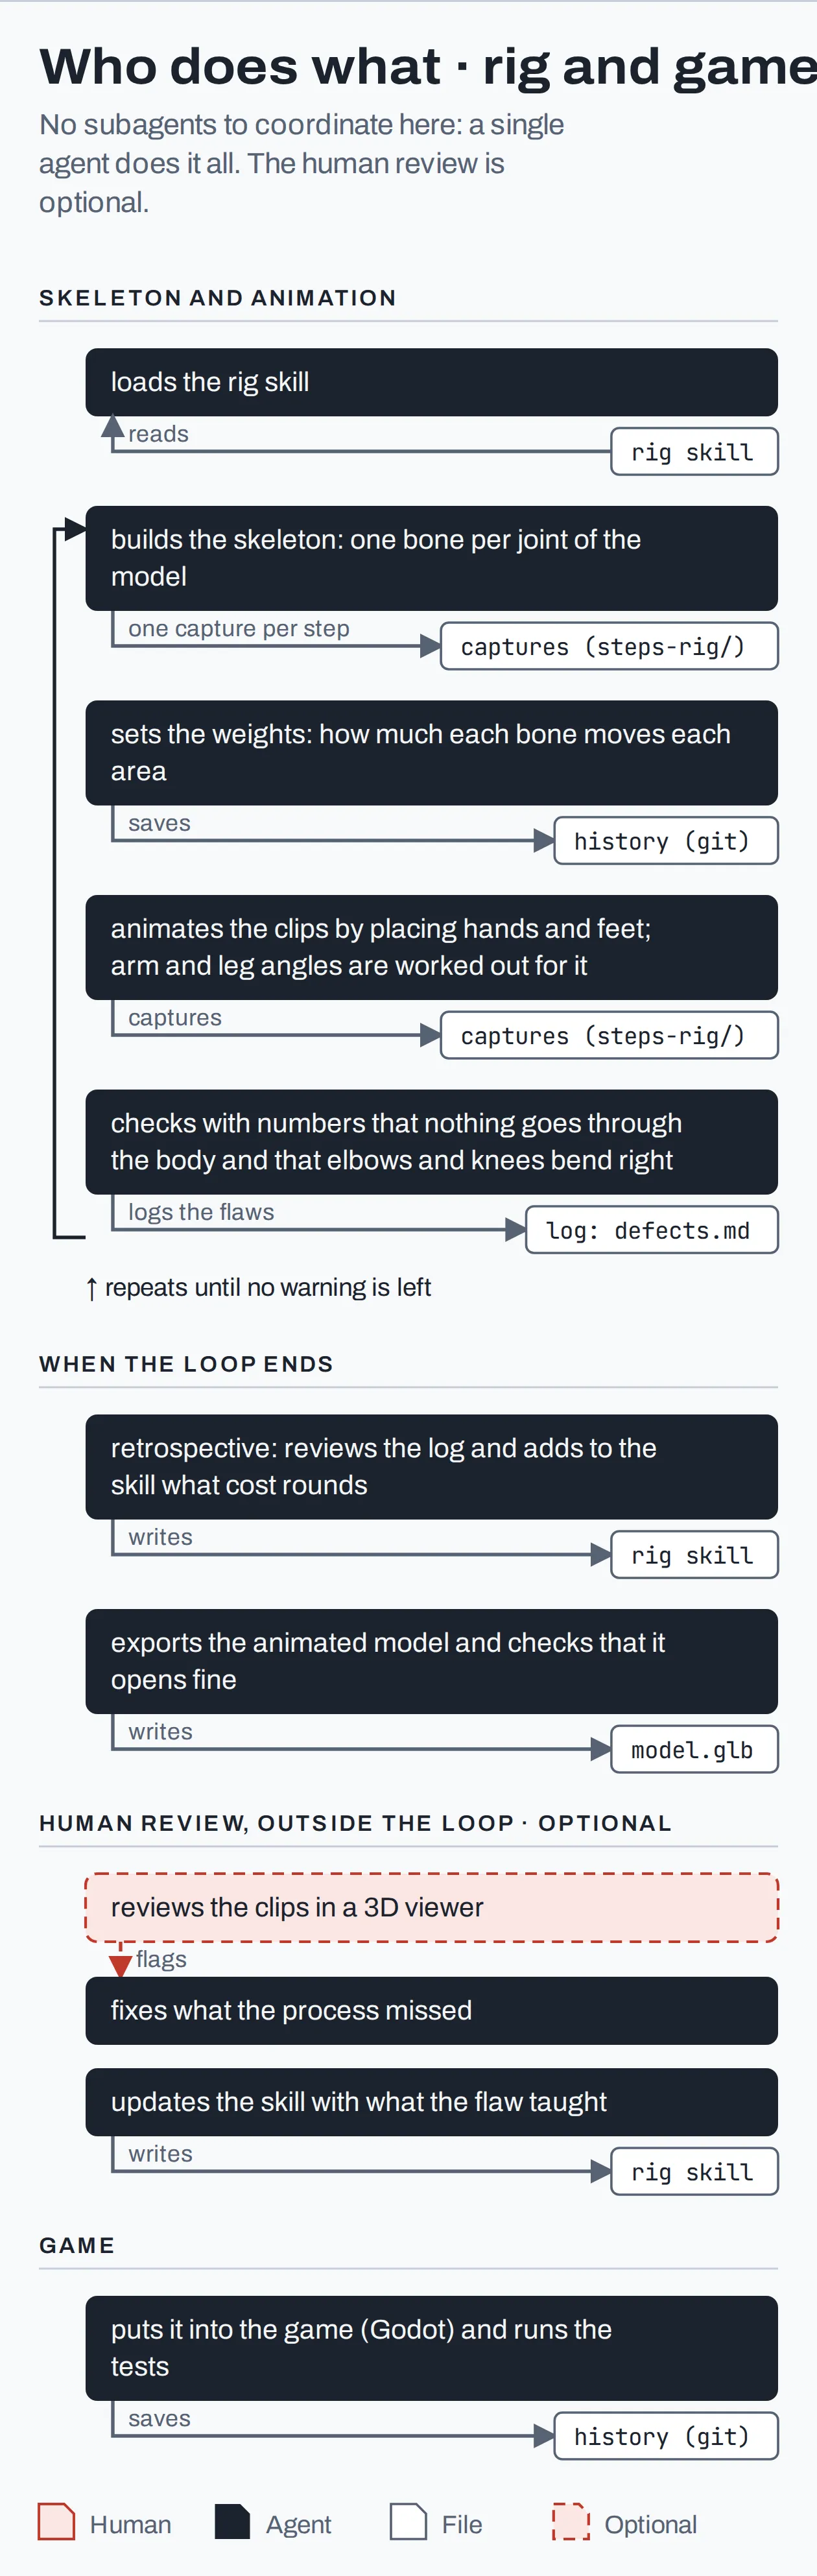
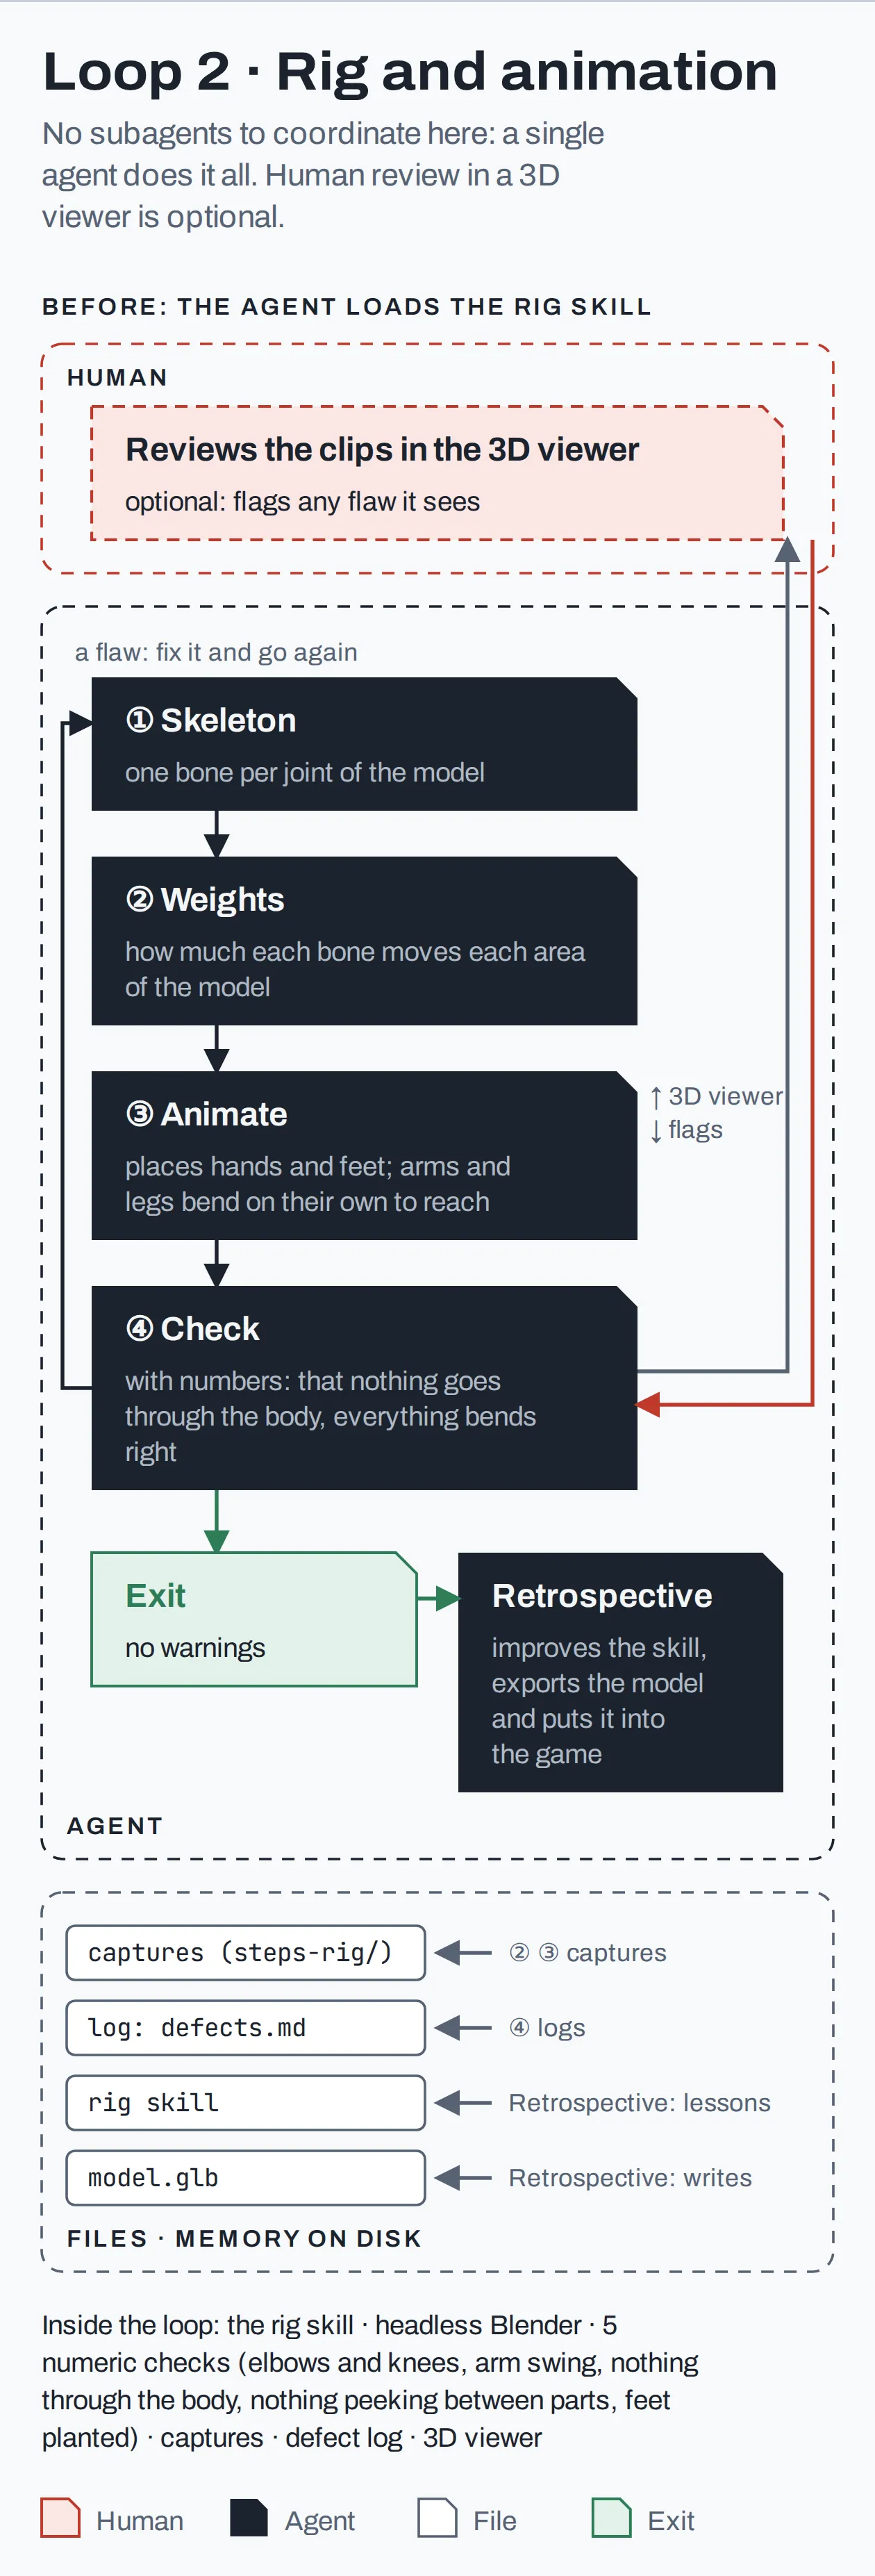
In my case, the skeleton and animation loop has a single agent, with no subagents:
- The agent loads the skill, builds the skeleton, sets the weights (how much each bone moves each area of the model), animates the clips and checks it all with numbers. It repeats until no warning is left.
- The rigging skill is simpler than the modelling one: its
SKILL.md, itstrampas.mdand a library,rigkit.py. - The scripts are five checks in code: that elbows and knees bend the right way, that arms swing back and forth (not sideways), that nothing goes through the body, that no clothing peeks out between parts, and that feet rest on the ground without sinking.
That’s why this loop is much cheaper: $30 against the $151 of modelling.
 Who does what in the rig and the game
When it’s done, it exports the model (modelo.glb) and puts it into the game, in Godot, with its tests.
 Loop 2: skeleton and animation
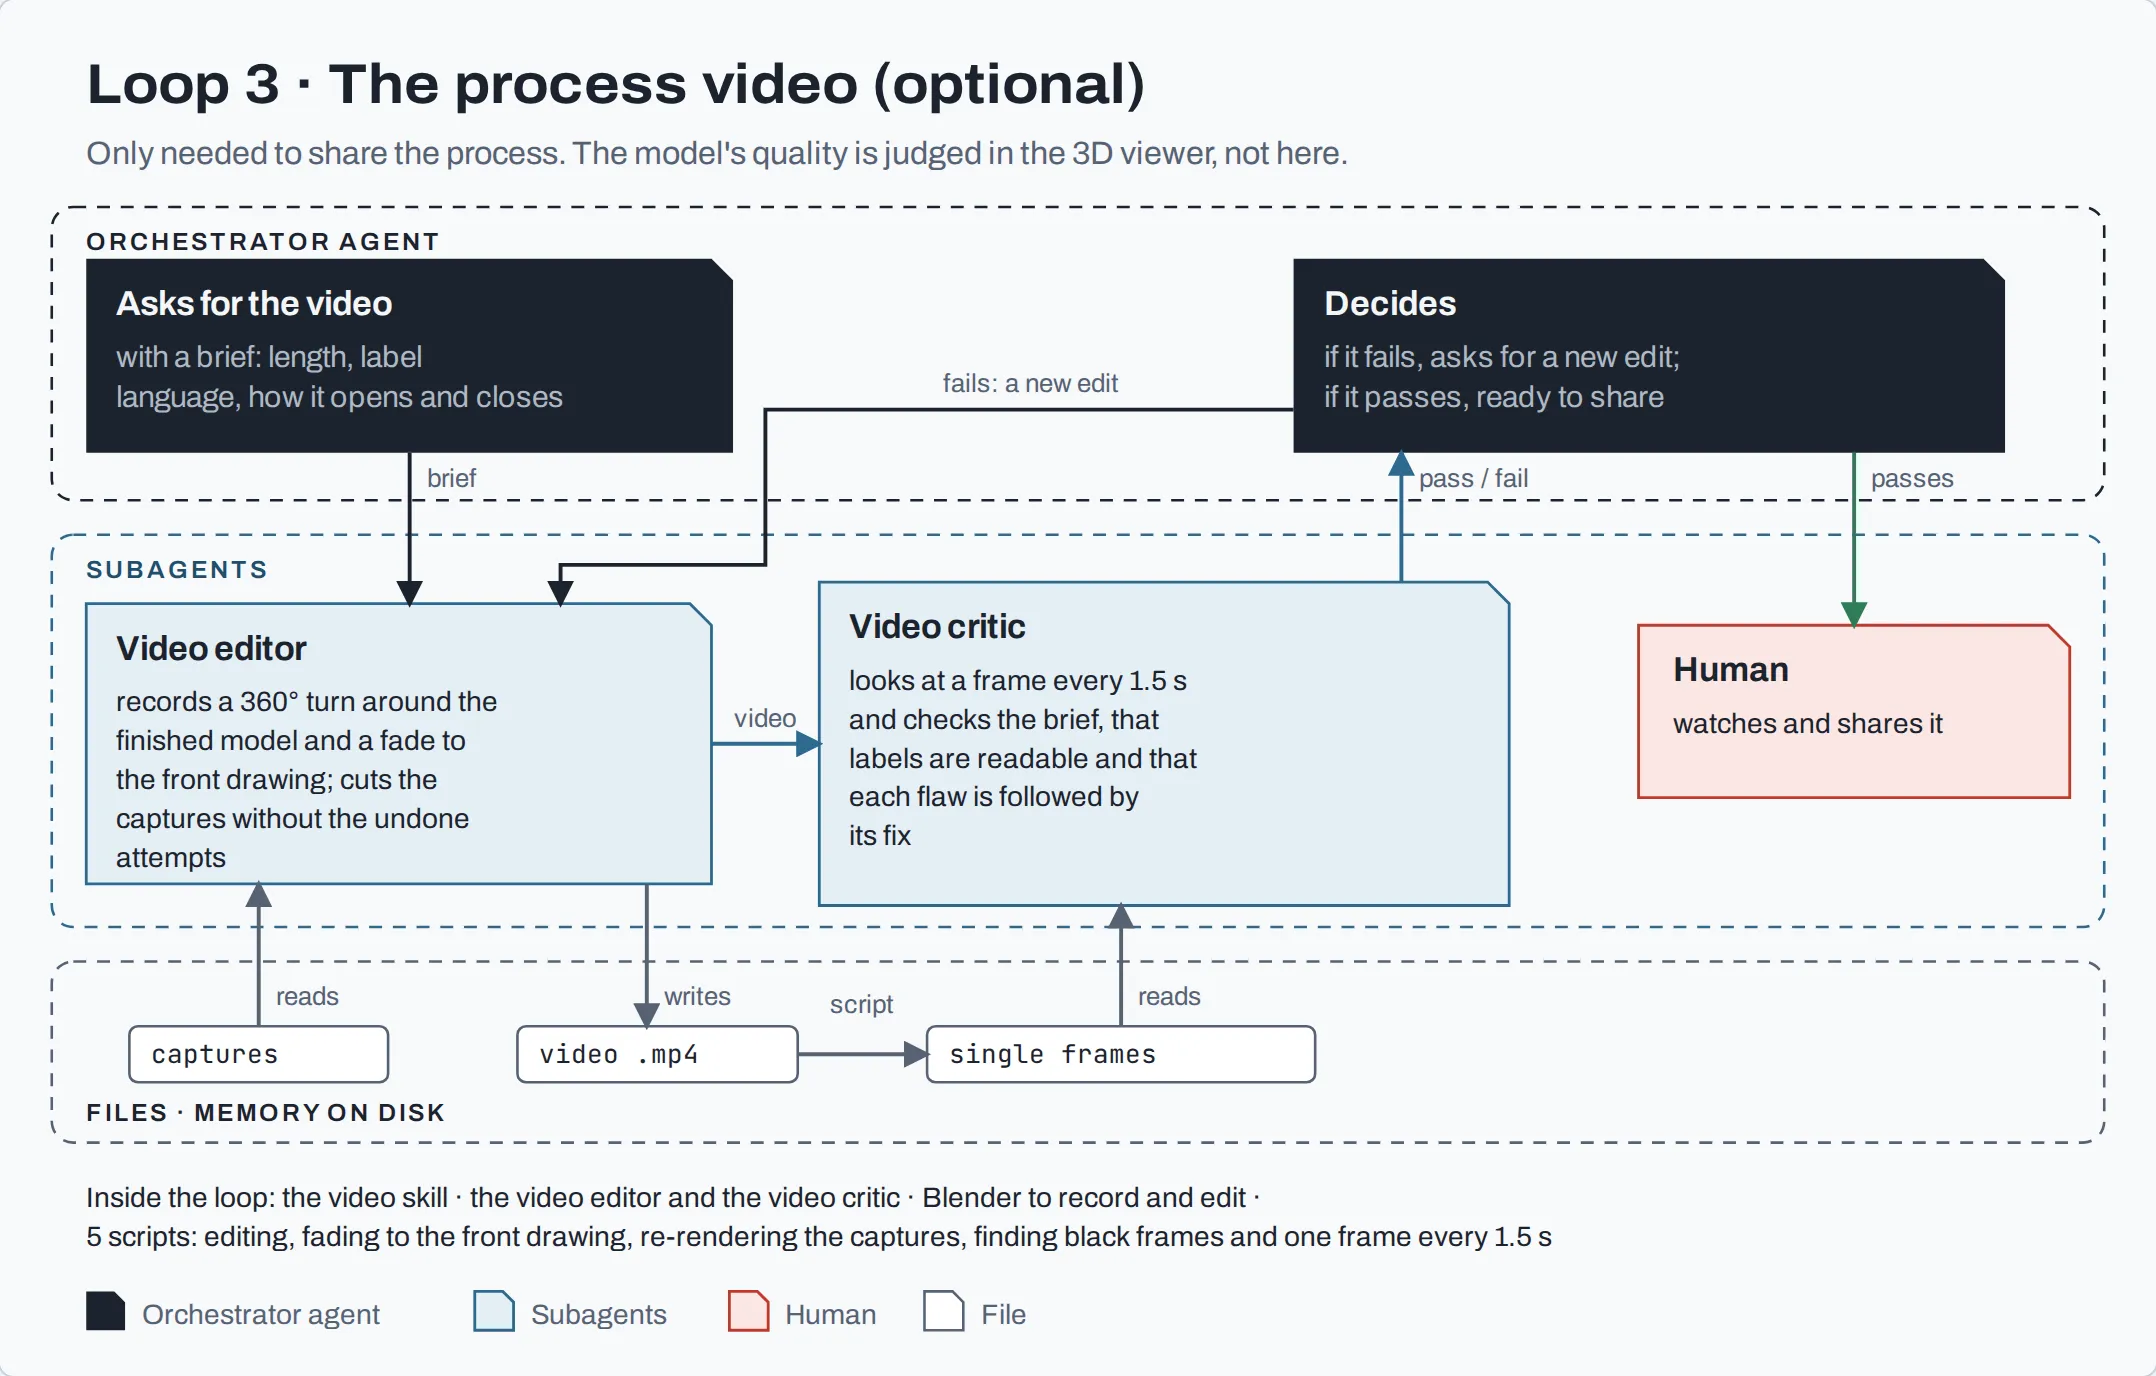
Loop 3: video (optional)
A loop doesn’t have to produce the main result. It also works for supporting tasks, like documenting or showing the work, with its own brief and its own evaluator.
In my case, the third loop edits a video of the process. The game doesn’t need it, but it’s how I show the work:
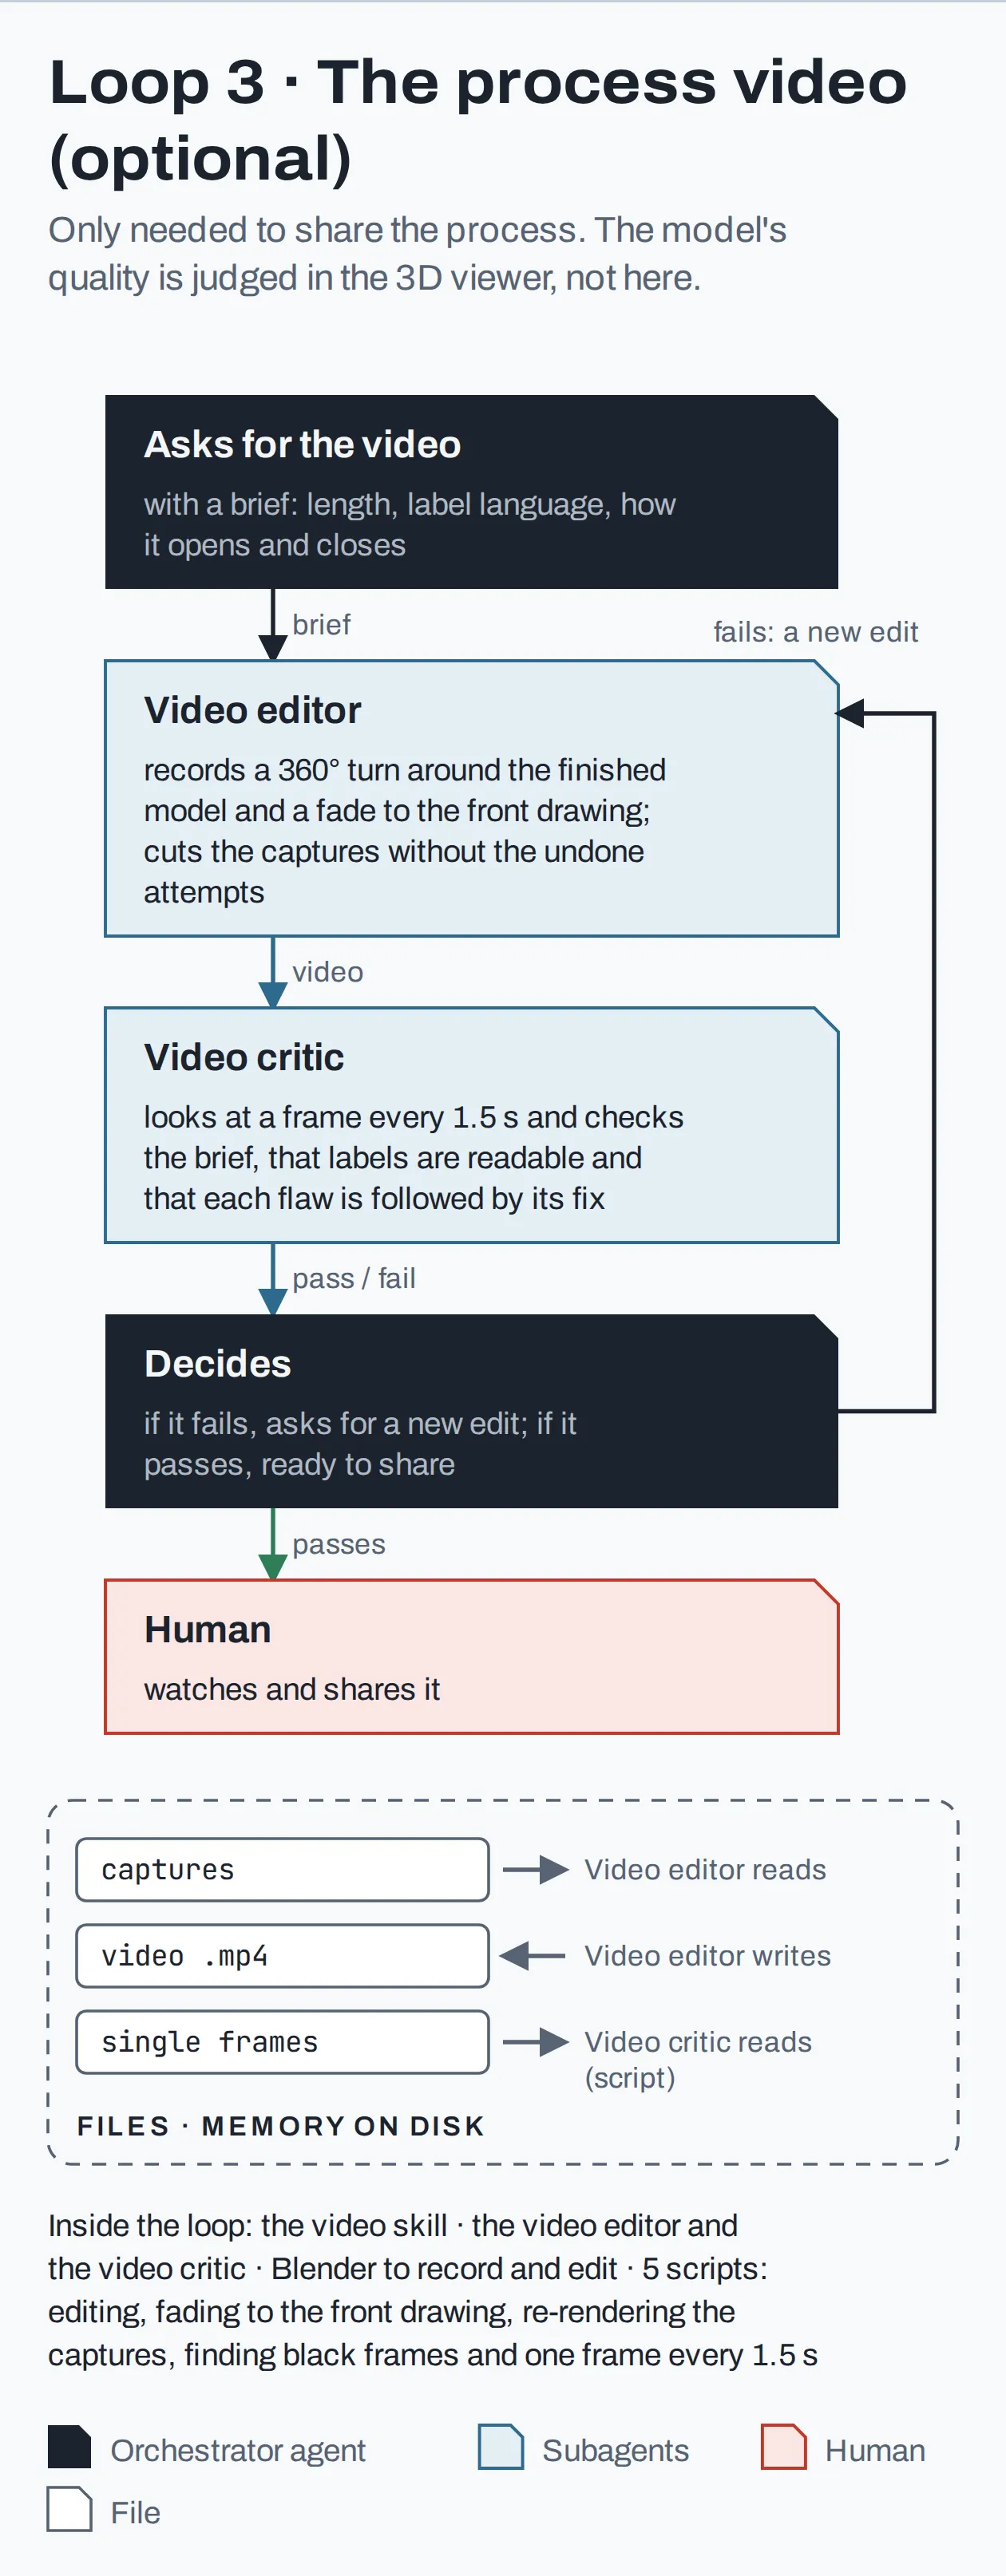
- The agents: the orchestrator writes a brief (length, label language, how it opens and closes, and who it’s for) and hands it to two subagents running Sonnet 5.5. The editor records a 360° turn around the model and a fade to the front drawing, and cuts together the captures of each step, leaving out the attempts that were undone. The video critic checks it against the brief.
- The skill: the video skill, with the editing instructions (what to record, how to edit it and when to call the editor and the critic) and its scripts.
- The scripts:
video.pyedits the video andcheck_video.pydecodes it to catch black frames.pasada.pydoes the fade from the model to the drawing, andreplay.pyre-renders the captures at higher quality from their recipe. And since the critic can’t watch video,hojas_video.pypulls a frame every 1.5 s with its timestamp underneath. That way it can say where each flaw is.
If the critic finds flaws, the editor re-edits the video and the critic reviews it again, until it approves it.
 Loop 3: video
What the three loops share
Memory lives on disk
When an agent’s memory fills up, Claude Code summarises it to keep working, and that summary loses details. Anthropic suggests saving progress to a file and relying on git (Effective harnesses for long-running agents (opens in a new tab)).
In my case, the defect log, the measurements and the captures live in the repository, next to the git history. When the context gets summarised, the work picks up where it was, because what matters isn’t only kept in the agent’s memory but also in the working files.
Systems that learn on their own
A loop can improve its own instructions: when it finishes, it reviews what it struggled with and turns that into rules for next time.
In my case, when each loop closes, the agent goes through the log and looks for:
- Flaws that have survived two or more reviews.
- Flaws the critics have missed.
- False alarms that have cost rounds.
- The slowest steps.
It’s the agent itself that, in that retrospective, updates the skill: it adds a lesson to trampas.md, a new check to the script that missed the flaw, or a line to the file of the subagent that got it wrong, always citing the flaw behind it. This happens at the end of the loop and not on every lap, so the rules don’t keep changing mid-game.
Then comes my review, which is optional, in a 3D viewer. If I find something, it gets fixed twice: in the model and in the skill.
An example: in the side image, the perspective drew the arms further back than they really were. The agent placed them there and its measurements said it was fine, but in the 3D viewer I saw in a second that they stuck out behind the torso. Now it’s a rule in the skill.
Lessons learned
The system isn’t perfect, and I’ve had to improve the pipeline several times. Before Santa I tried it with other characters, and that taught me a few things:
- A single agent gets overloaded. With all the work in one conversation, its memory filled up with images, script output and code. Splitting it into subagents works much better.
- Critics get it wrong too. In one review, a third of the flaws they reported were false. That’s why nothing gets fixed now until the verifier has confirmed it.
- Cheap can turn out expensive. With a cheaper model, the finish critic found half the flaws.
- Better numbers aren’t enough. There were laps where every measurement improved, but looking at the whole character, it was worse than before. That’s why I added the blind A/B comparison between the new version and the previous one.
- References fail too. AI-made images don’t fully match each other, so you have to decide which one rules for each measurement.
What my pipeline still can’t do
- In modelling, the orchestrator also builds. A modeller subagent would leave it only coordinating, which is its job.
- The definition of done isn’t always reached on its own.
- My review still finds things, although less and less.
My take
Anthropic’s patterns tell you how to organise the agents, but not what they need to check or how to measure it. You only learn that after wrestling with the problem.
You can’t automate a job you don’t know how to do. I made my first models using AI in a much more rudimentary way: Claude modelled in Blender, and I reviewed every result and asked for changes (I wrote about it in how to model a 3D character with AI). It was slow, but it helped me understand the process, spot the critical points and build up all the knowledge I’ve now moved into my factory. That’s where, for example, the idea of making the model a Python script came from, along with the different scripts to measure the result instead of eyeballing it.
And one more thing: don’t despair if your loop isn’t as useful as you hoped at first. Saying “hey Claude, create a 3D model factory, make no mistakes” won’t cut it. Automating a process with AI is iterative work: you design it, test it, see where it fails and ask your AI to fix it. Then you start over, until at some point your pipeline has improved enough to stop needing you.
Did you like this post? Leave me a comment and help me share it 😉
Get new posts by email
One email when I publish something new. No spam, and you can unsubscribe with one click.
Almost done: I sent you an email. Click the link in it to confirm.
Something went wrong. Try again in a few minutes.
Comments
You need a GitHub account to comment.