AI is changing 3D modeling: cheaper, faster, and easier to automate

I’ve wanted to make a mobile game for years, but never found the time. AI has now cut development time dramatically, so I finally decided to make one.
It’s called Santa Slideway, a runner where Santa flies his sleigh, collects presents, and drops them into chimneys. It has a cheerful low-poly style, with simple 3D models made from relatively few polygons.
I wanted to build it entirely with AI, 3D models included. I started with the obvious option: Meshy AI (opens in a new tab), a tool that generates 3D models from text or images. But I couldn’t get the low-poly look I wanted, so I tried building the models directly with Claude. I checked each result and asked for changes until it looked decent. I learned a lot, but it took too much of my time: I had to review and direct every step.
The solution was to take myself out of the loop. I needed to turn everything I’d learned into an automated process. That became my pipeline, a sequence of steps where several agents build models, inspect them, and fix errors. An agent is a system that uses an AI model to pursue a goal, choose its next steps, and operate tools without a person specifying every action. In practice, the pipeline became my 3D model factory. I hand it reference images, and it handles the rest.
The job
The first character through the factory was Santa himself, the star of Santa Slideway. It took two days and about $190 in AI.
I still handle the art direction. ChatGPT generates the reference images based on my creative direction. I pass them to the factory, which then handles modeling, rigging (adding the skeleton), animation, and validation. I can inspect the result at the end, but I don’t have to supervise every step.
For context, Fiverr and Upwork (two freelance marketplaces) list 3D character modeling jobs at $50 to $1,000, with delivery estimates of one to five weeks. AI doesn’t beat the cheapest offer on price, but these aren’t necessarily equivalent packages. A starting price doesn’t guarantee the same level of detail, or include rigging, animation, or compatibility. In my case, the pipeline guarantees exactly the format I need. And to integrate the character into the game, I just ask Claude Code to do it.
I’m not saying AI does better work than a freelancer. I’m saying I can get a more than decent result at a reasonable cost and turnaround. And this is just the beginning: AI models and their capabilities are only going to get better.
In this article I’ll explain what my pipeline does, what it costs, and where the time goes. In a follow-up, I’ll dig into how its internal loops are built.
From reference images to an animated model
I choose the design first. Then the factory runs three automated cycles, or loops. A loop performs a task, checks the result, and repeats until it meets predefined criteria. I can review the final result if I want, but the model is already ready to integrate into the game. I deliberately keep art direction outside the automated pipeline.
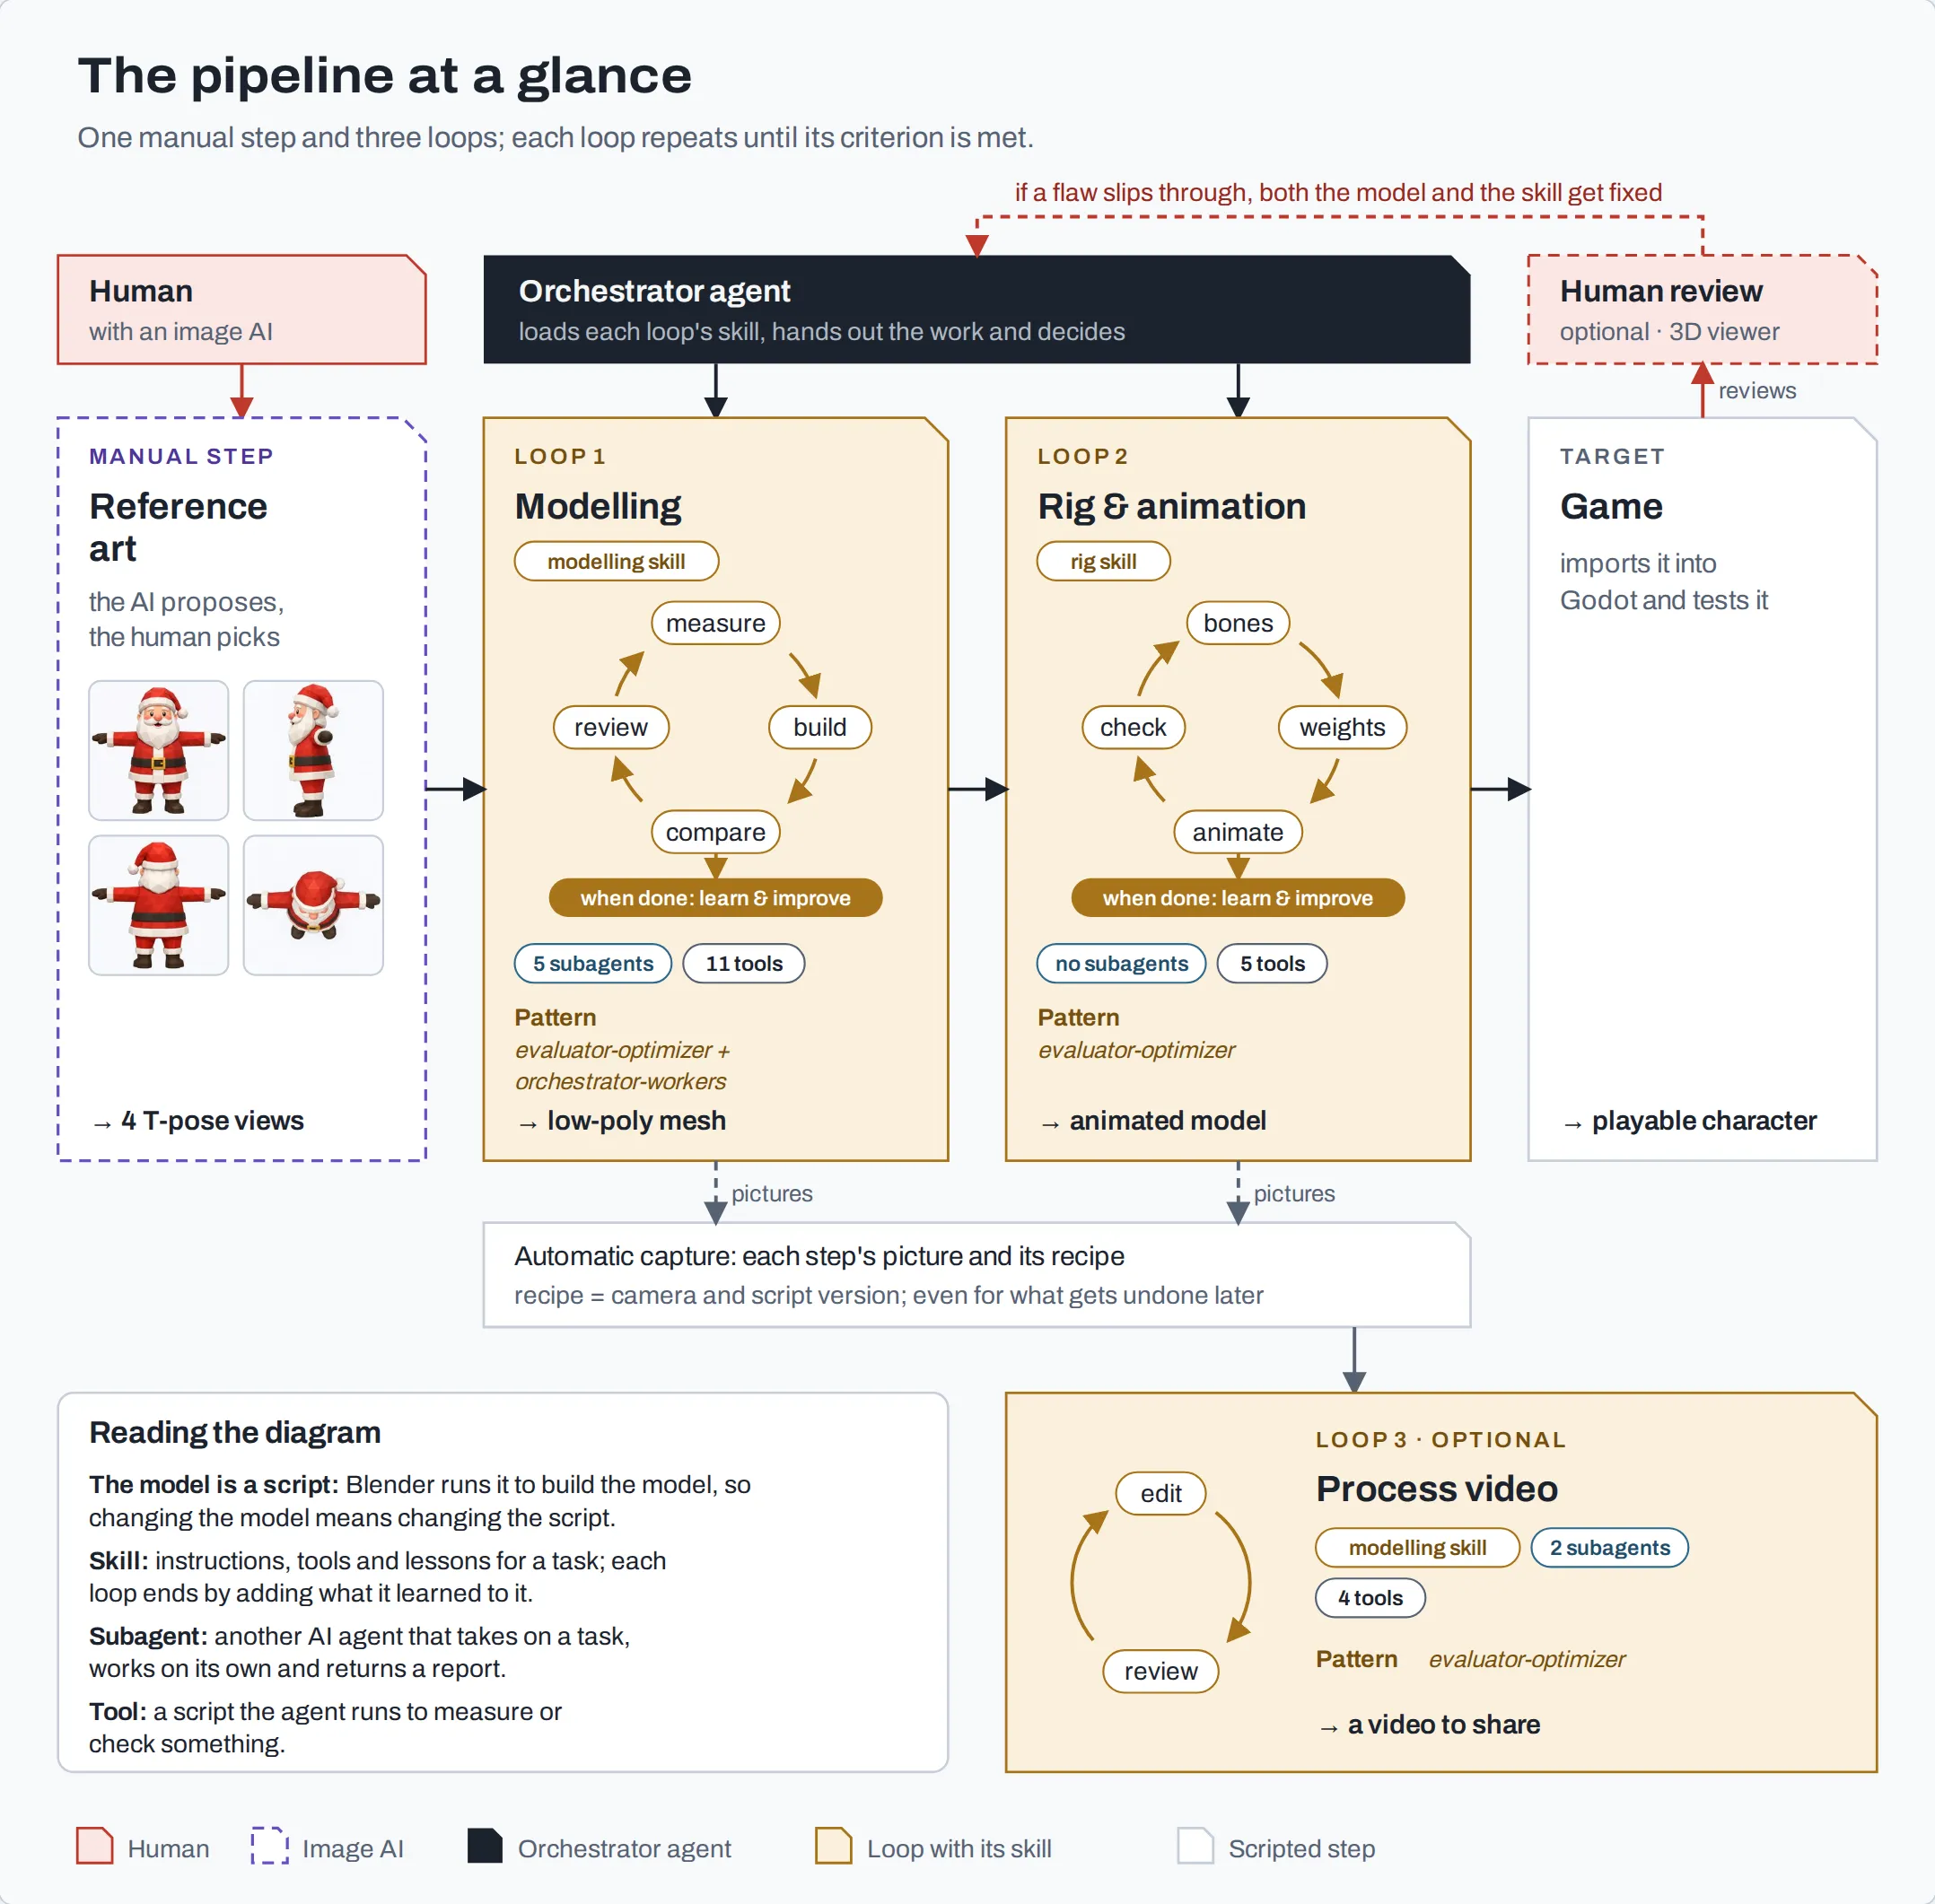
 The pipeline at a glance
First, I choose the look
I describe the character to ChatGPT. It suggests designs, and we keep refining them until I find one I like. Then I ask for four reference images in a T-pose, with the arms stretched out: front, side, back, and top. Those are what the factory needs. For Santa, I generated around 10 images with GPT Image 2.
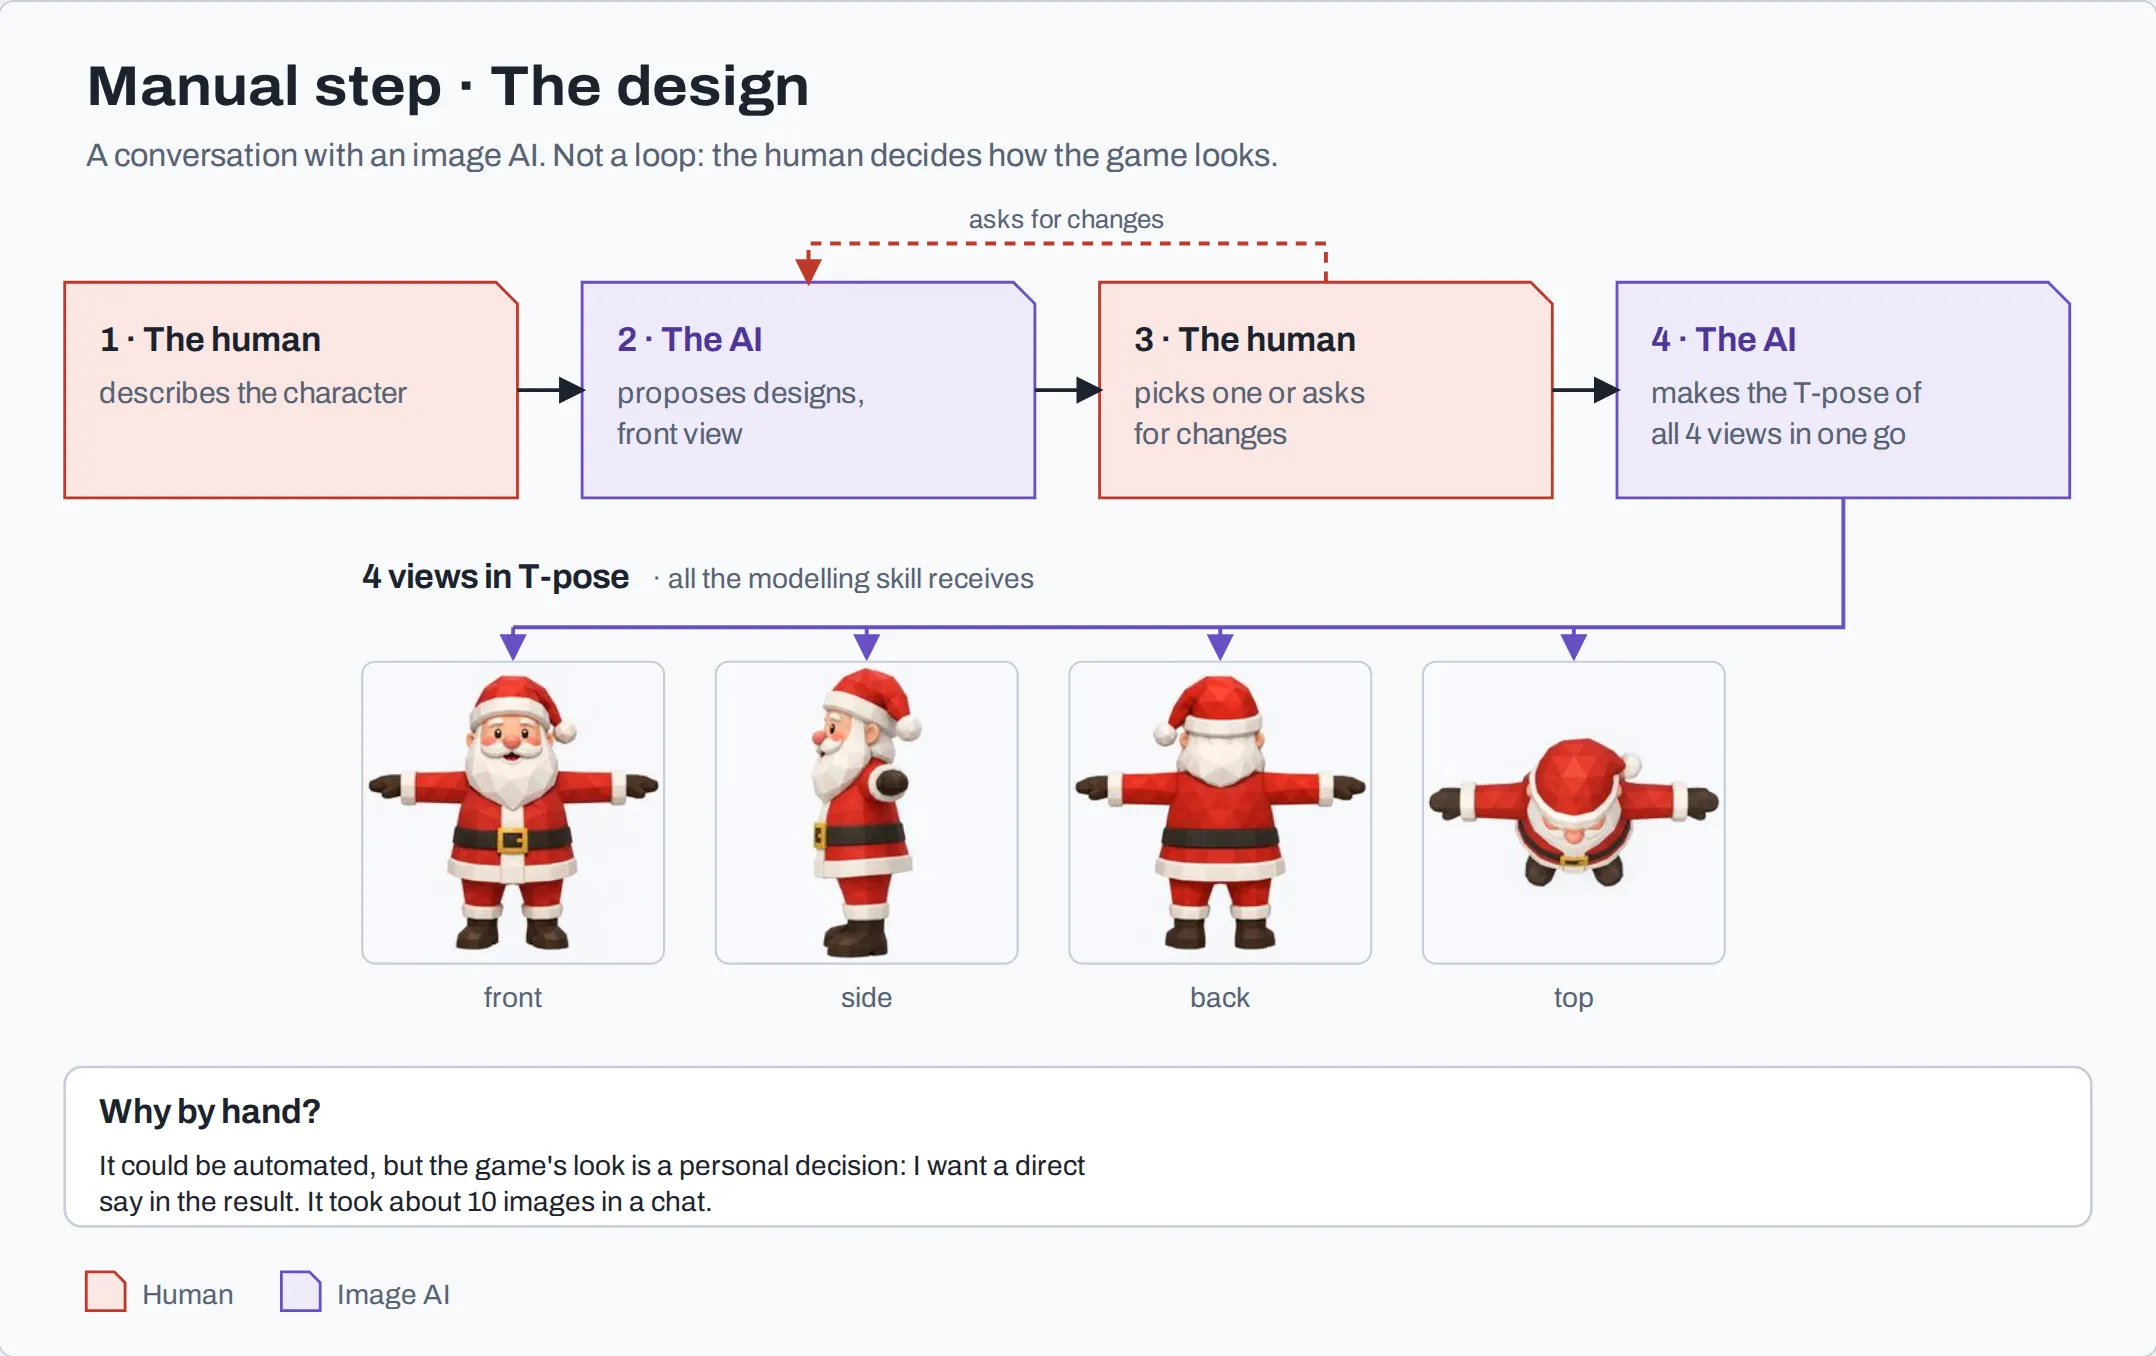
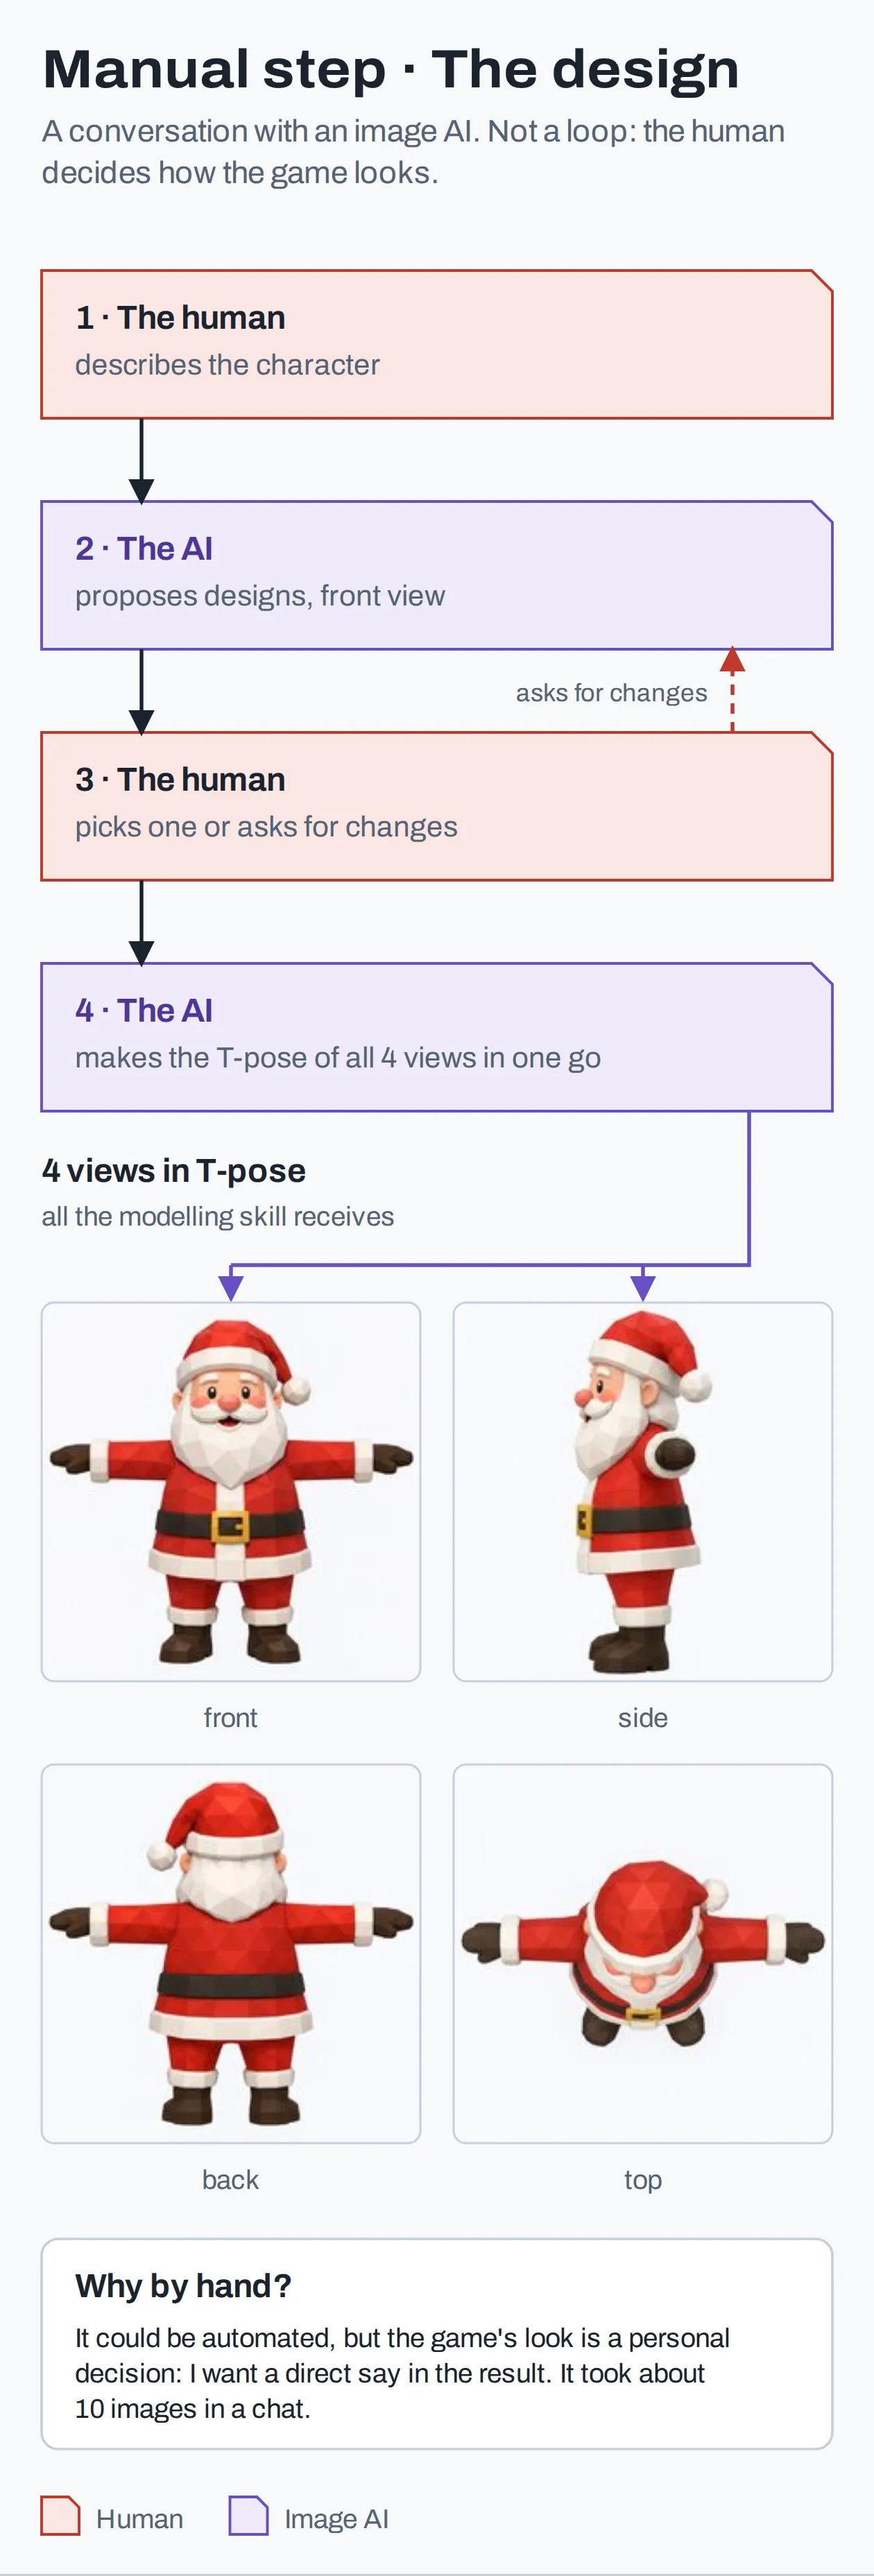 First step: designing by hand
I could automate the design decision too, but I’d rather stay in charge of the game’s visual style.
Then the factory takes over
I feed those images into Claude Code, the tool where my agents run. The main agent uses Claude Opus 5.5, while some simpler subagents use Claude Sonnet 5.5.
- Loop 1, modeling: builds the character in Blender (opens in a new tab), a 3D creation application, and compares it against the references to fix mistakes.
- Loop 2, rigging and animation: adds the skeleton that lets the character move, creates animations, and validates them. It prepares the model for Godot (opens in a new tab), the game engine I’m using to build Santa Slideway.
- Loop 3, optional process video: produces a video showing how the character was made.
When the factory finishes, I can open the character in a 3D viewer and inspect it. If I spot an issue, the model is corrected and a rule is added to help prevent the same problem next time. That human review is optional, not something I have to do at every iteration.
Santa is just the first example. I plan to use the factory for the game’s other characters and objects too.
Quality control
To stop supervising every step, the factory has to check the quality of its own work. That means the loops do more than produce something: they review the result and fix problems before moving on.
During the modeling stage, an agent builds a version and other agents review it. If they find problems, it fixes them and checks again. The rigging and animation loop also validates its work, but without the same team of critic agents: it uses measurements to check that the skeleton and animations behave as intended.
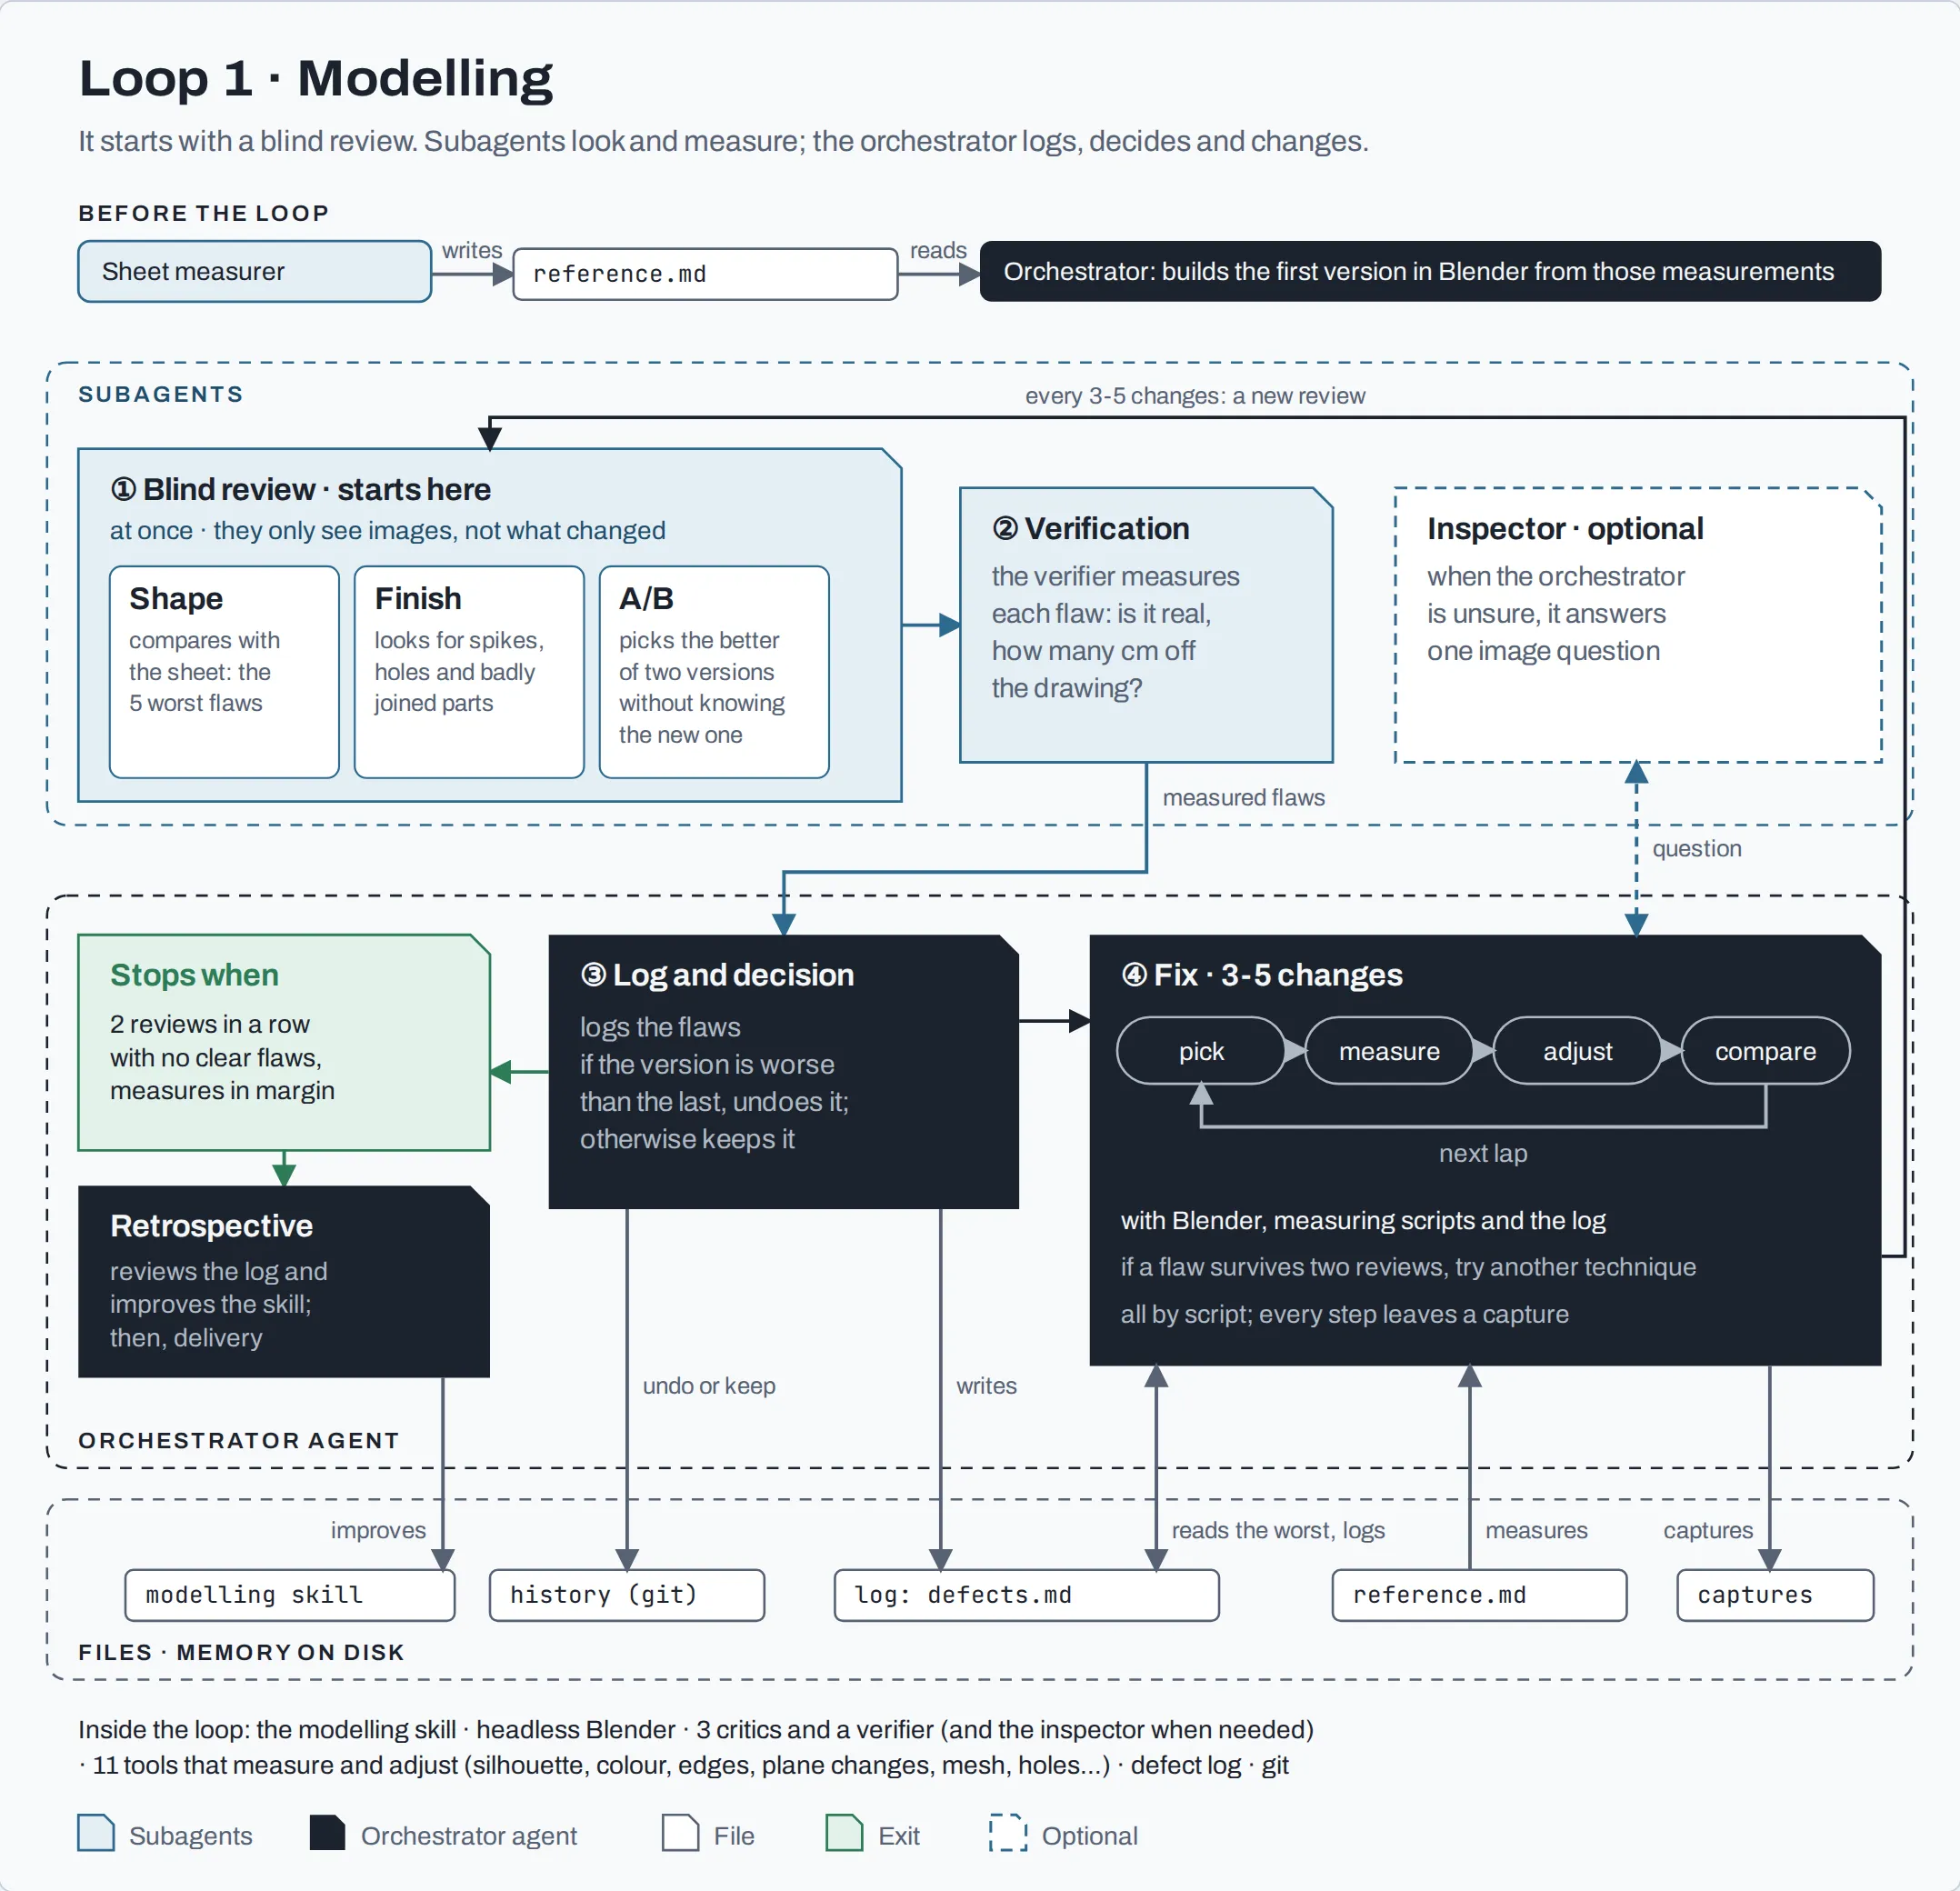
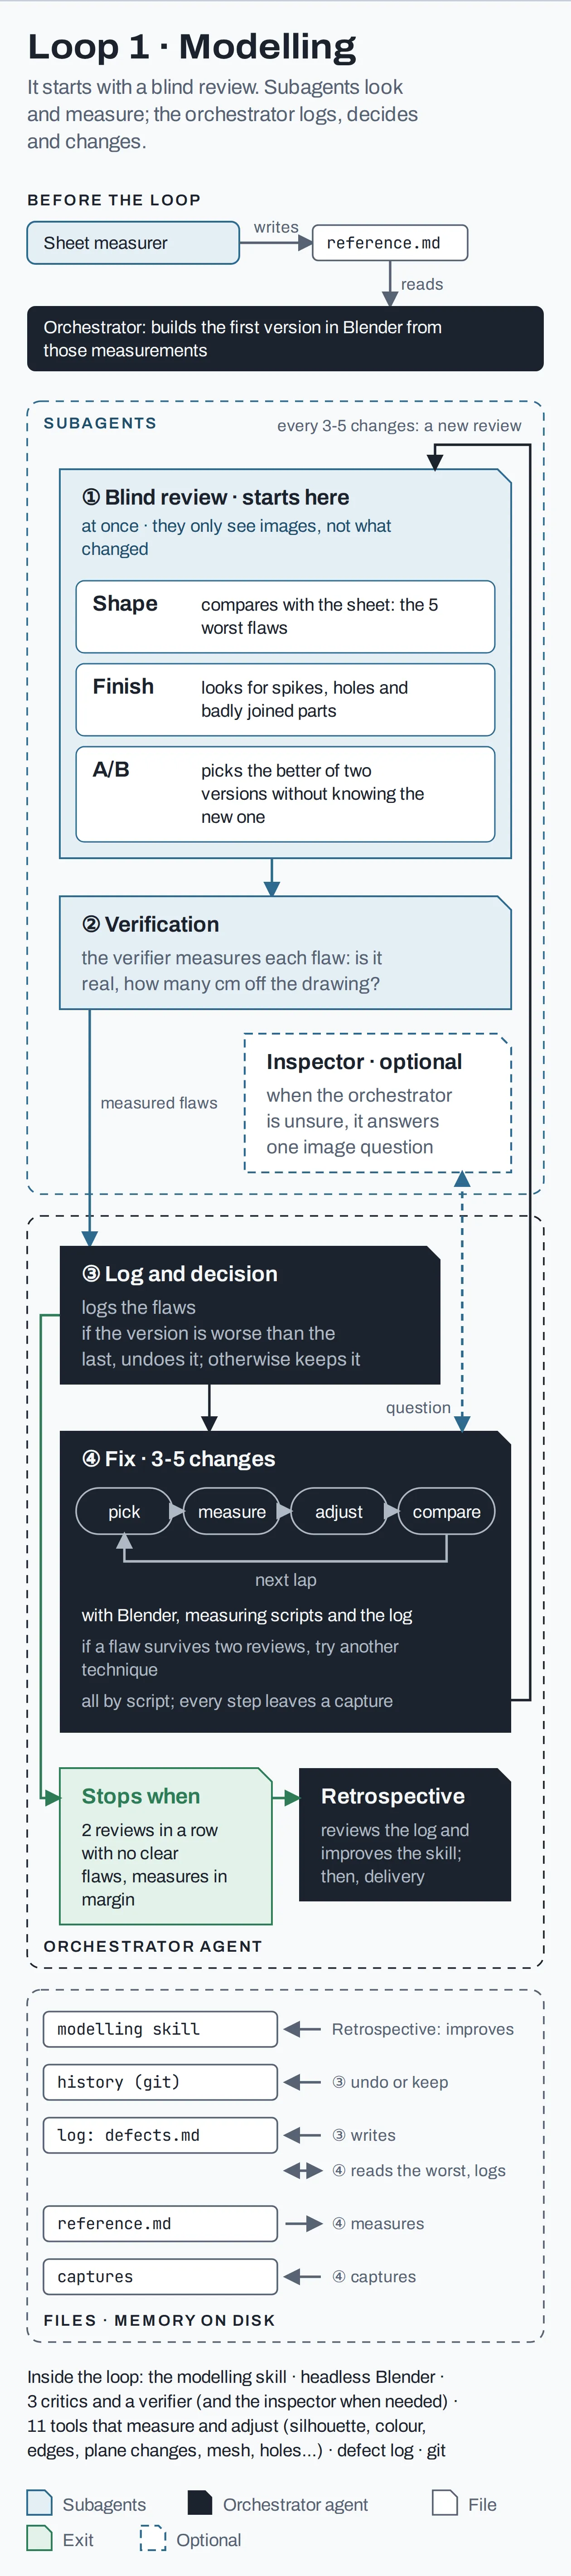 Loop 1: modeling
For modeling, the goal is two consecutive reviews with no issues, with measurements within set tolerances: height and width within ±1%, silhouette overlap of at least 85%, and edges less than 1 cm from the reference. I can stop the process myself, too.
Santa went through 43 changes and 16 reviews. He didn’t fully meet the stopping criteria: I approved the result with 38 minor issues logged. Some thresholds may need adjusting.
At the end, the system reviews the accumulated mistakes and updates its skill, a reusable set of instructions to help it do a better job next time.
I don’t need to approve every iteration. That saves human time, though the extra AI work also increases the cost.
Why a multi-agent system matters
This isn’t one agent working alone. The main agent is the orchestrator: it chooses the next task, hands work to other agents, and makes decisions. Those other agents are subagents. Each has a defined job and reports back.
During modeling, three independent critic agents review the images separately, without knowing what the orchestrator suspects. One checks the model against the reference art, another looks for geometry defects such as spikes and holes, and a third compares two versions without knowing which one is newer. Once potential problems have been flagged, a fourth agent uses measurement tools to confirm they actually exist and quantify the differences.
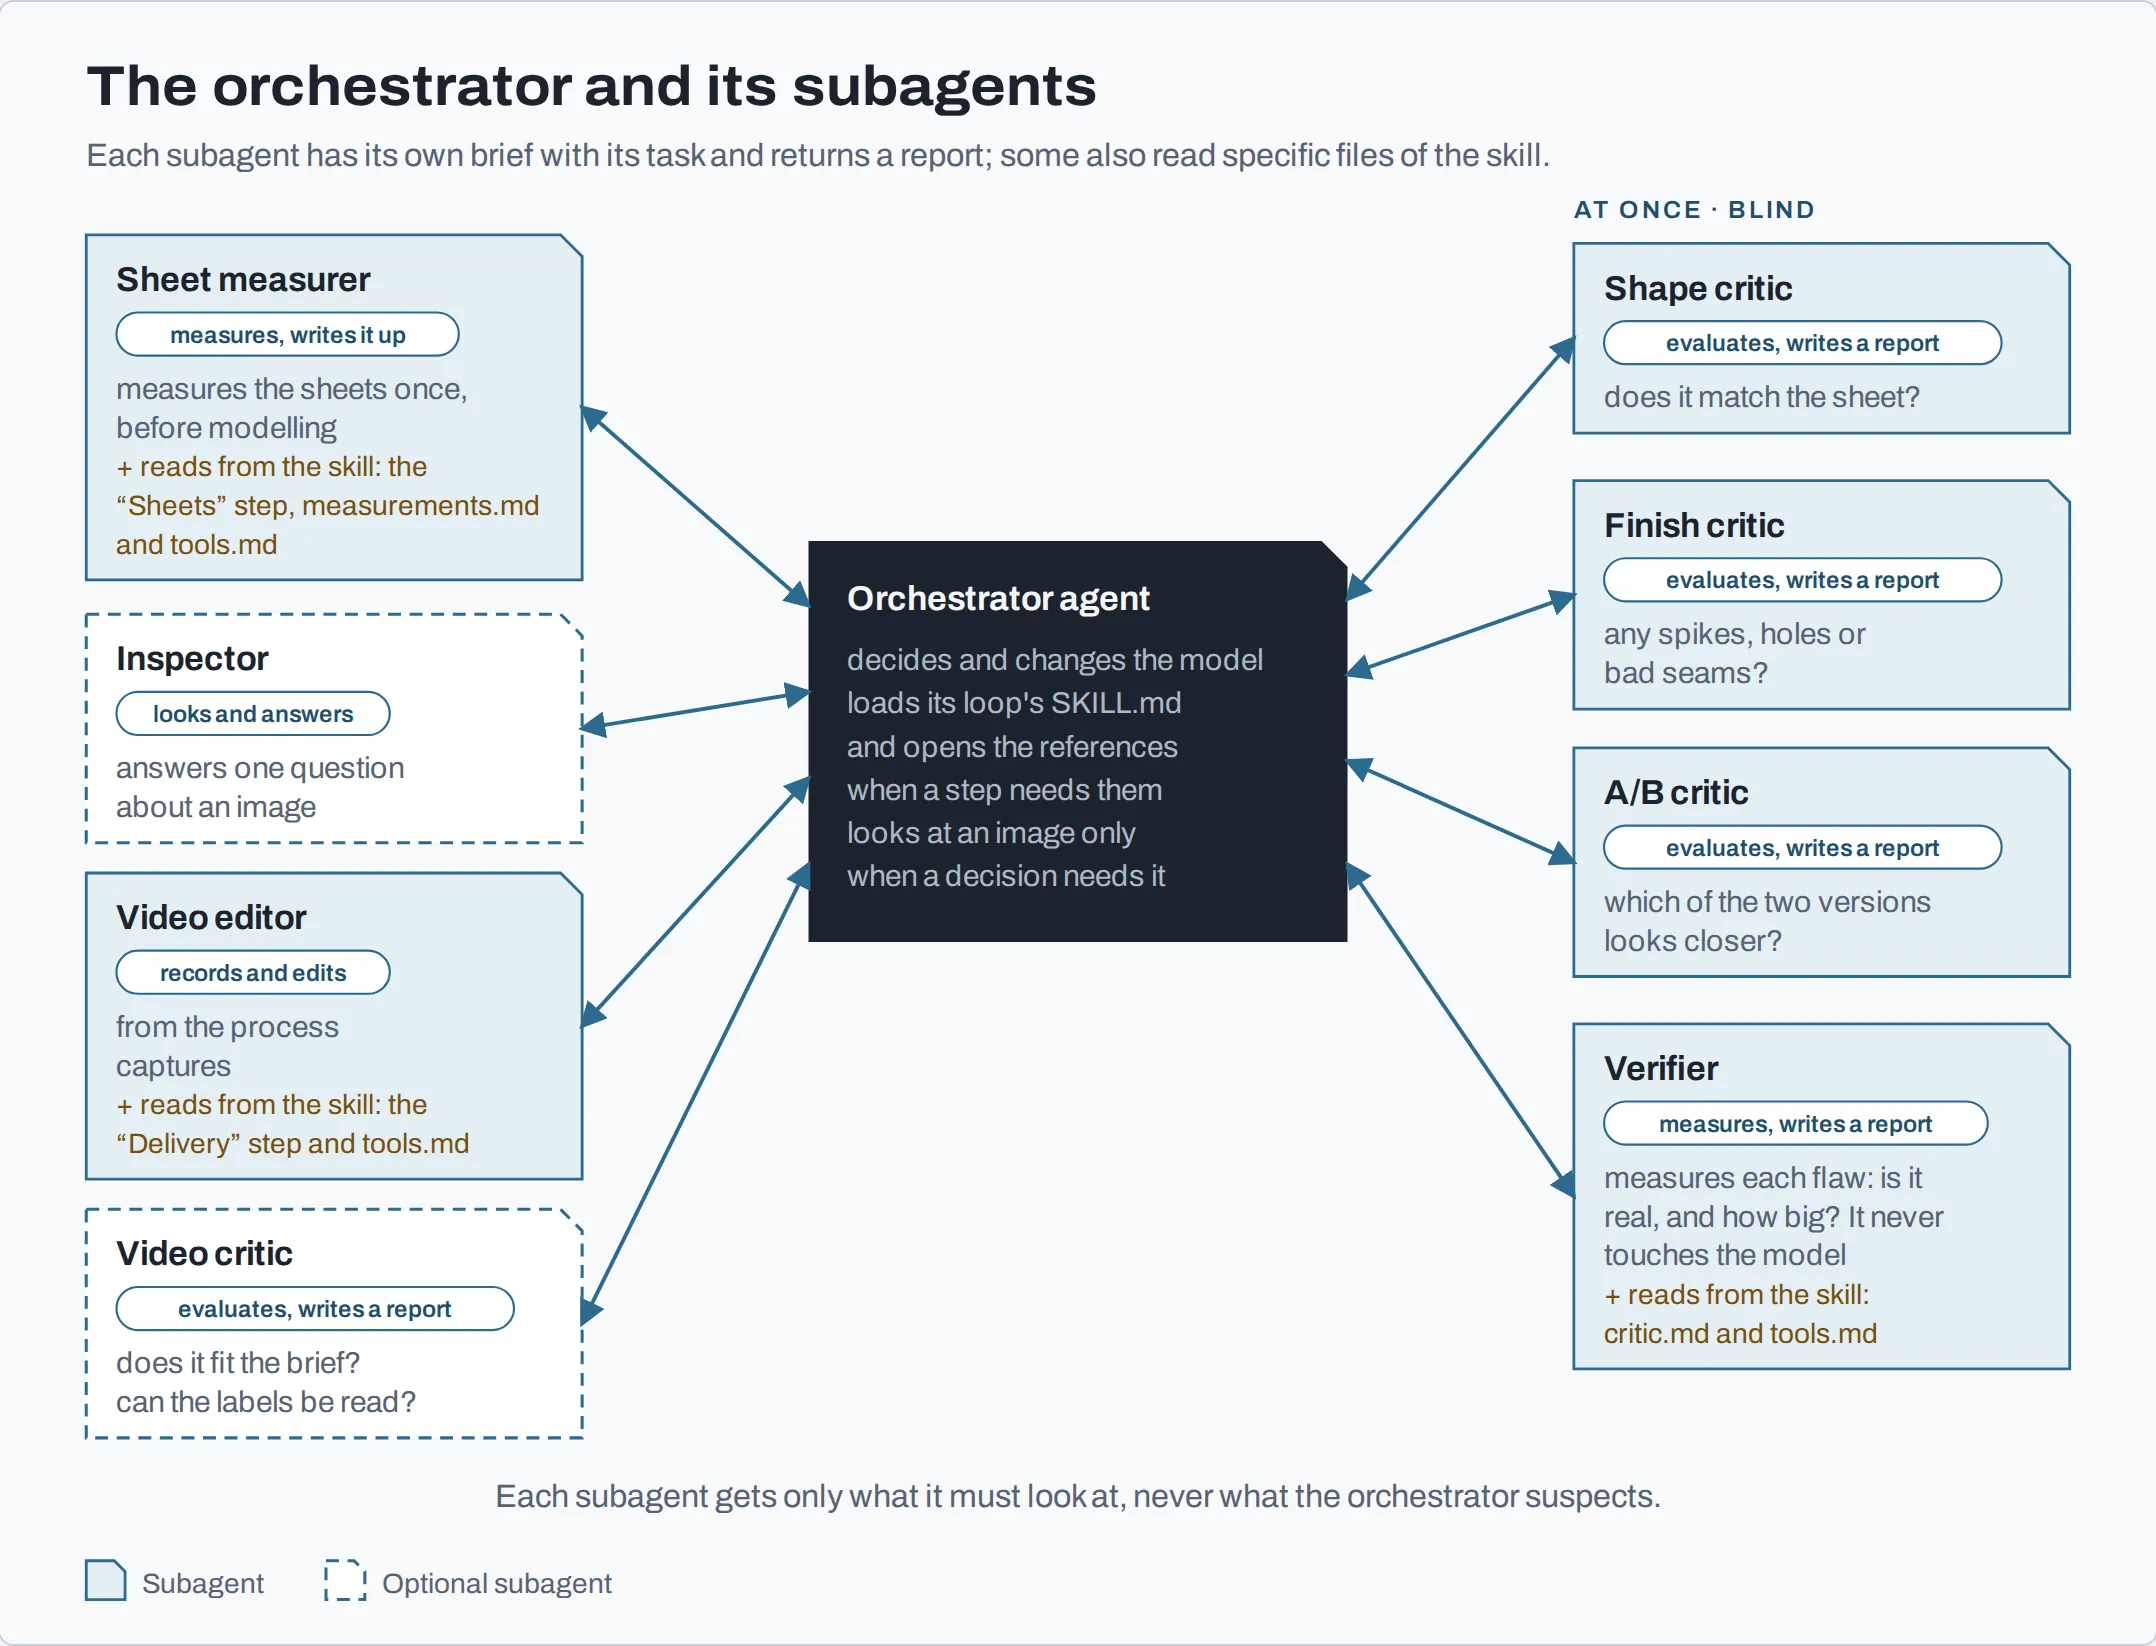
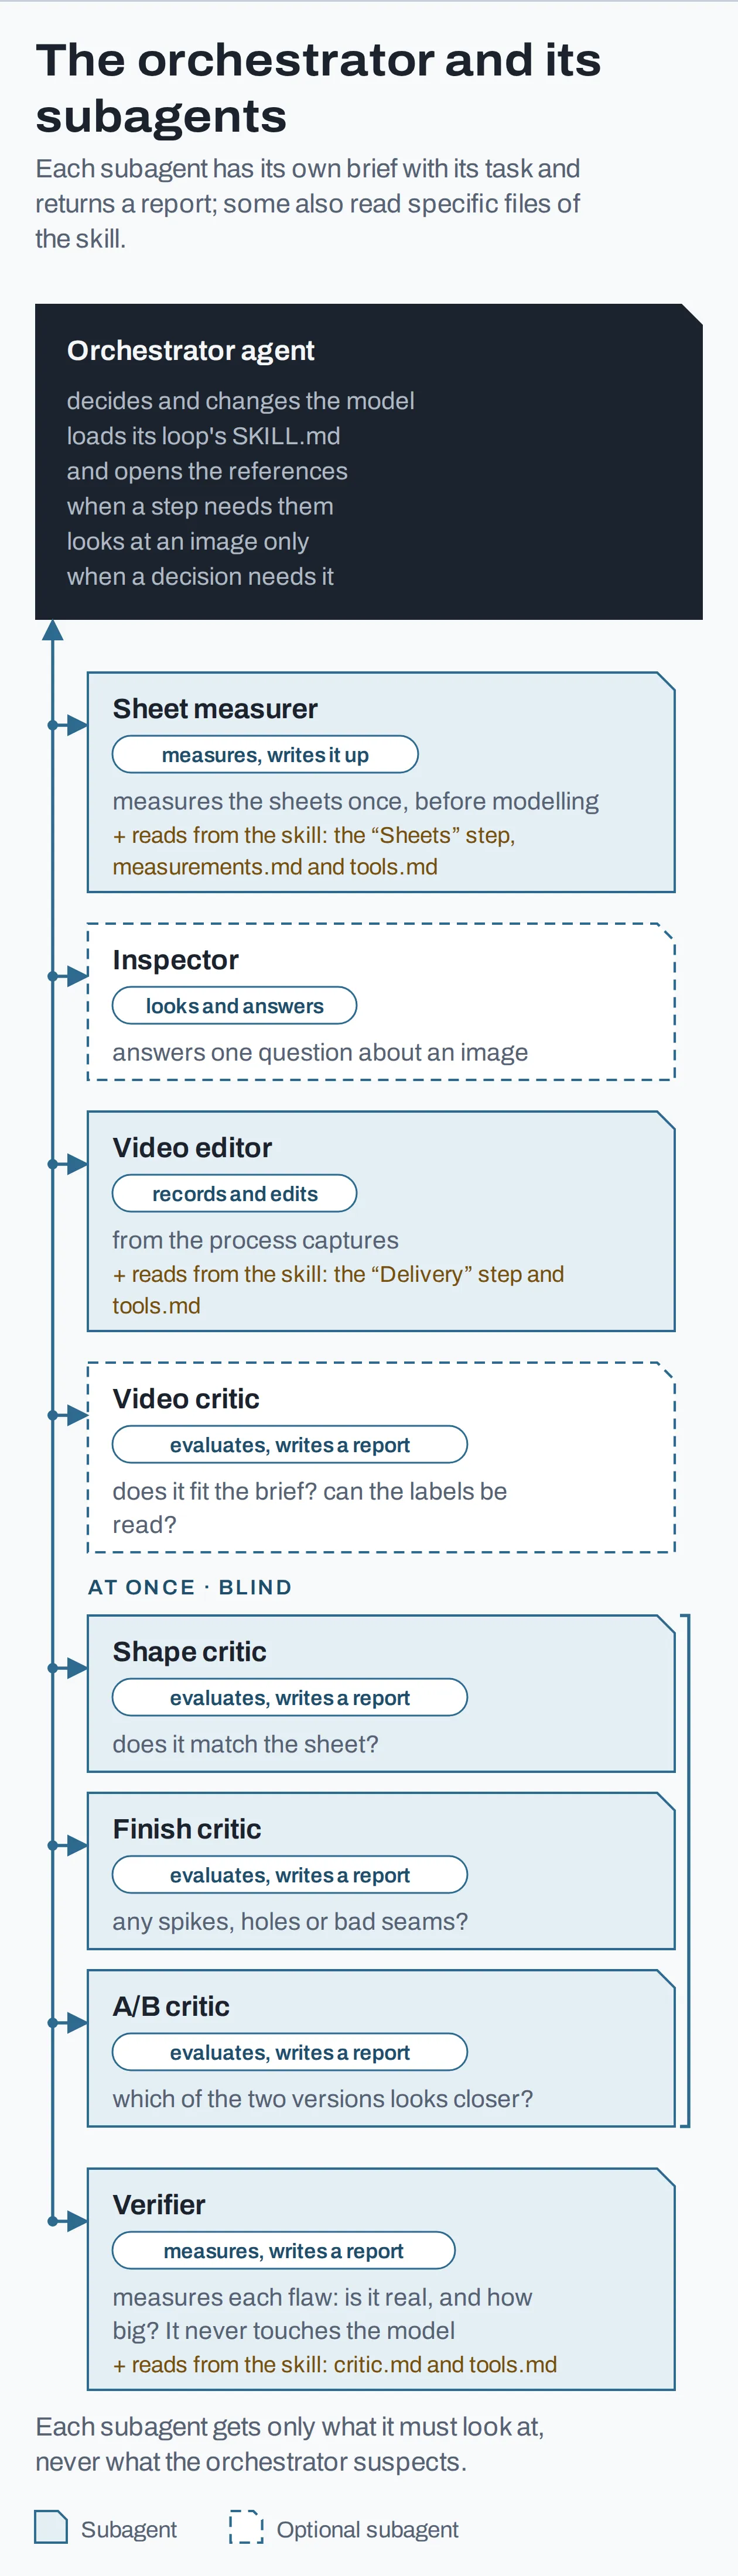 The orchestrator and its subagents
That separation matters. If the same agent built the character, identified every issue, and judged its own fixes, it could carry the same biases through the whole process. Here, each critic works with a narrower context and a specific responsibility. The critics don’t see one another’s conclusions or the orchestrator’s suspicions. That doesn’t remove every bias, but it reduces the chance of everyone repeating the same mistake.
Decisions based on data, not opinions
A visual review can flag a possible defect, but it cannot prove the defect is real. An agent might think the hat is tilted even when the measurements say otherwise. After the critics flag an issue, a separate agent checks it using measurement tools before anything gets changed.
The factory uses small programs to measure silhouette overlap, color differences, surface orientation, and mesh defects. The rule is simple: don’t fix something just because an agent thinks it looks wrong.
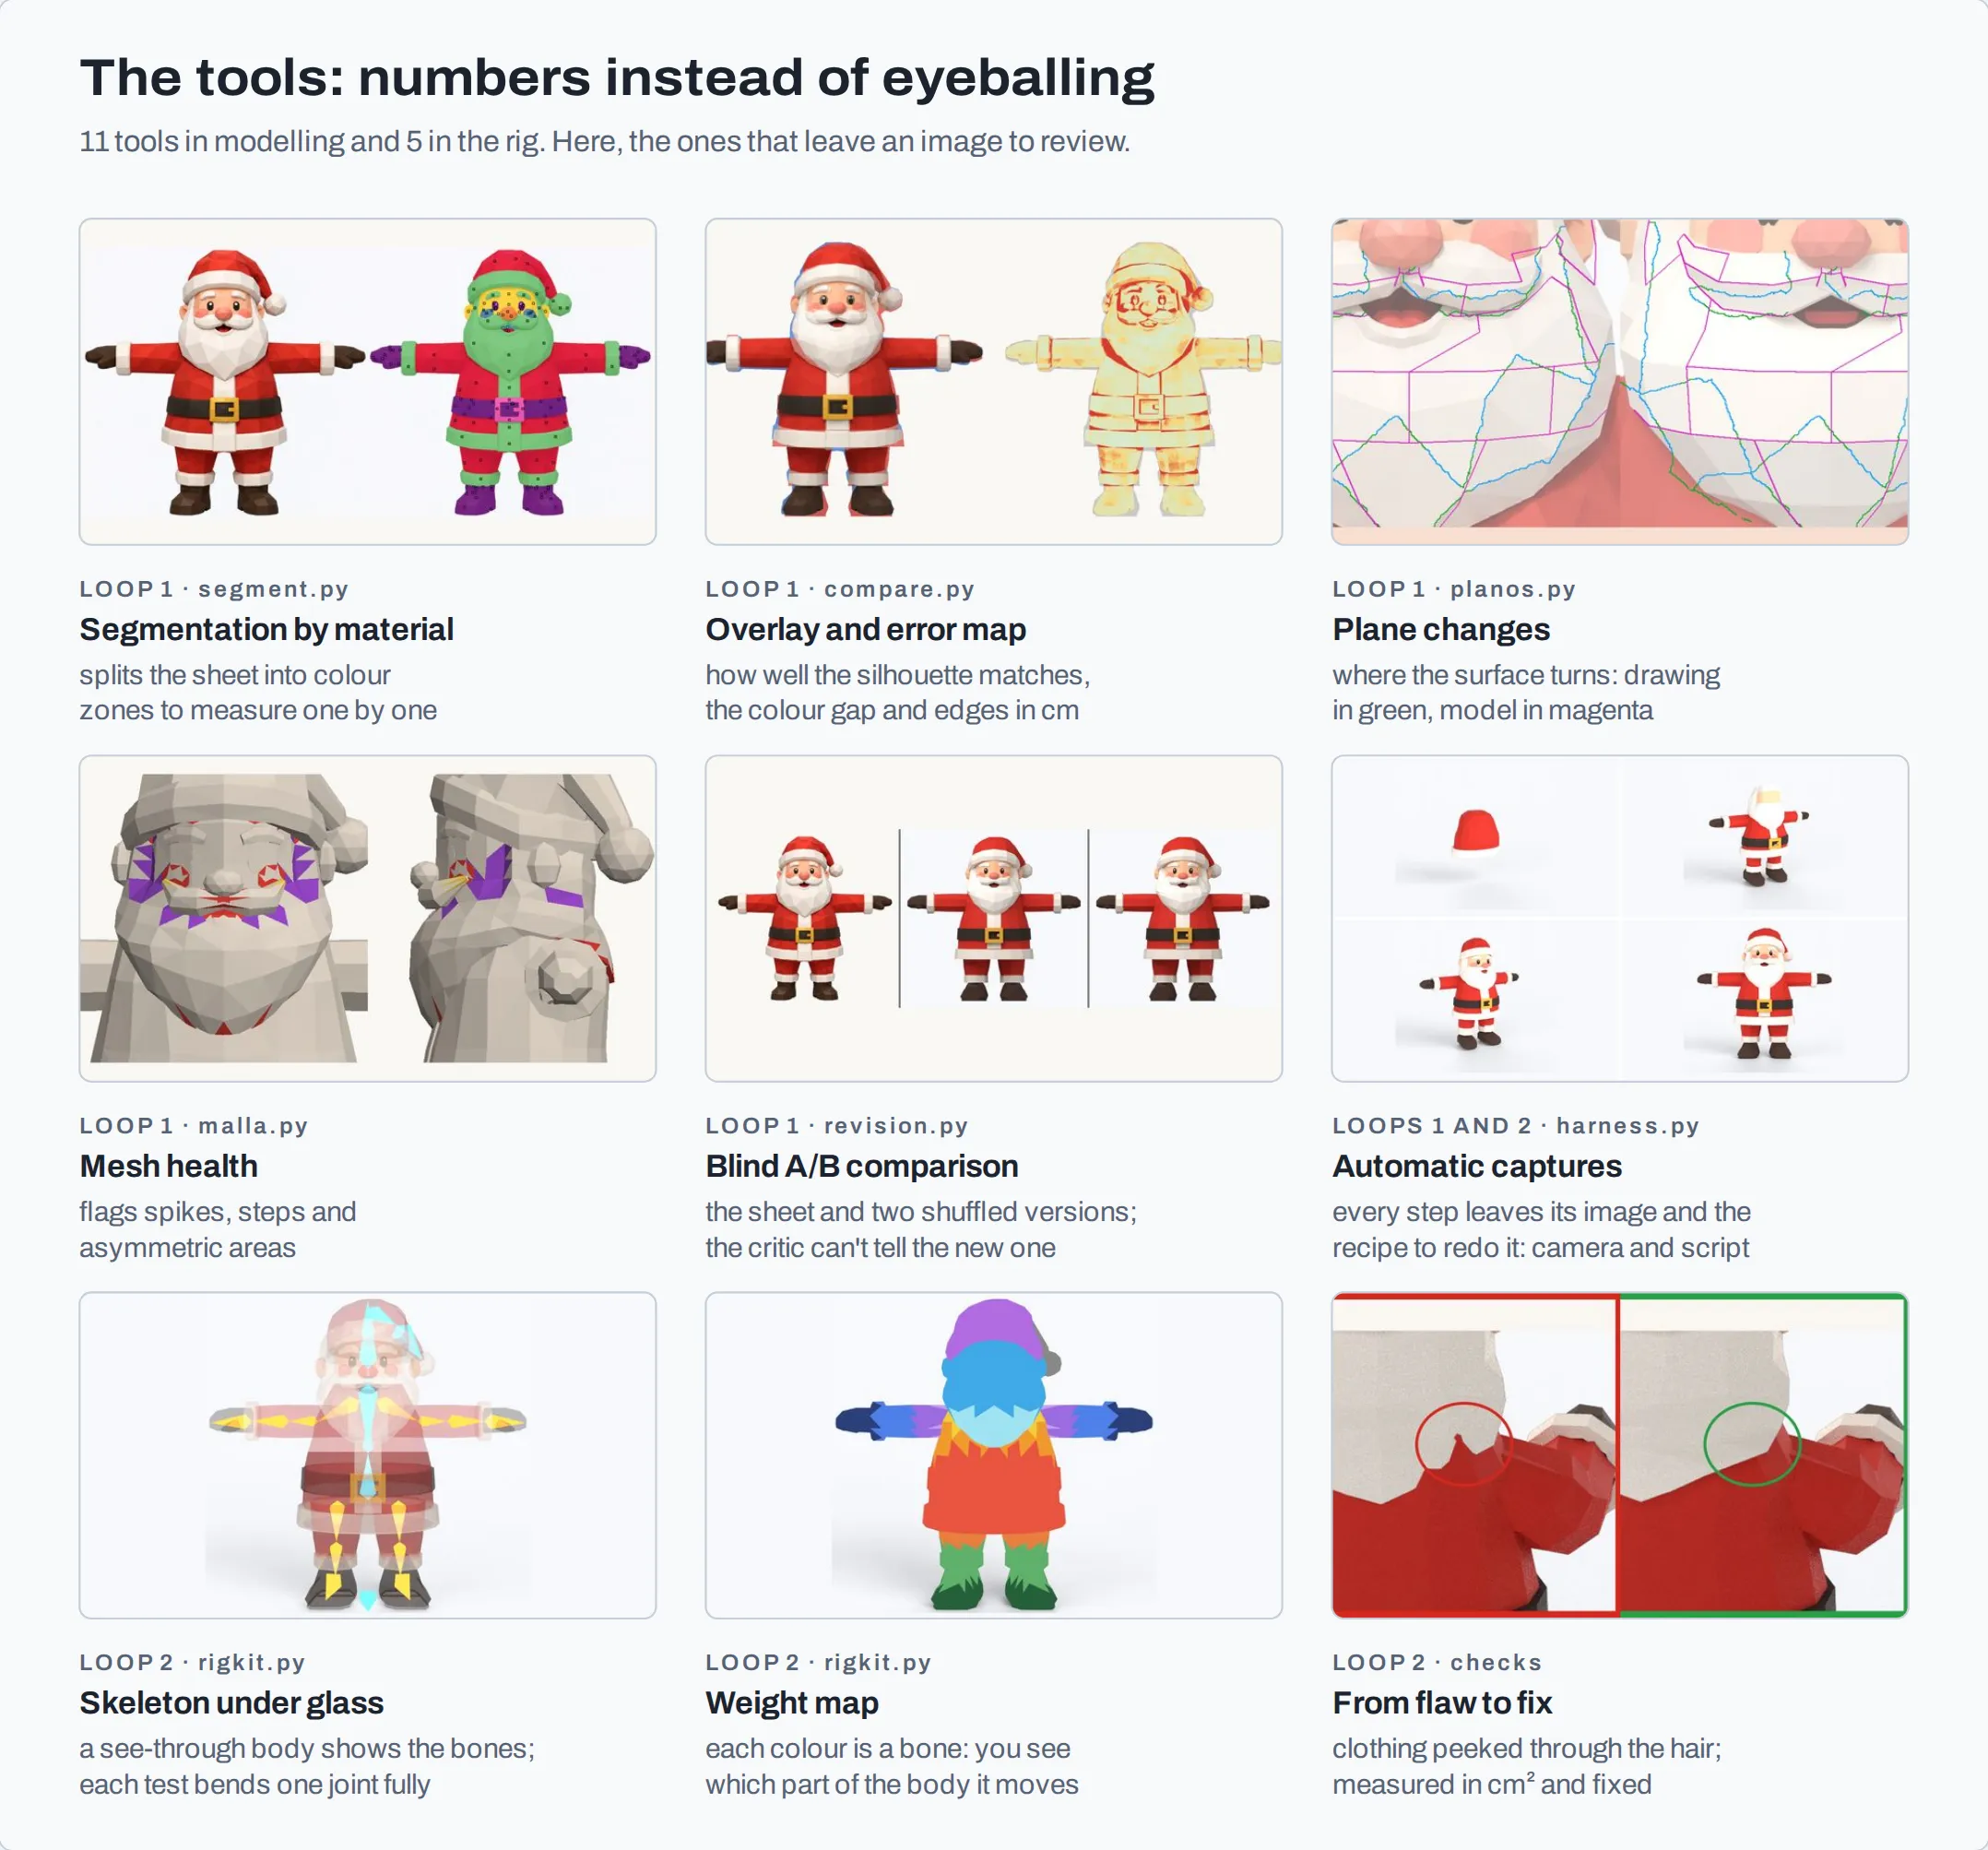
 The tools
These tools came out of the time I spent learning how to model in 3D with Claude. When something went wrong, we’d work out how to measure the problem instead of arguing about it by eye. The AI wrote the checking scripts as part of those conversations. I now have 11 tools for modeling and 5 for the skeleton.
They don’t eliminate every error. They turn many subjective reviews into checks the agents can repeat without asking me.
The cost in money and time
Most of the cost is in modeling
Unlike manual 3D modeling, nobody is dragging vertices with a mouse. In my setup, the model is a Python program that Blender executes. One file holds measurements such as hat height, belly width, and eye positions; another builds the pieces.
That’s an advantage: Claude Code is particularly good at coding. Moving an eye up 2 mm, adding a part, or reverting a change only requires editing the program and running it again.
The expensive part is the repeated cycle of changing, comparing against references, and correcting. To avoid introducing new errors, each review needs around 40 rendered views from different angles so the agents can judge the result. Repeating those reviews uses both model calls and processing time.
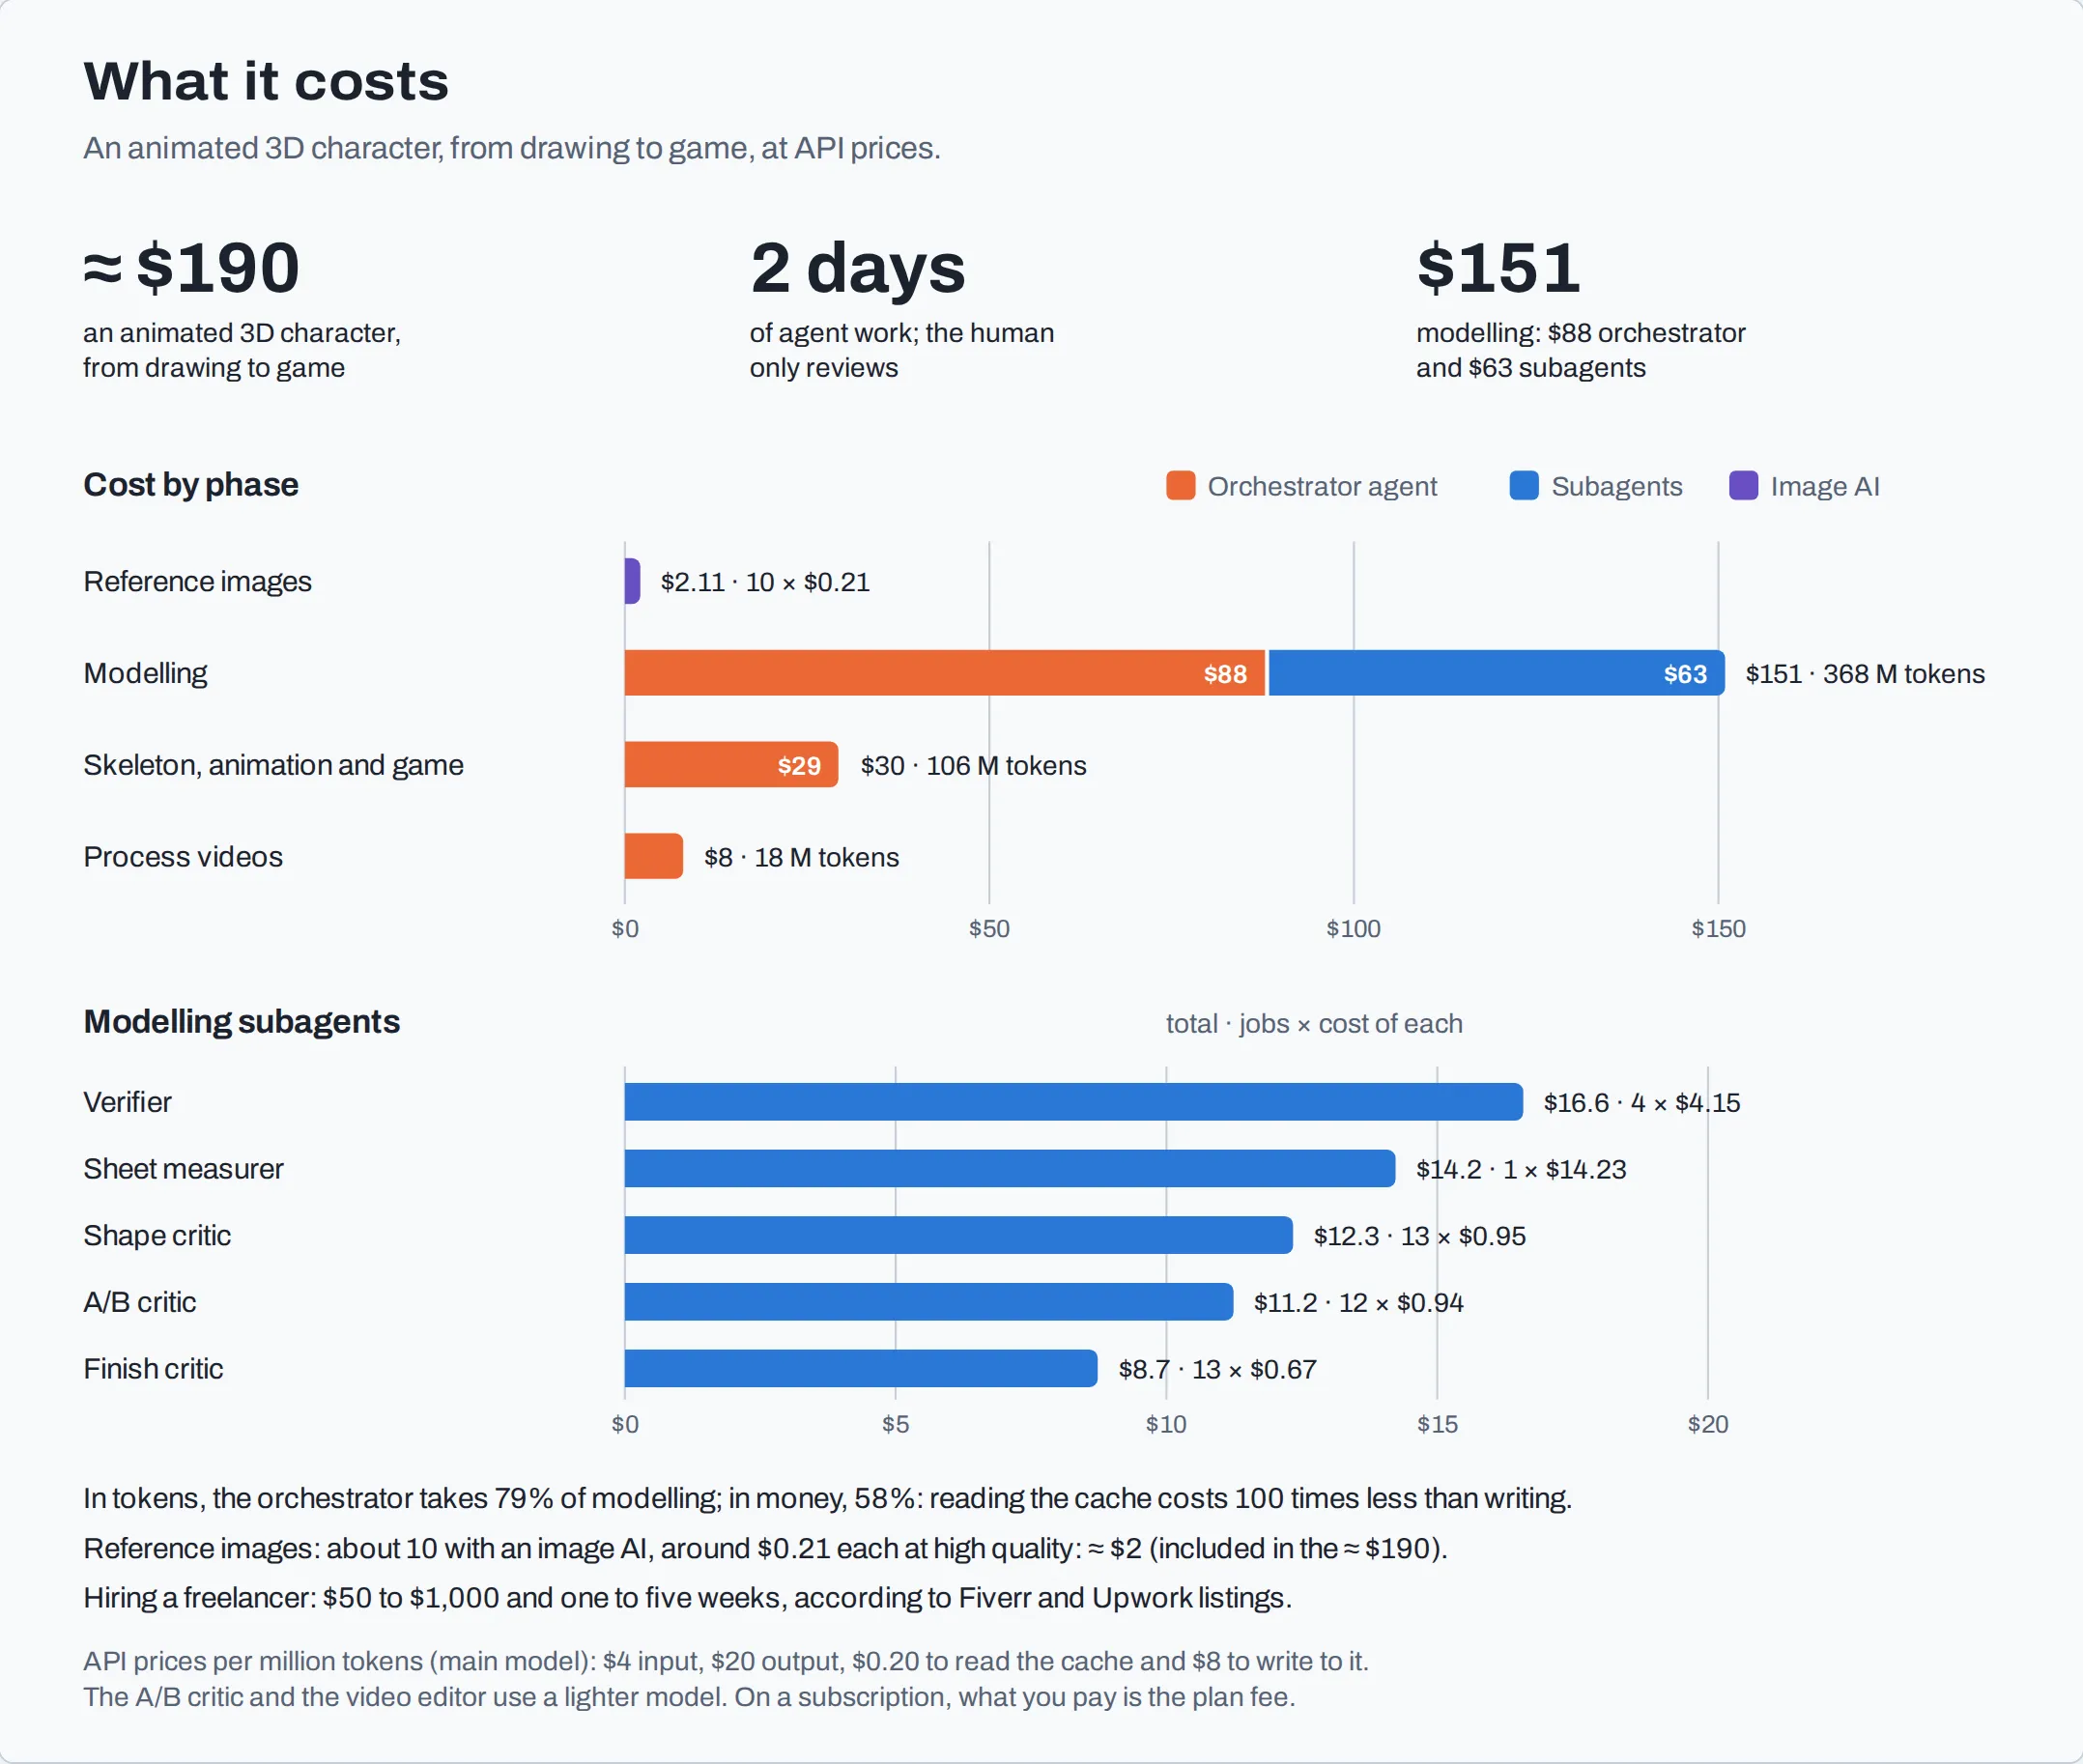
The bill: about $190
These are API costs (usage-based model charges) for the first character:
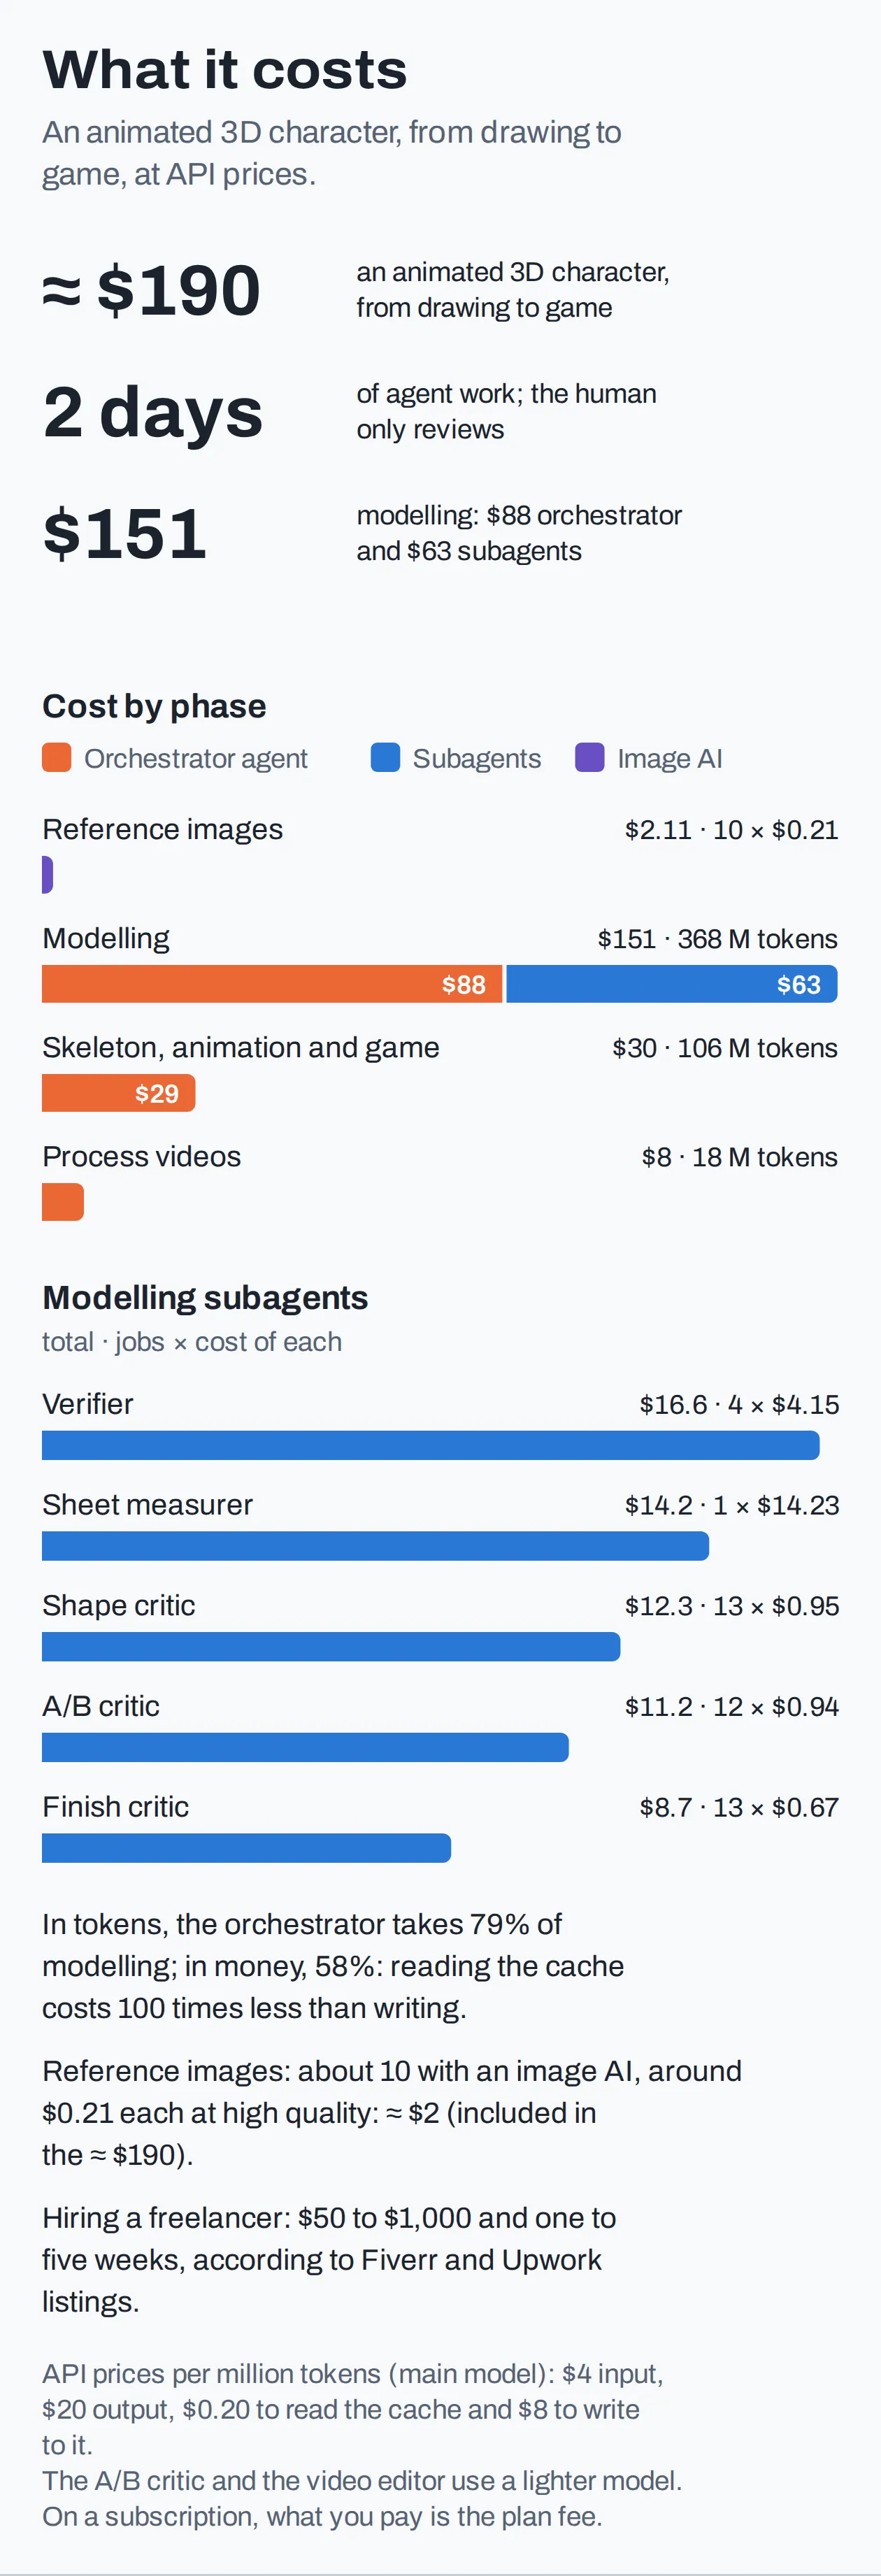 The cost
The figures are rounded, so the individual line items don’t have to add up exactly to the total.
Modeling accounts for $151. That’s the stage where several agents repeatedly inspect, compare, and correct the model. Rigging, animation, and preparation for integration cost $30 because they don’t require the same multi-agent review cycle. Videos add $8, and the initial images about $2.
Most of the agents, including the lead, use Claude Opus 5.5. The API prices used here are $4 per million input tokens and $20 per million output tokens. A token is a small chunk of text a model reads or writes. Some simpler subagent tasks run on the cheaper Claude Sonnet 5.5. High-quality GPT Image 2 images cost around $0.21 each.
A curious detail: 97% of the tokens are rereads. Agents repeatedly need instructions, results, and other context. Much of it can come from a cache, meaning previously processed content is reused. In this setup, cached reads cost 100 times less than generating new text. That makes a huge difference to the bill.
These are API prices, not what I pay through a subscription. I use Claude Max (opens in a new tab), which costs me around €90 a month in Spain. In practice, I could produce several models a month for less than €100.
Where the two days went
Everything ran in Claude Code’s cloud environment, inside a container (an isolated software environment), with Blender and Godot running without a graphical screen. I followed progress from the app. I didn’t pay separately for a computer or GPU.
A lot of the time went into rendering images for review. As I mentioned, each review required around 40 screenshots from different angles. That way, fixing the front of a model doesn’t silently break the back or top. With 16 reviews, that comes to roughly 640 review screenshots. Additional process images and video frames were generated too. Without a dedicated GPU, rendering took up much of the two days.
Another thing affects rendering time: render passes per image. Each screenshot is built by accumulating several render passes. Each pass adds information, and combining them produces a cleaner image with less noise. Santa used dozens of passes per screenshot. I tried cutting it to 16 passes and got the same model measurements, with rendering running 2.5 to 3 times faster. One process-video frame went from around 55 seconds to 16 seconds. The same applies to the video-generation loop: each frame is rendered with multiple passes to improve its quality.
I expect the next character to be substantially faster. I haven’t measured that end-to-end improvement yet, so it’s still an expectation, not a result.
What I actually got
Modelling Santa, from the four reference drawings to the finished model (40 s)
The skeleton and the animations, with the bugs it found and how it fixed them (44 s)
| Metric | Result |
|---|---|
| Character | Low-poly Santa Claus |
| Mesh | 2,676 triangles (limit: 3,000) |
| Modeling | 43 changes, 16 reviews |
| Rig and motion | 24 bones, 5 animations |
| Delivery | Animated character ready to integrate into the game, checks, and process video |
| Cost and time | ≈ $190 and two days |
It’s not flawless. I can still spot flaws by eye, beyond the ones the system catches. The difference is that those issues can become new instructions for future runs instead of disappearing into a one-off fix.
My take
$190 and two days won’t make this the cheapest choice for every project. Even so, they get you a more than decent, animated, game-ready character without supervising every step. AI radically changes the landscape for an indie developer.
Besides, the price is almost beside the point. The real shift is going from a process that eats up human hours, manually correcting models one conversation after another, to an automated process you can repeat with almost no intervention. And this isn’t just about 3D. The same idea applies to all sorts of AI work: learn what works. Then build a system that can do it without you.
In part 2, I’ll show how one of these loops works internally and the agent patterns behind it.
Did you like this post? Leave me a comment and help me share it 😉
Comments
You need a GitHub account to comment.